Mini Fruit Tarts: A Bite of Joy
Hey there, flavor chasers! If you’re ready to wow your friends and family with a delightful dessert that has "wow" factor written all over it, then you’ve landed in the right place. Today, we’re diving into a recipe for Mini Fruit Tarts that’s not just a feast for the eyes but a delicious treat for your taste buds too. These little gems are perfect for any occasion—whether you’re hosting a brunch, celebrating a birthday, or just craving something sweet on a Tuesday night!
Mini fruit tarts are one of those magical desserts that take you back to childhood memories. They remind me of summertime picnics, bustling farmer’s markets, and warm afternoons spent with loved ones. Each bite is a burst of flavor, combining a buttery, crumbly crust with a creamy filling and fresh seasonal fruits on top. So, grab your apron and let’s get cooking!
A Slice of Nostalgia
One of my fondest memories connected to fruit tarts, oh how it makes me smile! It was a sunny Saturday afternoon, and I was in the kitchen with my grandma, who was my culinary hero. We were preparing for a family gathering, and she insisted we make these mini fruit tarts to serve as a sweet ending to our feast.
As we rolled out the dough, I remember the unmistakable scent of buttery goodness filling the air. The best part, though, was the joy on everyone’s faces as they bit into those vibrant tarts. Grandma taught me that food is more than just sustenance; it’s about creating moments and memories that last forever. That lesson has stuck with me—and now, I get to share that joy with all of you!
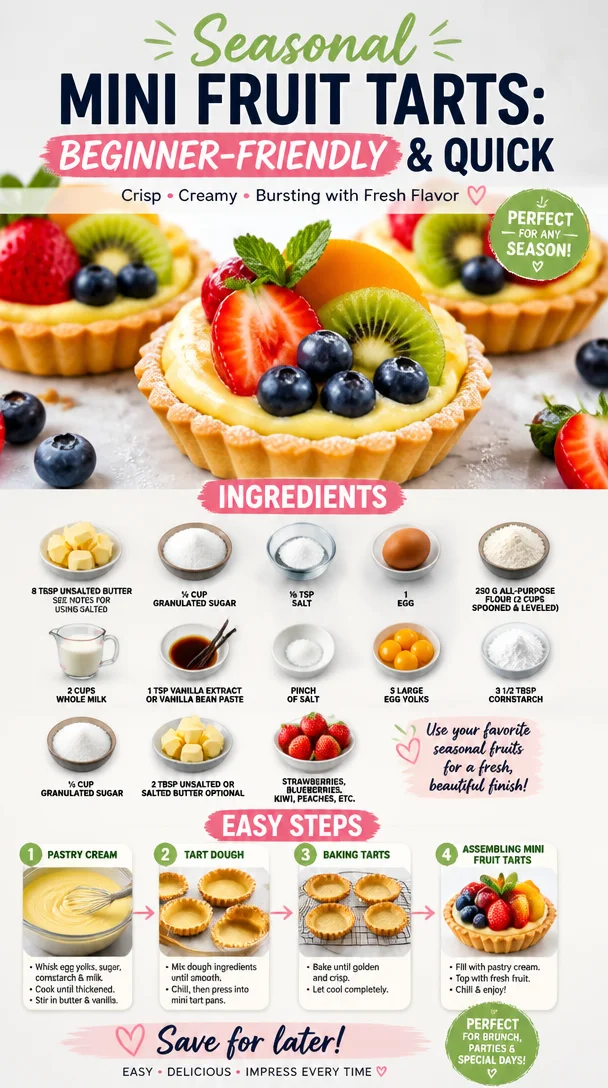
Ingredients
For our delightful mini fruit tarts, you will need the following ingredients:
-
8 tbsp unsalted butter
Unsalted butter is best for controlling the salt content in your crust. If you only have salted butter on hand, reduce the added salt in the recipe slightly. -
½ cup granulated sugar
This will sweeten the crust perfectly. Want a little extra flair? Consider substituting with coconut sugar for a touch of caramel flavor. -
⅛ tsp salt
A pinch of salt enhances the sweetness of desserts. It balances all the flavors beautifully. -
1 egg
The egg serves as a binder for your crust, giving it that lovely structure. If you’re vegan, a flax egg or chia egg can be swapped in. -
250 g all-purpose flour (2 cups spooned and leveled)
This is the base of our tart shell. For a gluten-free option, almond or oat flour can work wonders. -
2 cups whole milk
Use whole milk for a richer custard filling. If you’re looking for a lighter version, opt for low-fat milk or a non-dairy alternative like almond or oat milk. -
1 tsp vanilla extract or vanilla bean paste
The vanilla adds a lovely depth to your custard. If you can, grab the real stuff for the best flavor! -
Pinch of salt
Yep, another pinch! This enhances the custard’s sweetness while ensuring a balanced flavor profile. -
5 large egg yolks
These yolks enrich the custard, providing a creamy texture. Egg substitutes are available, but they might not give the same richness. -
3 ½ tbsp cornstarch
This acts as a thickening agent for the custard. If you’re out, arrowroot or tapioca starch could be used instead. -
½ cup granulated sugar (for the custard)
Sweeten up that delightful filling! Use less if you prefer a less sweet tart. -
2 tbsp unsalted or salted butter (optional)
A finishing touch to add creaminess to your custard. If you’re avoiding dairy, skip this or use a plant-based butter. -
Fresh fruits like strawberries, blueberries, kiwi, peaches, etc.
Use your favorites or whatever is in season! The freshness of the fruits elevates these tarts from good to extraordinary.
Step-by-Step Instructions
Now that we’ve gathered our ingredients, let’s embark on our baking adventure!
Step 1: Make the Tart Shell
-
Preheat your oven to 350°F (175°C).
Always start with a preheated oven for the best results! -
Cream the butter and sugar.
In a large mixing bowl, add the unsalted butter and granulated sugar. Using a hand mixer or a whisk, cream them together until light and fluffy—about 3 minutes. This step helps to incorporate air into the mixture, ensuring a tender tart shell.Chef Hack: Make sure the butter is at room temperature for easier mixing!
-
Add in the egg and salt.
Beat in the egg and a pinch of salt until well combined. You’ll notice the mixture becoming even lighter in color. -
Incorporate the flour.
Gradually add the all-purpose flour and mix until it just comes together. Don’t overmix; we want a light, flaky crust! -
Shape the dough.
Transfer the dough onto a lightly floured surface. Use your hands to form it into a disk, wrap it in plastic wrap, and chill in the fridge for about 30 minutes. This will help relax the gluten and make it easier to roll out.
Step 2: Roll and Bake
-
Roll out the dough.
On a floured surface, roll out the chilled dough to about 1/8 inch thick. Cut out circles to fit your muffin or tart pans—about 3 inches in diameter should do the trick. -
Place in the pans.
Gently place the dough circles into the greased muffin pans, pressing lightly to fit them into the molds. If the dough tears, simply patch it up with a bit of leftover dough. -
Prick with a fork.
Use a fork to poke holes in the bottom of each tart shell. This prevents them from puffing up while baking. -
Bake.
Bake in the preheated oven for about 15-18 minutes, or until lightly golden brown. Let them cool in the pan for a few minutes before transferring them to wire racks to cool completely.Chef Insight: If you notice your shells puffing, gently press them down with a spoon halfway through baking.
Step 3: Prepare the Custard
-
Heat the milk.
In a saucepan, combine the whole milk, vanilla, and a pinch of salt over medium heat. Heat until small bubbles form around the edges—don’t boil! -
Whisk the yolks and sugar.
Meanwhile, whisk together the egg yolks, cornstarch, and granulated sugar in a mixing bowl until well combined. -
Temper the eggs.
Slowly add the heated milk into the egg mixture, whisking constantly to prevent the eggs from cooking. Once well combined, pour it back into the saucepan. -
Cook the custard.
Cook over medium heat, stirring constantly until the mixture thickens and coats the back of a spoon—it should take about 5-7 minutes. -
Finish with butter (if using).
Once thickened, remove from heat and stir in the butter, if using, for a rich, glossy finish.
Step 4: Assemble the Tarts
-
Fill the tart shells.
Once your tart shells have cooled completely, spoon the creamy custard into each shell, filling them generously. -
Top with fruit.
Arrange your fresh fruits of choice on top—let your creativity shine!Serving Suggestion: Drizzle a bit of honey over the fruit for an extra touch of sweetness if you desire.
Serving Suggestions
To serve, arrange your mini fruit tarts on a beautiful platter, and watch the smiles emerge! You can pair these tarts with a dollop of whipped cream or a scoop of vanilla ice cream for an indulgent treat. Enjoy them cold for a refreshing dessert after a hearty meal or warm up with a cup of tea if you’ve just baked them!
Recipe Variations
Feeling adventurous? Here are a few delightful twists you can try:
- Chocolate Ganache Filling: Swap the custard for a rich chocolate ganache for a chocolate lover’s dream!
- Non-Dairy Custard: Use coconut milk and a plant-based butter substitute for a vegan-friendly version.
- Seasonal Spices: Add a pinch of cinnamon or nutmeg to the custard for a warm spice twist.
- Zesty Lemon: Infuse a bit of fresh lemon zest into the custard for a bright, citrusy kick.
- Berry Blast: Top with all types of berries for a colorful and fresh look.
Chef’s Notes
I’ll let you in on a little secret—these mini fruit tarts have come a long way since that sunny Saturday in Grandma’s kitchen. I’ve played around with different fillings, fruits, and even crust options over the years. Variations that once felt experimental now delight family and friends with each version. Plus, there’s just something extra special about serving a dessert that evokes nostalgia while still feeling fresh and exciting.
So, my wonderful flavor chasers, I encourage you to put your own spin on these mini fruit tarts. It’s your kitchen, your creativity—let it shine!
FAQs and Troubleshooting
-
Why did my tart shells puff up?
This usually happens if the dough hasn’t been pricked with a fork. Be sure to poke holes before baking! -
How can I store leftover mini tarts?
Store any leftovers in an airtight container in the fridge for up to 2 days. The crust may soften slightly, but the flavor will still be fabulous. -
Can I freeze the tart shells?
Absolutely! After cooling, you can freeze the baked shells. Just layer them with parchment paper and store in an airtight container. When ready to use, thaw and fill as desired! -
What if my custard is too runny?
If your custard doesn’t set, it likely needed more cooking time. Just remember to stir it constantly until it thickens. If it’s too late, you can always top it with fresh fruit to cover it up!
Nutritional Info
For those of you counting, here’s a rough estimate for one mini fruit tart (assuming 12 tarts total):
- Calories: 200
- Protein: 3g
- Fat: 8g
- Carbohydrates: 30g
- Sugar: 10g
Remember, these numbers can vary based on specific ingredients used, so adjust accordingly!
There you have it—a comprehensive guide to creating Mini Fruit Tarts that will not only impress but will also remind you and your loved ones how magical cooking can be. Each tart is not just a dessert; it’s a piece of joy, a sprinkle of nostalgia, and a chance to connect over something sweet. Happy baking, and don’t forget to share your creations with me! 🍓✨
PrintMini Fruit Tarts: A Bite of Joy
Delightful mini fruit tarts with a buttery crust, creamy custard filling, and fresh seasonal fruits, perfect for any occasion.
- Prep Time: 30 minutes
- Cook Time: 20 minutes
- Total Time: 50 minutes
- Yield: 12 mini tarts 1x
- Category: Dessert
- Method: Baking
- Cuisine: International
- Diet: Vegetarian
Ingredients
- 8 tbsp unsalted butter
- ½ cup granulated sugar
- ⅛ tsp salt
- 1 egg
- 250 g all-purpose flour (2 cups spooned and leveled)
- 2 cups whole milk
- 1 tsp vanilla extract or vanilla bean paste
- Pinch of salt
- 5 large egg yolks
- 3 ½ tbsp cornstarch
- ½ cup granulated sugar (for the custard)
- 2 tbsp unsalted or salted butter (optional)
- Fresh fruits like strawberries, blueberries, kiwi, peaches, etc.
Instructions
- Preheat your oven to 350°F (175°C).
- Cream the butter and sugar together until light and fluffy.
- Add in the egg and salt, beating until combined.
- Incorporate the flour gradually until it just comes together.
- Shape the dough into a disk, wrap in plastic, and chill for about 30 minutes.
- Roll out the dough to about 1/8 inch thick and cut circles to fit muffin pans.
- Place the dough circles into greased muffin pans and prick with a fork.
- Bake for about 15-18 minutes until lightly golden brown, then cool.
- Heat the milk with vanilla and a pinch of salt in a saucepan.
- Whisk the egg yolks with cornstarch and granulated sugar until combined.
- Temper the eggs by slowly adding heated milk while whisking constantly.
- Cook the custard until thickened, stirring constantly for about 5-7 minutes.
- Finish the custard with butter if using.
- Fill the cooled tart shells with custard and top with fresh fruit.
Notes
Serve with a drizzle of honey or a dollop of whipped cream for extra sweetness. Store leftovers in an airtight container in the fridge for up to 2 days.
Nutrition
- Serving Size: 1 tart
- Calories: 200
- Sugar: 10g
- Sodium: 200mg
- Fat: 8g
- Saturated Fat: 4g
- Unsaturated Fat: 4g
- Trans Fat: 0g
- Carbohydrates: 30g
- Fiber: 1g
- Protein: 3g
- Cholesterol: 20mg
Keywords: mini fruit tarts, dessert, sweet treat, fruit, custard