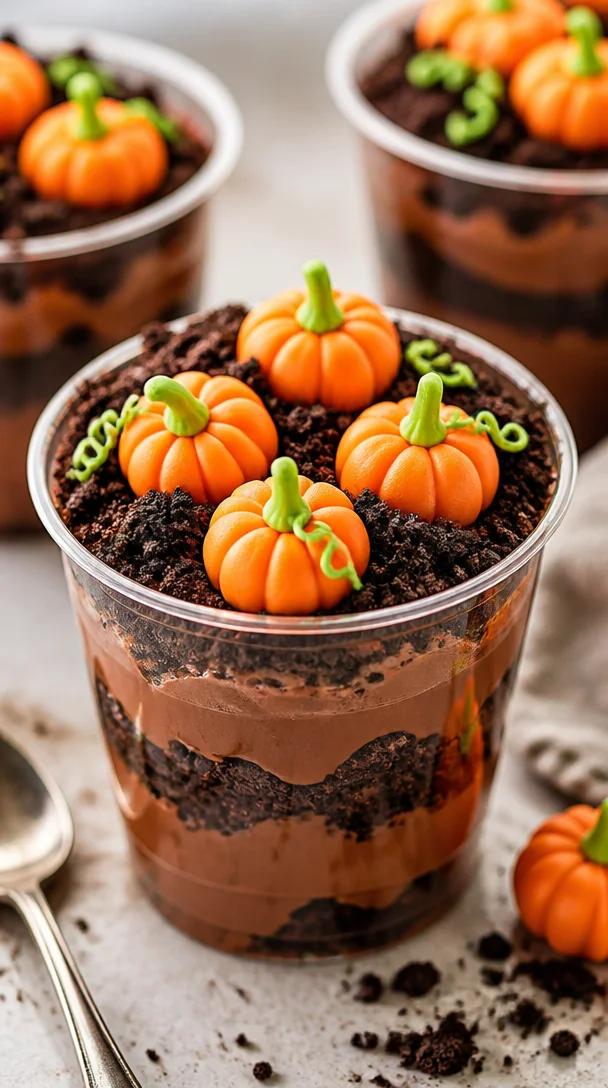
Pumpkin Patch Dirt Cups: A Fun Fall Treat to Make Together!
Hey there, fellow foodies! 🍂🎃 As autumn arrives, there’s something magical about the season that just screams cozy kitchen adventures. The leaves start to turn various shades of orange and gold, pumpkin spice wafts through the air, and every store displays an array of beautiful pumpkins. With Halloween around the corner, it’s the perfect time to gather in the kitchen and whip up some delightful and messy treats.
Today, we’re diving into a fun, whimsical recipe that’s sure to bring a smile to your face: Pumpkin Patch Dirt Cups! These charming dessert cups are not only kid-friendly but also a blast to create with your family or friends. They combine rich chocolate pudding, Oreo crumbles, and a playful pumpkin patch topping that includes candy pumpkins. Trust me when I say that these cups will be the highlight of your fall gatherings!
My Pumpkin Patch Memories
I can still recall the first time I made Pumpkin Patch Dirt Cups with my niece, Lily. It was a rainy Saturday afternoon, and we were both feeling a bit stir-crazy stuck indoors. I rummaged through my pantry and found some Oreos, chocolate pudding mix, and a bag of candy pumpkins I’d been saving for the Halloween season. It was like a light bulb went off!
We turned on some festive music, donned our cutest aprons, and made a delightful mess in the kitchen. I remember the giggles as we smashed those Oreos for the “dirt” layer and the excitement on Lily’s face as we layered the cups together. Each spoonful was a sweet reminder of how fun cooking can be when you’re surrounded by people you love. That day, I learned how a simple recipe could turn into a cherished memory, and I can’t wait for you to create your own!
Ingredients
Here’s what you’ll need to get started on your Pumpkin Patch Dirt Cups. Don’t worry; these ingredients are easy to find and the process is a breeze!
-
Chocolate Pudding Mix: The star of the show! Look for a good quality instant pudding mix or make it from scratch. If you’re feeling adventurous, try a flavored pudding like vanilla or butterscotch for a twist!
-
Whole Milk: This is essential for preparing the pudding and gives it that creamy texture we all love. You can substitute almond milk or oat milk for a dairy-free option.
-
Oreo Cookies: The classic chocolate cookie! You can bash them to bits for the “dirt” or use a different cookie like chocolate wafers for a similar effect without the cream filling.
-
Whipped Topping: Light and airy, this is what brings everything together! You can use store-bought whipped cream or homemade whipped topping for an extra special touch.
-
Candy Pumpkins: These little gems add that festive touch! If you can’t find them, use gummy candy or even chocolate-covered pretzels for a delicious surprise.
-
Chocolate Sprinkles: Optional, but they make a fantastic finishing touch! You can use colored sprinkles to match your theme or swap for crushed nuts for added crunch.
Step-by-Step Instructions
Ready to roll? Grab your ingredients, and let’s get cooking! Here’s how to craft your delicious Pumpkin Patch Dirt Cups:
-
Prepare the Chocolate Pudding:
- In a mixing bowl, combine your chocolate pudding mix with the whole milk. Whisk until it’s smooth and the pudding starts to thicken, usually about 2 minutes.
- Chef’s Tip: If you’re using instant pudding, make sure to whisk properly to avoid any lumps. It helps to let it rest in the fridge for about 5 minutes for optimal thickness!
-
Crush the Oreos:
- Place the Oreo cookies in a zip-top bag and crush them with a rolling pin until they resemble fine crumbs. You can also pulse them in a food processor for a quicker method.
- Chef Hack: Leave some larger pieces for added texture! This not only looks great but adds a delightful bite to your cups.
-
Layer the Cups:
- Start by scooping a layer of chocolate pudding into the bottom of each cup. I usually go for about 1-2 tablespoons, but you can adjust depending on your cup size.
- Next, sprinkle a layer of crushed Oreo crumbs on top of the pudding to create the “dirt” layer.
- Repeat this process until you reach the top of the cup, finishing with a generous layer of whipped topping.
- Presentation Tip: Use clear cups or jars! This way, everyone can see those delicious layers—trust me, it makes all the difference!
-
Add Candy Pumpkins and Sprinkles:
- Now comes the fun part! Top your fluffy whipped cream with a few candy pumpkins and sprinkle some chocolate sprinkles all around.
- Chef’s Touch: Arrange the pumpkins in a way that they look like they’re nestled in the dirt. You could even add a mini candy corn or two for a pop of color.
-
Chill and Serve:
- Place your assembled cups in the refrigerator to chill for at least 30 minutes. This helps everything meld together and cools your delightful treat.
- Serving Suggestion: Serve these cups on a festive platter, maybe with some extra candy pumpkins and Oreos on the side for a fun display!
Recipe Variations
Want to jazz things up a bit? Let your creativity shine with these tasty twists:
-
Orange Cream Version: Mix some orange food coloring into your whipped topping to create a pumpkin flavor that matches the season. It adds a beautiful seasonal hue!
-
Healthy Swap: Swapping traditional pudding with a healthy avocado chocolate pudding makes for a deliciously creamy and nutritious option. Who knew healthy desserts could taste so good?
-
Peanut Butter Layers: Who doesn’t love chocolate and peanut butter? Layer in some peanut butter mixed with whipped topping to give your cups a nutty surprise.
-
Banana Substitute: Replace the crushed Oreos with crushed graham crackers for a different "dirt" flavor. Bananas can add great sweetness to the pudding as well!
-
Vegan-Friendly Option: Use dairy-free pudding and whipped cream alternatives, like coconut whipped cream, to make this dish suitable for vegan friends!
Chef’s Notes
Isn’t it funny how some recipes stick with you over the years? When I first shared this recipe with my niece, it was just something fun to do on a rainy day. Now, I make these Pumpkin Patch Dirt Cups every fall! I love how versatile they are—they can adapt for birthday parties, Halloween, or even a cozy family dinner!
One of my favorite moments was seeing how imaginative kids can be while decorating! Each person has their version of how the pumpkins should be arranged, and honestly, that’s what makes cooking so much fun—seeing everyone’s creativity unfold.
FAQs and Troubleshooting
-
Why is my pudding not thickening?
Sometimes, if the milk is too warm or if the mix wasn’t whisked long enough, it can prevent the pudding from thickening properly. Be sure to whisk for the full two minutes and give it some chill time! -
What if I get lumps in my pudding?
If lumps develop, you can try to strain the mixture through a fine mesh to remove them or blend it in a blender briefly till smooth. -
Can I make this recipe ahead of time?
Absolutely! You can prepare the cups a day in advance and store them covered in the fridge. Just add the toppings close to serving for the freshest look! -
What’s a good dairy-free substitute?
Use coconut milk for the pudding and plant-based whipped cream. It’ll hold up beautifully and taste just as good!
Nutritional Info
Now, I know not everyone wants to douse their treats in numbers, but here’s a quick look at the nutritional profile per serving (1 cup) of your Pumpkin Patch Dirt Cup:
- Calories: 320-360
- Total Fat: 18g
- Saturated Fat: 10g
- Carbohydrates: 40g
- Sugar: 25g
- Protein: 4g
This recipe is a treat, so remember to enjoy it in moderation! Feel free to tweak it to suit your dietary needs, especially if you’re gearing towards a healthier lifestyle.
Final Thoughts
I hope you’re as excited to make these Pumpkin Patch Dirt Cups as I am to share them with you! Remember, the joy of cooking isn’t just in the final product, but in the fun, laughter, and memories made along the way. Gather your loved ones, embrace the mess, and enjoy every glorious bite that falls between the crumbles and cream.
Let’s connect over food, and don’t forget to share your creations with me! 🧡 Until next time, happy cooking, my fellow food lovers!
PrintPumpkin Patch Dirt Cups

A whimsical dessert perfect for fall gatherings, combining rich chocolate pudding, Oreo crumbles, and festive candy pumpkins.
- Prep Time: 15 minutes
- Cook Time: 5 minutes
- Total Time: 30 minutes
- Yield: 4 servings 1x
- Category: Dessert
- Method: No-Bake
- Cuisine: American
- Diet: Vegetarian
Ingredients
- 1 box chocolate pudding mix
- 2 cups whole milk (or dairy-free milk)
- 1 package Oreo cookies
- 1 cup whipped topping
- 1 cup candy pumpkins
- 1/4 cup chocolate sprinkles (optional)
Instructions
- Prepare the chocolate pudding by combining chocolate pudding mix with whole milk and whisking until smooth, about 2 minutes.
- Crush the Oreos in a zip-top bag or food processor until they resemble fine crumbs.
- Layer chocolate pudding in the bottom of each cup, followed by a layer of crushed Oreo crumbs.
- Repeat the layering process until the cup is filled, finishing with a layer of whipped topping.
- Add candy pumpkins and sprinkles on top for decoration.
- Chill the cups in the refrigerator for at least 30 minutes before serving.
Notes
This recipe can be adapted for various occasions, using different toppings or flavors. Perfect for family gatherings or Halloween parties.
Nutrition
- Serving Size: 1 cup
- Calories: 350
- Sugar: 25g
- Sodium: 200mg
- Fat: 18g
- Saturated Fat: 10g
- Unsaturated Fat: 6g
- Trans Fat: 0g
- Carbohydrates: 40g
- Fiber: 1g
- Protein: 4g
- Cholesterol: 10mg
Keywords: pumpkin, fall dessert, Halloween treats, family recipe, no-bake dessert