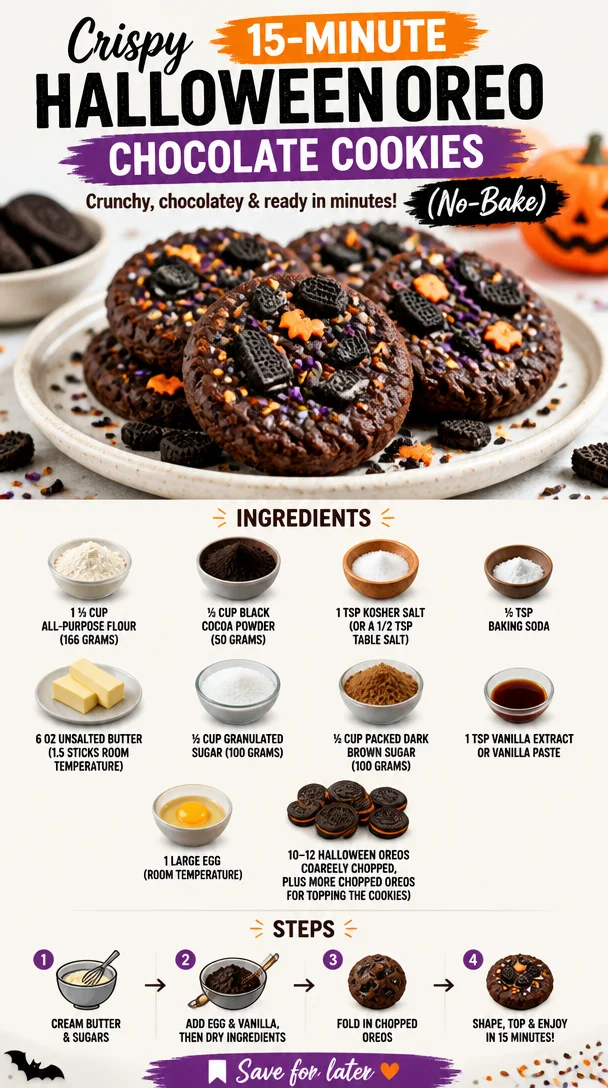
Halloween Oreo Chocolate Cookies: A Spooky Sweet Delight!
As the leaves start to change and a crisp chill fills the air, we know Halloween is right around the corner! It’s that magical time of year when we can indulge our sweet tooth without a hint of guilt—after all, it’s for the kids, right? This year, why not elevate your Halloween festivities with a scrumptious treat that will delight both kids and adults alike? I present to you my Halloween Oreo Chocolate Cookies—rich, chocolatey cookies adorned with the beloved Halloween Oreo.
Imagine the delight on your loved ones’ faces as they take a bite into these delightful cookies, revealing luscious chocolate flavor combined with a crunch of cookies that’s simply addictive! Not only do they taste fantastic, but they also look like they belong on the cover of a spooky bake sale flyer. Let’s roll up our sleeves and create a batch that’ll have everyone howling for more!
Personal Story: A Spooky Tradition
Growing up, Halloween was always a special time in our household. Each year, we would gather in the kitchen, flour dust dancing in the air as we mixed up something sweet to celebrate the season. My mom had a talent for whipping up spooky treats—think ghostly cupcakes and witchy brownies. One year, she decided to try her hand at creating cookies that paid homage to the classic Oreo but with a twist: Halloween Oreos!
I can still picture my mom wearing a silly witch hat, trying to keep us from eating all the batter while she pulled these hauntingly delicious cookies from the oven. We indulged in warm, gooey cookies, bodies buzzing from sugar and laughter! Those simple moments—baking alongside loved ones—helped me realize that cooking is less about the end product and more about the joy of sharing, teaching, and creating lasting memories.
And now, as we embark on this delicious journey together, I can’t wait for you to share the same magic with your friends and family!
Ingredients
Before we dive into the mixing bowl, let’s gather our ingredients. Here’s what you’ll need:
-
1 ⅓ cup all-purpose flour (166 grams)
A staple in most baking recipes, it provides the structure for our cookies. If you need to make these gluten-free, you can substitute with a 1:1 gluten-free flour blend. -
½ cup black cocoa powder (50 grams)
This is the secret behind the rich, dark color and intense chocolate flavor of your cookies. If you can’t find black cocoa, Dutch-process cocoa works, but the flavor will be slightly milder. -
1 tsp Kosher salt (or ½ tsp table salt)
This enhances all the flavors in the cookies. If you’re using salted butter instead of unsalted, you can reduce the added salt slightly. -
½ tsp baking soda
A leavening agent that helps the cookies puff up a bit without losing that chewy texture we adore! -
6 oz unsalted butter (1.5 sticks, room temperature)
Butter lends a rich flavor and tender texture. If you’re in a pinch, you can substitute this with margarine, but again, the taste will vary. -
½ cup granulated sugar (100 grams)
A classic sweetener providing that delightful sweetness and crunch. For a deeper flavor, you might consider using coconut sugar. -
½ cup packed dark brown sugar (100 grams)
Brings moisture and a lovely caramel-like flavor to the cookies; it’s my go-to for cookies! If you don’t have dark brown sugar, light brown sugar works just as well. -
1 tsp vanilla extract or vanilla paste
A splash of vanilla offers warmth and enhances the chocolate flavor. For a non-alcoholic option, try using vanilla bean powder instead. -
1 large egg (room temperature)
Binds the ingredients together and provides moisture! It’s important to use room-temperature eggs for even mixing. You can use a flax egg for a vegan alternative. -
10-12 Halloween Oreos (coarsely chopped, plus more chopped Oreos for topping the cookies)
These festive cookies add a great crunch and a hint of creaminess to each cookie. Feel free to swap with regular Oreos if you can’t find the Halloween ones, but trust me—those spooky decorations make a difference!
Step-by-Step Instructions
Now that we’ve gathered our spooky ingredients, let’s get our bake on! Follow these detailed steps for Halloween Oreo Chocolate Cookies sure to impress:
-
Preheat Your Oven: Set your oven to 350°F (175°C). This ensures that the cookies bake evenly and get that lovely texture we crave.
-
Mix Dry Ingredients: In a medium-sized bowl, whisk together the flour, black cocoa powder, Kosher salt, and baking soda. I like to add a pinch of salt because it balances the sweetness perfectly. Remember: it’s all about layering flavors!
-
Cream Butter and Sugars: In a large mixing bowl (I prefer using a stand mixer for this), add your room-temperature unsalted butter, granulated sugar, and dark brown sugar. Beat them together on medium speed until light and fluffy—about 2 minutes. A light, airy mixture is key to that delightful cookie texture!
-
Add the Egg and Vanilla: Crack in your egg and pour in the vanilla extract or paste. Mix until everything is just combined. Pro-tip: don’t overbeat at this stage! You want to retain that fluffiness.
-
Incorporate Dry Ingredients: Gradually add your dry mixture to the butter mixture, mixing on low speed until just combined. You want to avoid over-mixing; we’re aiming for a cookie that’s chewy and not tough!
-
Fold in the Oreos: Use a spatula to gently fold in your coarsely chopped Halloween Oreos. I like to reserve a few for topping the cookies! This adds an extra crunch when they come out of the oven.
-
Scoop and Bake: With a cookie scoop or spoon, drop generous dollops of dough onto a lined baking sheet. Leave a little space in between, as they will spread. Do not forget to top each dough ball with extra chopped Oreos for an Insta-worthy finish!
-
Bake to Perfection: Pop your cookie-filled baking sheet in the preheated oven. Bake for 10-12 minutes until the edges look set and the centers are still a bit soft. They will harden as they cool, giving you the ideal chewy texture.
-
Cool and Enjoy: Allow the cookies to cool on the baking sheet for about 5 minutes before transferring them to a wire rack to cool completely. But a warm cookie is always a treat, so feel free to delve in right away!
Serving Suggestions
Once your kitchen is filled with that heavenly chocolatey aroma, it’s time to serve those delicious cookies! Plate them on a festive Halloween platter or stack them high in a glass jar. Consider adding a sprinkle of powdered sugar for a ghostly effect or drizzle some melted chocolate over the top for that extra flair. These cookies make fantastic party favors if you wrap them up in cute cellophane bags. Everyone will appreciate a taste of the spooky season!
Recipe Variations
Looking to switch things up a bit? Here are a few creative twists:
-
Minty Surprise: Add a few drops of peppermint extract to the dough, bringing that classic mint-chocolate Oreo flavor to life.
-
Peanut Butter Bliss: Swirl in some creamy peanut butter into half of the dough for a brownie-like experience when combined with Oreos!
-
Vegan Version: Use flax eggs (1 tablespoon of ground flaxseeds mixed with 2.5 tablespoons water per egg) and coconut oil instead of butter for a completely plant-based treat.
-
Nut Lovers: Toss in some chopped nuts like walnuts or pecans for added crunch and a deeper flavor profile!
-
Spooky Fillings: Add a few pieces of white chocolate or Halloween-themed candies. Not only do they add sweetness, but they will also look extra festive!
Chef’s Notes
These Halloween Oreo Chocolate Cookies hold a special place in my heart, not only because they’re deliciously addictive but also because they remind me of those fun nights with my family in the kitchen. Over the years, I’ve modified the recipe to accommodate different tastes and dietary preferences.
I once had a challenge with a batch that wouldn’t quite come together, which turned out to be an expired cocoa powder culprit! Believe me, always check your pantry before baking. The beauty of cooking is in the small lessons learned along the way, and each cookie is a little piece of that journey!
FAQs and Troubleshooting
-
Why are my cookies flat?
If your cookies are spreading too much, it may be that your butter was too soft, or the dough was not chilled. Try placing the dough in the refrigerator for about 30 minutes before scooping! -
What can I do if the dough is too crumbly?
If the dough feels too dry and crumbly, mix in a tablespoon of milk or water at a time until it comes together. -
How do I store leftover cookies?
These cookies can last up to a week in an airtight container. You can also freeze them! Just freeze the cookies on a baking sheet, then store them in a bag once frozen. -
Can I use regular Oreos for this recipe?
Absolutely! If you can’t find Halloween Oreos, regular ones work beautifully. The flavor will change slightly, but they will still be fantastic!
Nutritional Info
(Just as a rough estimate, 1 cookie has)
- Calories: 130
- Total Fat: 7g
- Saturated Fat: 4g
- Cholesterol: 20mg
- Sodium: 90mg
- Total Carbohydrates: 16g
- Dietary Fiber: 0g
- Sugars: 8g
- Protein: 1g
In Closing
There you have it—my Halloween Oreo Chocolate Cookies that are sure to charm at your next gathering. Let the spooky season usher in the spirit of creativity and community by bringing everyone together in the kitchen. I hope this recipe inspires you to create lasting memories with loved ones, just as it has for me.
So, what are you waiting for? Grab your apron, turn up your favorite tunes, and let’s keep the magic of cooking alive this Halloween! Happy baking, foodies!
PrintHalloween Oreo Chocolate Cookies

Deliciously rich and chocolatey cookies featuring Halloween-themed Oreos, perfect for the spooky season!
- Prep Time: 15 minutes
- Cook Time: 12 minutes
- Total Time: 27 minutes
- Yield: 12 servings 1x
- Category: Dessert
- Method: Baking
- Cuisine: American
- Diet: Vegetarian
Ingredients
- 1 ⅓ cup all-purpose flour (166 grams)
- ½ cup black cocoa powder (50 grams)
- 1 tsp Kosher salt (or ½ tsp table salt)
- ½ tsp baking soda
- 6 oz unsalted butter (1.5 sticks, room temperature)
- ½ cup granulated sugar (100 grams)
- ½ cup packed dark brown sugar (100 grams)
- 1 tsp vanilla extract or vanilla paste
- 1 large egg (room temperature)
- 10–12 Halloween Oreos (coarsely chopped, plus more for topping)
Instructions
- Preheat your oven to 350°F (175°C).
- Mix dry ingredients: In a medium-sized bowl, whisk together the flour, black cocoa powder, Kosher salt, and baking soda.
- Cream butter and sugars: In a large mixing bowl, add room-temperature unsalted butter, granulated sugar, and dark brown sugar. Beat together on medium speed until light and fluffy (about 2 minutes).
- Add the egg and vanilla: Crack in your egg and pour in the vanilla extract or paste. Mix until just combined.
- Incorporate dry ingredients: Gradually add your dry mixture to the butter mixture, mixing on low speed until just combined.
- Fold in the Oreos: Use a spatula to gently fold in your coarsely chopped Halloween Oreos.
- Scoop and bake: Drop generous dollops of dough onto a lined baking sheet, topping each with extra chopped Oreos.
- Bake for 10-12 minutes until the edges look set and the centers are soft.
- Cool on the baking sheet for about 5 minutes before transferring to a wire rack.
Notes
These cookies can last up to a week in an airtight container. You can also freeze them!
Nutrition
- Serving Size: 1 cookie
- Calories: 130
- Sugar: 8g
- Sodium: 90mg
- Fat: 7g
- Saturated Fat: 4g
- Unsaturated Fat: 3g
- Trans Fat: 0g
- Carbohydrates: 16g
- Fiber: 0g
- Protein: 1g
- Cholesterol: 20mg
Keywords: Halloween cookies, chocolate cookies, Oreo cookies, spooky treats