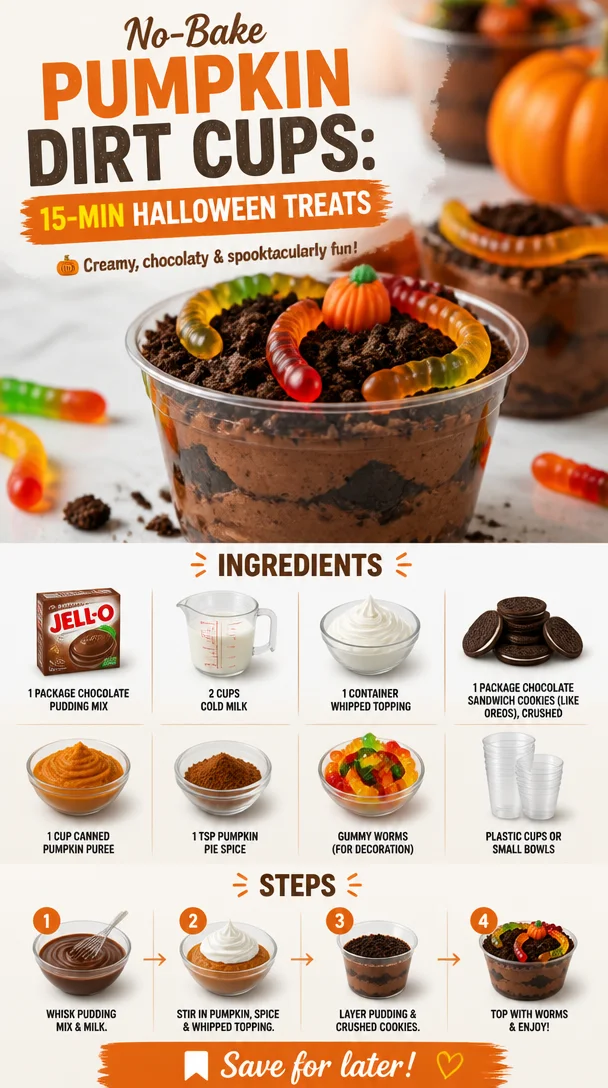
Pumpkin Dirt Cups: A Fun and Festive Treat to Celebrate Autumn
Fall is one of my favorite seasons—a time for cozy sweaters, warm drinks, and, of course, deliciously delightful desserts! If you’re looking for a sweet treat that’s not just tasty but also brings a sprinkle of nostalgia and a dash of creativity, you’re in for a treat with Pumpkin Dirt Cups. These delightful desserts are perfect for gatherings, Halloween parties, or simply enjoying a cozy evening at home. Let’s dive into making this treat, but first, let me share a little story that makes these cups even sweeter.
A Sweet Childhood Memory
As a child, fall was magical in many ways. The air would turn crisp, the leaves would paint the ground in hues of orange and gold, and my mom would bring home the first pumpkin of the season. The day we carved that pumpkin was always a celebration. We’d scoop out the seeds, and in among the gooey mess, my siblings and I would giggle and laugh, creating our own spooky designs. While the pumpkin sat on our porch, I remember my mom whipping up something special: her famous pumpkin pie.
But one year, she surprised us with an even more playful dessert: a layered pumpkin and chocolate treat. The combination of rich chocolate along with the creamy pumpkin was a game-changer, and those memories have stuck with me like caramel apples on a stick! Today’s Pumpkin Dirt Cups are a tribute to those playful moments, embracing the flavors of pumpkin and childhood delight in each and every scoop.
Ingredients
To whip up these fun Pumpkin Dirt Cups, make sure you have the following ingredients on hand:
-
1 package chocolate pudding mix
This serves as the rich, chocolaty base of our dessert. You can opt for a low-sugar version if you’re watching your sugar intake! -
2 cups cold milk
Use any milk you prefer—whole, low-fat, or even almond milk works beautifully in this recipe. -
1 container whipped topping
This lightens the pudding and gives it that creamy, dreamy texture. You can substitute with homemade whipped cream if you’re feeling fancy! -
1 package chocolate sandwich cookies (like Oreos), crushed
These not only add texture but also resemble the "dirt" in our dirt cups. Gluten-free sandwich cookies are a great alternative if needed. -
1 cup canned pumpkin puree
This is where the autumn magic happens! Be sure to use 100% pumpkin puree for the best flavor, and not pumpkin pie filling which can be sweetened. -
1 tsp pumpkin pie spice
A warm blend of spices that perfectly complements the pumpkin. If you don’t have this on hand, a mix of cinnamon, nutmeg, and ginger will work too! -
Gummy worms (for decoration)
These add a playful touch! You can also use candy pumpkins or chocolate sprinkles for a seasonal vibe. -
Plastic cups or small bowls
You’ll need these to layer your delicious dirt cups. Feel free to get creative with sizes and shapes!
Step-by-Step Instructions
Let’s get cooking! Follow these steps to create your Pumpkin Dirt Cups:
-
Prepare the Chocolate Pudding:
In a mixing bowl, combine the chocolate pudding mix with the cold milk. Whisk it together until it thickens, which usually takes about 2-3 minutes. Tip: Make sure the milk is really cold—it helps the pudding set perfectly. You can even chill your mixing bowl for added coolness! -
Mix in the Whipped Topping:
Gently fold in the container of whipped topping into the pudding mixture until it’s fully combined. This adds a light, airy texture. Be careful not to whip it too hard, or you’ll lose that fluffiness! -
Prepare the Pumpkin Layer:
In a separate bowl, mix together the pumpkin puree and pumpkin pie spice. Stir until well combined. If you enjoy a sweeter pumpkin flavor, feel free to add a tablespoon of powdered sugar or maple syrup for a touch of extra sweetness. -
Crush the Chocolate Sandwich Cookies:
Place the cookies in a zippered bag and crush them using a rolling pin or just your hands until they resemble dirt. This is a great way to let off some steam! You want them crumbly but not turned into dust. -
Layer Your Dirt Cups:
In your plastic cups or small bowls, start by adding a layer of the chocolate pudding mixture at the bottom. Follow it with a layer of the pumpkin mixture, then a layer of crushed cookies. Repeat these layers until your cups are full, ending with crushed cookies on top for that charming “dirt” effect. -
Add the Gummy Worms:
Take a moment to decorate! Insert gummy worms (or your decoration of choice) into the top layer of cookie crumbs, letting them wiggle out for a fun surprise. These little guys really finish off the look, and they’re sure to make everyone smile! -
Chill and Serve:
Place the filled cups in the refrigerator and let them chill for at least 30 minutes to allow the flavors to meld. When you’re ready to serve, take them out and enjoy!
Serving Suggestions
To serve your Pumpkin Dirt Cups, place them on a festive platter or individual dessert plates. Consider adding a sprinkle of extra cookie crumbs on top and maybe a few additional gummy worms wriggling around for that fun, playful touch. These cups are bound to be a hit, sparking joy and excitement at any autumn gathering!
Recipe Variations
Here are a few ideas to switch things up and keep your Pumpkin Dirt Cups exciting:
-
Spiced Whipped Cream:
Instead of regular whipped topping, try spicing up your whipped cream by adding a dash of vanilla and cinnamon! -
Chocolate Drizzle:
Add an indulgent chocolate sauce drizzle on top right before serving for an extra layer of decadence. -
Nutty Crunch Layer:
Incorporate chopped pecans or walnuts for a crunchy texture in one of the layers. This adds a bit of healthy flavor while enhancing the dessert’s depth! -
Non-Dairy Options:
Swap out the milk and whipped topping for non-dairy alternatives, and use gluten-free cookies to make this treat suitable for various dietary preferences.
Chef’s Notes
Over the years, I’ve tweaked this recipe as I’ve introduced new flavors and ingredients. It’s amazing how something as simple as a chocolate pudding mix can transform with the addition of pumpkin and spices. I once had some friends over for a movie night, and they couldn’t stop raving about how “adult” the dirt cups felt with the pumpkin twist! It’s so fun to see people’s reactions when they realize that pumpkin can be a dessert staple and not just for pie!
Remember, cooking and baking are about being creative and having fun in the kitchen. Don’t be shy to make this dessert your own!
FAQs and Troubleshooting
1. Can I make these cups in advance?
Absolutely! Pumpkin Dirt Cups can be prepared a day in advance. Just keep them covered in the refrigerator until serving time.
2. Can I use fresh pumpkin instead of canned?
You can! Just ensure you cook and mash the pumpkin until it’s smooth and add a bit of sugar if needed, as canned pumpkin is typically sweeter.
3. What if my pudding doesn’t thicken?
Don’t worry! Sometimes if the milk isn’t cold enough or if it’s not whisked long enough, it can remain runny. You can whisk in a bit more pudding mix, and it should thicken up.
4. How long do the Pumpkin Dirt Cups last?
They are best enjoyed within 2-3 days, but they can last up to a week in the fridge. Just make sure they are well covered!
Now that you’re equipped with the knowledge to create these playful Pumpkin Dirt Cups, I hope you’ll feel inspired to gather your ingredients, invite a friend, or even enjoy them solo while watching your favorite fall flick. Happy cooking and indulging!
PrintPumpkin Dirt Cups

A creative and delicious fall dessert combining pumpkin and chocolate in a fun layered presentation.
- Prep Time: 15 minutes
- Cook Time: 0 minutes
- Total Time: 30 minutes
- Yield: 4 servings 1x
- Category: Dessert
- Method: No Cooking
- Cuisine: American
- Diet: Vegetarian
Ingredients
- 1 package chocolate pudding mix
- 2 cups cold milk
- 1 container whipped topping
- 1 package chocolate sandwich cookies, crushed
- 1 cup canned pumpkin puree
- 1 tsp pumpkin pie spice
- Gummy worms (for decoration)
- Plastic cups or small bowls
Instructions
- Prepare the Chocolate Pudding: In a mixing bowl, combine the chocolate pudding mix with the cold milk. Whisk it together until it thickens, about 2-3 minutes.
- Mix in the Whipped Topping: Gently fold in the whipped topping into the pudding mixture until fully combined.
- Prepare the Pumpkin Layer: In a separate bowl, mix together the pumpkin puree and pumpkin pie spice until well combined.
- Crush the Chocolate Sandwich Cookies: Place the cookies in a zippered bag and crush them until they resemble dirt.
- Layer Your Dirt Cups: Start with a layer of chocolate pudding, followed by a layer of pumpkin mixture, and then a layer of crushed cookies. Repeat layers and end with cookie crumbs.
- Add the Gummy Worms: Insert gummy worms into the top layer of cookie crumbs for decoration.
- Chill and Serve: Place the cups in the refrigerator for at least 30 minutes, then serve and enjoy!
Notes
These cups can be prepared a day in advance and should be kept covered in the refrigerator.
Nutrition
- Serving Size: 1 cup
- Calories: 250
- Sugar: 20g
- Sodium: 200mg
- Fat: 10g
- Saturated Fat: 6g
- Unsaturated Fat: 4g
- Trans Fat: 0g
- Carbohydrates: 35g
- Fiber: 2g
- Protein: 3g
- Cholesterol: 15mg
Keywords: pumpkin, dessert, fall treats, Halloween, chocolate, kid-friendly