Witch Hat Cookies: A Spooktacular Treat for All Ages
Introduction
Hey there, cookie aficionados! 🎃 It’s that time of year when the leaves start to change, and we embrace the cozy vibes of fall. As soon as the air gets a bit crisp, my mind drifts towards Halloween, and you know what that means—Witch Hat Cookies! These playful and delicious treats are not only simple to make but are also an absolute showstopper for any Halloween gathering or cozy night in.
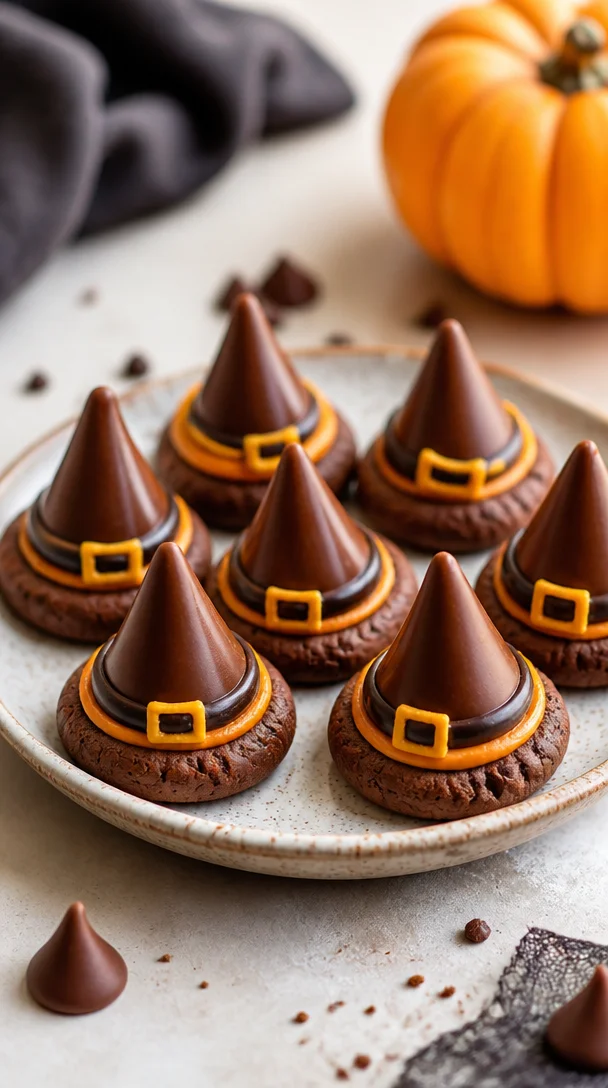
Imagine a chocolatey cookie, shaped like a witch’s hat, adorned with a classic Hershey’s Kiss topped with colorful sprinkles or candy corn. It’s a sweet spell that transforms an ordinary cookie into a festive delight that you can whip up with the family. The best part? You don’t need to be a baking wizard to create these bewitching beauties!
In today’s post, I’ll share not just the recipe but my fond memories attached to these cookies, insider tips to nail your bake, and exciting ways to personalize them. So, grab your mixing bowls, put on your witch hats (pun totally intended), and let’s conjure up some magic in the kitchen!
Personal Story
Growing up, Halloween was a high holiday in my household. My mom would set aside the weeks leading up to October 31st for specific traditions—carving pumpkins, dressing up in the most imaginative costumes, and, of course, baking an assortment of cookies. There’s one particular memory that stands out: the year I decided to take charge and make the Witch Hat Cookies all by myself.
With flour dusting my cheeks and half a bottle of food coloring splattered on the countertop, I felt like a true culinary sorceress. I mixed dark chocolate cookies, shaped them into pointy hats, and had a blast pressing those shiny Hershey’s Kisses on top. My little brother insisted on eating the cookies right away, but I convinced him to wait until we had the whole batch done. Finally, my family gathered around, and the look on their faces as they devoured my witchy creations filled my heart with joy. It was in that moment I knew baking was my love language.
Ingredients
To make these delightful Witch Hat Cookies, you’ll need the following ingredients:
-
1 cup of unsalted butter: For a rich and buttery flavor. If you’re looking for a healthier fat option, you can use coconut oil instead, though the flavor will slightly differ.
-
1 cup of granulated sugar: It sweetens the cookies perfectly. For a deeper flavor, try brown sugar or a 50/50 mix of both.
-
1 cup of packed brown sugar: Adds moisture and a caramel-like depth. If you’re out of brown sugar, you can create your own by mixing white sugar with a little molasses.
-
2 large eggs: Essential for binding and moisture. If you’re egg-free, substitute with ½ a banana or 1/4 cup of applesauce.
-
2 teaspoons vanilla extract: A must-have for flavor. Don’t skimp on quality! If you’re in a pinch, almond extract works as a fun alternative.
-
3 cups all-purpose flour: The base of your cookie. For gluten-free options, try a certified gluten-free flour blend.
-
¾ cup unsweetened cocoa powder: For that rich chocolate flavor. Dutch-processed cocoa gives a deeper color and flavor, so feel free to experiment!
-
1 teaspoon baking soda: For lift and fluffiness. Avoid using expired baking soda for the best results.
-
½ teaspoon salt: Balances sweetness. If using salted butter, you can reduce the salt to 1/4 teaspoon.
-
Hershey’s Kisses: These are essential for your witch hats! If you’d like to shake things up, try caramel-filled chocolates or any chocolate bonbons.
-
Sprinkles or candy corn: For decoration, these give your cookies that whimsical flair!
Step-by-Step Instructions
Now that we’ve gathered all our magical ingredients, let’s get cooking! Here’s how to make these enchanting Witch Hat Cookies step by step:
-
Preheat your oven: Preheat your oven to 350°F (175°C). This ensures your cookies bake evenly and nicely.
-
Cream the butter and sugars: In a large bowl, cream together the unsalted butter, granulated sugar, and brown sugar until the mixture is light and fluffy. This step is vital for achieving the right texture, so take your time!
-
Add the eggs and vanilla: Beat in the eggs, one at a time, mixing well after each addition. Then add the vanilla extract. This will enhance the rich flavor of your cookies.
-
Mix dry ingredients: In a separate bowl, whisk together the flour, cocoa powder, baking soda, and salt. This helps distribute the dry ingredients evenly and avoids clumps.
-
Combine mixtures: Slowly add the dry ingredient mixture to your wet mixture, stirring until just combined. Be careful not to overmix; this keeps your cookies tender.
-
Shape the cookies: Using your hands or a small cookie scoop, form the dough into small, pointed shapes resembling hats. Each should be about 1-2 inches wide at the bottom and taper to a peak.
-
Bake: Place the cookies on a parchment-lined baking sheet (about 2 inches apart). Bake for 10-12 minutes, or until the edges are set but the centers still look soft.
-
Add Hershey’s Kisses: Remove from the oven and immediately press a Hershey’s Kiss into the center of each cookie to create the hat’s point. Let the cookies cool on the sheet for 5-10 minutes before transferring them to a wire rack.
-
Decorate: Once cooled, use sprinkles or candy corn to decorate around the base of the Hershey’s Kiss for an extra pop of color. You can even melt some chocolate to drizzle on top for an extra fun visual!
Serving Suggestions
When it comes to serving these witchy delights, your presentation can truly add to the experience. Display these cookies on a festive platter surrounded by mini pumpkins and cobwebs for that perfect Halloween vibe, or create a buffet-style treat table with other spooktacular goodies like candy corn and pumpkin puffs.
For a fun twist, consider pairing these cookies with a warm glass of apple cider or hot chocolate for a cozy fall gathering. Creating a ‘Witch Hat Cookie Bar’ where guests can decorate their own cookies with various toppings and fillings is also a fantastic idea. It turns your baking into an interactive experience!
Recipe Variations
Feeling adventurous today? Here are a few creative twists you could try with your Witch Hat Cookies:
-
Pumpkin Spice Ghost Hats: Substitute the cocoa powder with pumpkin spice for a seasonal twist. Use white chocolate melts instead of Hershey’s Kisses and add ghost faces with icing.
-
Chocolate Peanut Butter Hats: Mix in a tablespoon of peanut butter into your cookie batter, or use peanut butter cups instead of Hershey’s Kisses to satisfy that sweet and salty craving.
-
Nutty Witch Hats: Incorporate walnuts or pecans into the dough for a crunchy texture, or press whole almonds on top in place of the Kisses for a healthier spin.
-
Gluten-Free Version: Use a gluten-free flour blend and ensure your chocolates and sprinkles are gluten-free as well.
-
Vegan Adaptation: Substitute eggs with flax eggs and use plant-based butter alongside dairy-free chocolates for cruelty-free treats.
Chef’s Notes
Every recipe evolves over time for me, and these Witch Hat Cookies are no exception! Initially, I would follow a more classical approach, but through experimenting with flavors and shapes, they became a Halloween staple in my house. They remind me of the laughter echoed around my kitchen as we crafted our own witch hats.
And let’s be real—my biggest tip? Embrace the mess! Cooking and baking are as much about the joy of creation as they are about perfecting a dish. Flour on your face? A sprinkle explosion in the kitchen? All part of the fun!
FAQs and Troubleshooting
1. My cookies flattened out too much! What did I do wrong?
This can happen if your butter was too soft. Ensure that it’s just at room temperature, and chill your dough for 30 minutes before baking if needed.
2. Can I make the dough ahead of time?
Absolutely! You can prepare the dough a day in advance. Keep it wrapped in plastic wrap in the fridge, and it’ll be ready to bake when you are.
3. How do I store my cookies?
Store them in an airtight container at room temperature for up to a week, or freeze them for longer storage (just remember to layer them with parchment paper!).
4. What if my cookies are too crumbly?
It could be an issue with the flour measurement. Ensure you’re scooping the flour gently and leveling it off. Or add a little more butter or egg to bind them.
Nutritional Info
These Witch Hat Cookies are meant for enjoyment, but if you’re curious about their nutritional content, here’s a quick breakdown per cookie (assuming 24 cookies):
- Calories: 150
- Total Fat: 7g
- Saturated Fat: 4g
- Cholesterol: 25mg
- Sodium: 80mg
- Total Carbohydrates: 20g
- Dietary Fiber: 1g
- Sugars: 10g
- Protein: 1g
Of course, nutritional values may change according to substitutions and portions, but I firmly believe in balance and enjoying the treats of life.
Final Thoughts
There you have it—your ultimate guide to baking these delightful Witch Hat Cookies! Whether you’re making them for Halloween or just because you love a good cookie, these little treats are sure to cast a sweet spell on everyone around.
Baking is all about celebrating moments with friends and family, and I hope that these cookies bring a little extra joy to your autumn festivities. Don’t forget to share your baking adventures—I’d love to hear how you put your spin on this recipe!
So, get those aprons on, gather the troops, and let’s have a blast creating some spooktacular memories together. Happy baking! 🍪✨
— Chef Emily
Print