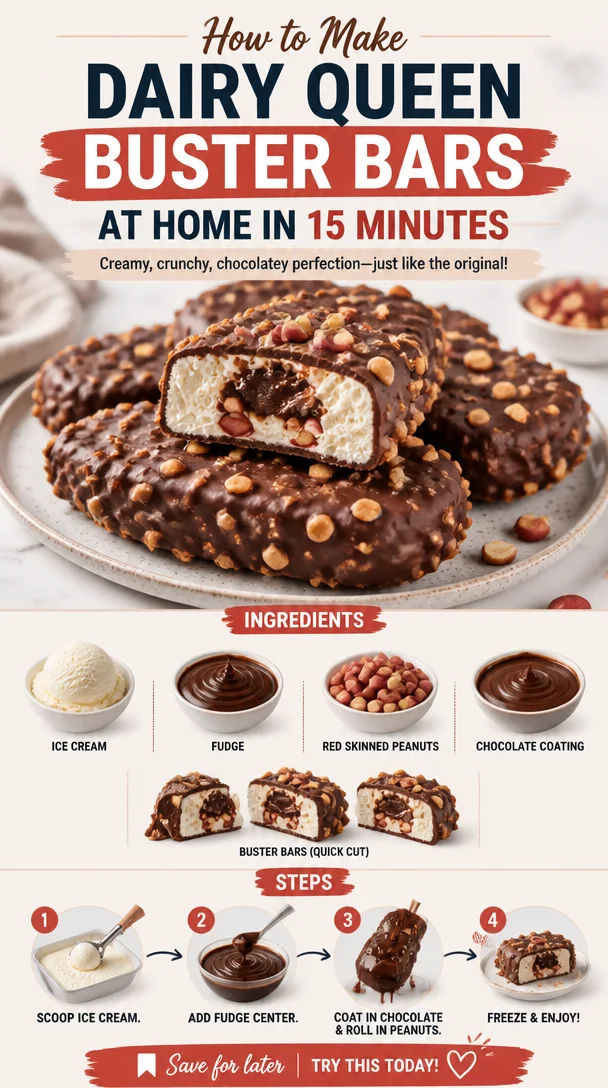
Indulge in Nostalgia: Homemade Dairy Queen Buster Bars
Ah, the sweet taste of nostalgia! There’s something magical about revisiting those childhood treats that made us feel like kids again. For me, nothing sparks joy quite like a Dairy Queen Buster Bar. Remember rushing in on a hot summer day, your heart racing in anticipation as you handed over your hard-earned allowance for that creamy, crunchy delight? Those layers of ice cream, fudge, and peanuts encased in a chocolate coating were nothing short of a symphony of flavors. It felt like a celebration of life, each bite reminding you that little joys can pack a big punch.
Creating a homemade version of these beloved Buster Bars is not only an exciting kitchen adventure but also a way to transport yourself back to those carefree days. Today, I’m here to walk you through the simple steps to create these dreamy treats in your own kitchen. With just a handful of ingredients, you can whip up a batch that will impress friends and family alike—or, let’s be honest, satisfy those late-night cravings. So, roll up your sleeves and get ready for a journey filled with creamy goodness and delightful textures. Let’s dive into the world of homemade Dairy Queen Buster Bars!
A Sweet Memory: Buster Bars and Summer Days
Every summer, we would pile into the family minivan, my siblings and I vying to claim the best spot for the ride to Dairy Queen. The anticipation was palpable—like an ice cream countdown to happiness. My favorite among all the delicious ice cream offerings was the Buster Bar. My sister loved her Oreo Blizzard, but for me, the combination of soft-serve ice cream layered with fudge and peanuts underneath that thick chocolate coating was nothing short of perfection.
I fondly remember the time I attempted to recreate these little joys at home. After an unsuccessful run with a completely melted concoction, I decided to tweak my approach. With laughter filling the air and ice cream spills decorating the kitchen counters, I managed to create my own version that brought back all those delightful memories. And, let’s be honest, they were far superior to the store-bought versions! This recipe is a love letter to those summer days and a fun way to share a piece of my childhood with all of you.
Ingredients
Here’s what you’re going to need for these scrumptious Dairy Queen Buster Bars. Each ingredient plays a vital role in creating that signature flavor and texture, and I’ve included some helpful hints to make your life easier in the kitchen.
-
Ice Cream: The star of the show! Any flavor you love will work, but I recommend a classic vanilla for that authentic taste. If you’re dairy-free, look for oat or almond-based ice creams.
-
Fudge Sauce: A rich, gooey layer that adds that signature sweetness. You can make your own or, for convenience, use store-bought fudge sauce. If you’re feeling adventurous, chocolate syrup works as a lighter alternative.
-
Red-Skinned Peanuts: These crunchy bites give that nutty flavor and satisfying crunch. You can substitute with salted peanuts or even chopped almonds for a different flavor profile, but I love the classic red-skinned variety.
-
Chocolate Coating: You’ll need some chocolate for melting—use semisweet or dark chocolate, depending on your preference. If you want to cut down on the chocolate, try drizzling it instead of fully coating the bars, or even dip them in a light layer of yogurt for a tangy twist!
-
Quick-Cut Bars: These flexible molds allow you to create perfectly shaped bars. If you don’t have molds, feel free to use a baking dish lined with parchment paper—just cut into squares or rectangles once set!
Step-by-Step Instructions
Now, let’s get down to business! Follow these steps to create your delightful Dairy Queen Buster Bars:
-
Gather Your Tools: Start by assembling your equipment. You will need your molds or a baking dish if you’re going the parchment paper route, a mixing bowl for your fudge, and another for melting the chocolate. Prep and embrace your inner chef!
-
Prepare the Ice Cream Base:
- Allow your ice cream to soften slightly at room temperature for about 10-15 minutes. This makes it easier to spread into your molds.
- Using a knife or spatula, spread a generous layer of ice cream into each mold, filling it up to about halfway or more if you’re feeling generous. Smooth out the tops for a lovely finish. Chef’s Tip: To get a more even spread, dip your spatula in warm water before scooping.
-
Add the Fudge Sauce:
- Next, take your fudge sauce and pour a generous layer over the ice cream. Use a knife or the back of a spoon to gently spread it, ensuring an even layer. Fun Fact: You can heat your fudge sauce slightly in the microwave for easier spreading!
-
Top with Peanuts:
- Sprinkle the red-skinned peanuts evenly over the fudge layer. Press them down gently to ensure they stick well. This layer is crucial for that classic crunch! Chef Hack: Toast the peanuts lightly in a pan for added flavor and depth!
-
Finish with More Ice Cream:
- Carefully spread another layer of softened ice cream over the peanuts to fill the molds. Again, smooth it out for a beautiful finish. Then, cover them with plastic wrap and freeze for at least 3-4 hours, or overnight for best results.
-
Melt the Chocolate Coating:
- When you’re ready to dip, melt your chocolate coating in a microwave-safe bowl in 30-second intervals, stirring in between until it’s completely smooth. Note: Make sure the chocolate is not too hot; let it cool for a minute or two before dipping. This will help prevent the ice cream from melting when dipped!
-
Dip the Bars:
- Once your ice cream bars are completely frozen, carefully remove them from their molds. Dip each bar into the melted chocolate until well-coated, then place on a parchment-lined tray to set. Tip: If you want a thicker chocolate layer, dip them twice, freezing briefly in between dips!
-
Final Freeze:
- Once all bars are dipped, pop them back into the freezer for about 30 minutes to set the chocolate coating.
Serving Suggestions
To serve, plate your homemade Buster Bars on a rustic wooden board or a colorful plate. You can add a drizzle of fudge, a sprinkle of extra peanuts, or even a dollop of whipped cream on the side for a fun presentation. Don’t forget the napkins—these bars can get a little messy but that’s part of the fun!
Recipe Variations
Once you’ve mastered the classic Buster Bar, feel free to put your own spin on it. Here are some fun variations:
- Nutty Buddy: Swap the red-skinned peanuts for crushed cookies (like Oreos or Graham crackers) in the fudge layer for a delicious twist.
- Mint Chocolate: Add mint extract to your melted chocolate for a refreshing mint chocolate Buster Bar. You can also substitute the vanilla ice cream for mint chocolate chip.
- Peanut Butter Bliss: Mix creamy peanut butter into your fudge sauce for a double peanut flavor explosion!
- Fruit Fusion: Layer some sliced strawberries or bananas along with the fudge for a fruity touch.
Chef’s Notes
Creating these Buster Bars has been an evolving experience! The first time I made them, I ended up with a gooey mess that tasted delightful but looked like a crime scene. After a few tries and some friends turning into taste testers, I honed the technique to what it is now. The word “Buster” in Buster Bars also reminds me of my beloved golden retriever who used to buster through the kitchen when I was baking, hoping for some accidental drops! This recipe not only gives a nod to my childhood but also to those silly, joyous kitchen moments.
FAQs and Troubleshooting
-
What if my ice cream gets too soft?
- If your ice cream becomes too soft to spread, pop it back into the freezer for a few minutes until it firms up again.
-
Can I use other types of nuts?
- Absolutely! Almonds, walnuts, or even pecans would work well. Just remember to chop them into smaller pieces for easy munching.
-
How do I store these bars?
- Keep your Buster Bars in an airtight container in the freezer to maintain their texture. They’ll last about 1-2 months, but let’s be honest, they probably won’t last that long!
-
My chocolate coating isn’t smooth. What should I do?
- If your chocolate seizes up, try adding a small amount of vegetable oil to the melted chocolate to help smooth it out again.
Nutritional Info
If you’re curious about the nutritional breakdown, each bar roughly contains around 250 calories, depending on the specific ingredients and portions you use. Remember, these are a treat to cherish, so savor every bite!
So there it is! Your homemade Dairy Queen Buster Bars are just waiting for you to dig in. Often, the kitchen can feel like a chore, but with a recipe that brings back sweet memories and evokes the childhood joy of ice cream, it’s a pleasure to whip up. Grab friends or family, and make a batch together—after all, cooking is always better when shared! Happy creating!
PrintHomemade Dairy Queen Buster Bars
Recreate the nostalgic treats of Dairy Queen Buster Bars with layers of ice cream, fudge, peanuts, and chocolate coating.
- Prep Time: 15 minutes
- Cook Time: 0 minutes
- Total Time: 240 minutes
- Yield: 12 servings
- Category: Dessert
- Method: Freezing
- Cuisine: American
- Diet: Vegetarian
Ingredients
- Ice Cream (vanilla or your favorite flavor)
- Fudge Sauce (store-bought or homemade)
- Red-Skinned Peanuts (or salted peanuts)
- Chocolate Coating (semisweet or dark chocolate)
- Quick-Cut Bars Molds (or baking dish with parchment paper)
Instructions
- Gather your tools: Assemble your equipment including molds or a baking dish, mixing bowls, and a spatula.
- Prepare the ice cream base: Allow it to soften for 10-15 minutes, then spread into the molds.
- Add the fudge sauce: Pour and spread a layer over the ice cream.
- Top with peanuts: Sprinkle and press them down evenly over the fudge.
- Finish with more ice cream: Spread another layer over peanuts and freeze for 3-4 hours.
- Melt the chocolate coating: Do this in intervals until smooth.
- Dip the bars: Carefully remove from molds and dip into melted chocolate.
- Final freeze: Place dipped bars back in the freezer for 30 minutes to set the chocolate.
Notes
For added flavor, toast the peanuts lightly before adding them to the bars. You can customize the bars using different nuts or by adding mint extract to the chocolate.
Nutrition
- Serving Size: 1 bar
- Calories: 250
- Sugar: 22g
- Sodium: 200mg
- Fat: 15g
- Saturated Fat: 5g
- Unsaturated Fat: 8g
- Trans Fat: 0g
- Carbohydrates: 25g
- Fiber: 2g
- Protein: 5g
- Cholesterol: 15mg
Keywords: Dairy Queen, Buster Bars, ice cream dessert, nostalgic treats, summer dessert