A Taste of Summer: Homemade Lemonade Popsicles
As summer rolls around, I find myself dreaming of lazy afternoons, sunshine, and the refreshing zing of a cold treat in my hand. Oh, how I adore those warm months! They bring a sense of nostalgia, where favorite memories mix with the tangy burst of citrus that can only mean one thing: summertime. It’s the perfect excuse to indulge in my favorite dessert—lemonade popsicles!
These popsicles remind me of my childhood, when my grandma would whip up a batch of her famous lemonade during the hot days. She would hand us each a frozen treat, our faces lighting up with joy as we savored that first bite. Running around with sticky fingers, we’d giggle and race each other across the lawn, our popsicles slowly melting in the summer heat. The simple joy of homemade lemonade transformed into a popsicle was almost magical—sweet, tart, refreshing, and guaranteed to turn any hot day into a delightful adventure.
Today, I want to share my version of those timeless lemonade popsicles. Not only are they incredibly easy to make, but they’re also a canvas for creativity! You can customize them to your heart’s content or keep them classic. Trust me, once you make your own, you’ll wonder how you ever settled for store-bought.
Get ready to put on your apron, channel your inner kitchen magician, and let’s dive into the world of homemade lemonade popsicles!
Personal Story: Zesty Memories
As a little girl, summer meant one thing: my grandma’s backyard. A sprawling garden filled with vibrant blooms and a treehouse where all our imaginations ran wild. But the best part? It was the promise of her famous lemonade. With her signature sun hat perched atop her head and an apron scribbled with flour stains, she stirred together freshly squeezed lemons, sparkling water, and just the right amount of sweetness.
One day, while she made us a pitcher, I remember sneaking into her kitchen cupboard, hoping to find a secret recipe. What I found was her beloved glass jug, filled with bright yellow lemonade. I was so inspired that I begged her to teach me how to make my own version. She grinned, pulled me into her side, and showed me the ropes. We laughed and squabbled over what made lemonade truly great—more sweetness or extra tartness? It didn’t matter, really. What mattered was the connection we shared, all built around the simple act of making something together.
Years later, those memories still warm my heart and inspire my love for food. Now it’s my turn to recreate that magic and share it with you through these delightful lemonade popsicles!
Ingredients
Let’s gather our ingredients and get ready to whip up these zesty popsicles! Here’s what you need:
-
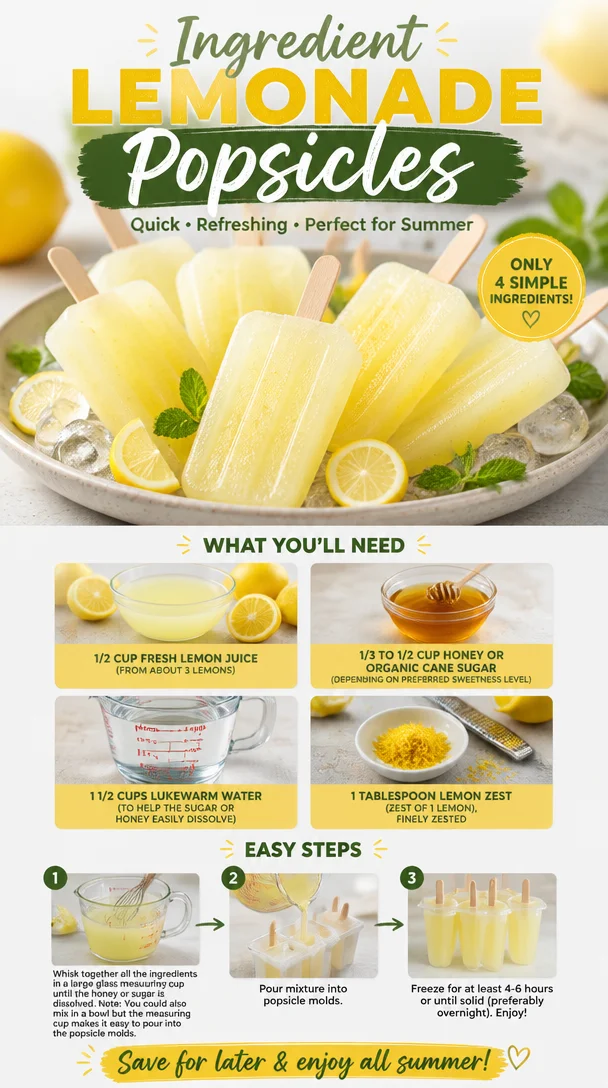
1/2 cup fresh lemon juice (from about 3 lemons)
Freshness is key! Bottled lemon juice won’t have that vibrant flavor we’re after. You can substitute with lime juice for a different twist, or a mix of both for a citrus party. -
1/3 to 1/2 cup honey or organic cane sugar
Depending on your sweetness preference, you can adjust this to taste. Honey adds a lovely floral note, while sugar offers a classic sweetness. If you’re looking for a lower-calorie option, try agave nectar or a sugar substitute like stevia. -
1 1/2 cups lukewarm water
This helps dissolve the sweetener quickly—no one likes granulated sugar stuck at the bottom of the popsicle mold! You can also use sparkling water for a fizzy surprise. -
1 tablespoon lemon zest (zest of 1 lemon, finely zested)
This tiny addition significantly elevates the flavor, making your popsicles taste super fresh. You can swap it for lime or even a hint of orange zest for an exciting citrus blend.
Step-by-Step Instructions
Alright, let’s get cooking! Making these lemonade popsicles is so easy, I promise you’ll want to whip them up all summer long.
Step 1: Juice Those Lemons
Start by washing your fresh lemons. Cut them in half and use a citrus juicer—or your trusty hands— to extract 1/2 cup of lemon juice. Don’t forget to catch any seeds! We want a smooth base for our popsicles. Once you have the juice, set it aside and revel in that zesty aroma.
Step 2: Sweeten it Up
In a medium bowl, combine the lukewarm water and your chosen sweetener (honey or sugar). Use a whisk or spoon to mix until everything is well-combined, and the sweetener is fully dissolved. Chef hack: If using honey, you can warm it slightly for easier mixing.
Step 3: Combine the Ingredients
Now, pour the fresh lemon juice into your sweetened water mixture. Toss in the lemon zest and stir everything together until it blends beautifully. Tip: Taste your mixture here! If you prefer it sweeter, add more honey or sugar, and mix again.
Step 4: Fill Your Molds
Carefully pour the mixture into your popsicle molds. Use a funnel if you have one—this keeps things tidy! If you don’t have molds, you can use small cups and insert popsicle sticks once they begin to freeze. Just leave a little space at the top for expansion.
Step 5: Freeze Time
Cover your molds with their lids or some plastic wrap, making sure the popsicle sticks are in place if you’re using cups. Freeze for at least 4-6 hours, or until completely solid. Chef insight: For a fun twist, toss fresh berries or mint leaves into the molds before freezing for added flavor and eye-catching beauty!
Step 6: Unmold and Enjoy
Once frozen, remove your popsicles from their molds. If they’re stubborn, run the mold under warm water for a few seconds to help loosen them. You’re ready for the best bite of summer!
Serving Suggestions
Plating is just as fun as making! Serve these lemonade popsicles on a colorful wooden board or a chic plate. You can garnish them with fresh mint leaves for a pop of color or serve them alongside a pitcher of extra chilled lemonade for that sunny picnic vibe. Trust me, your friends will be oohing and aahing over this refreshing treat!
Recipe Variations
Now, let’s get creative! Here are a few ways to put your own spin on these popsicles:
-
Berry Lemonade Popsicles: Add fresh or frozen berries like strawberries, blueberries, or raspberries to the mixture for a fruity twist.
-
Herbal Infusion: Infuse your mixture with fresh herbs like basil or mint for a fresh take on traditional lemonade.
-
Creamy Lemonade Popsicles: Mix in a cup of coconut milk or yogurt before freezing for a creamy treat!
-
Sparkling Lemonade Popsicles: Use sparkling water instead of still water for a fizzy surprise.
-
Spicy Lemonade Popsicles: For those who love heat, add a pinch of cayenne pepper or some diced jalapeños to spice things up!
Chef’s Notes
Every time I make these popsicles, I can’t help but think of my grandma’s sunny kitchen and the laughter that filled the air. Although the recipe has evolved, the heart of it remains the same. I remember one time, I accidentally added too much lemon zest, and they turned out super tangy! A little sugar helped balance it out, and voila! A happy accident that turned into a new favorite. So maybe once in a while, let loose in the kitchen, and don’t shy away from those little mishaps—they might turn out to be the best part of your cooking journey.
FAQs and Troubleshooting
Q: How long do the popsicles last in the freezer?
A: These lemonade popsicles can last up to 2 months in the freezer. Just make sure to keep them in an airtight container for optimal freshness!
Q: What if my popsicles are too hard to remove?
A: If they’re stubborn, run warm water over the outside of the mold for a few seconds to help loosen them. Be careful not to let any water seep in!
Q: Can I use bottled lemon juice?
A: While using fresh lemon juice is always best for flavor, you can use bottled juice in a pinch. Just know that the taste may not be as vibrant!
Q: How can I adjust the sweetness?
A: It’s all about your personal taste! Start with the recommended amount and add more if necessary. You can always taste the mixture before freezing to ensure it’s just how you like it.
Q: Can I make these without molds?
A: Absolutely! Use small paper or plastic cups, and insert a popsicle stick after a couple of hours in the freezer when the mixture is slushy.
Nutritional Info
(Insert approximate nutritional info here, depending on the ingredients used, like calorie count or sugar content.)
And there you have it! These homemade lemonade popsicles are not only a smart way to beat the heat but are also a joyful reminder of simpler times. So cheers to sunny days, good company, and delicious flavors—I can’t wait for you to try these popsicles at home. Happy cooking!
PrintHomemade Lemonade Popsicles
Delight in the refreshing zing of homemade lemonade transformed into popsicles—sweet, tart, and perfect for hot summer days.
- Prep Time: 15 minutes
- Cook Time: 0 minutes
- Total Time: 360 minutes
- Yield: 8 popsicles 1x
- Category: Dessert
- Method: Freezing
- Cuisine: American
- Diet: Vegetarian
Ingredients
- 1/2 cup fresh lemon juice (from about 3 lemons)
- 1/3 to 1/2 cup honey or organic cane sugar
- 1 1/2 cups lukewarm water
- 1 tablespoon lemon zest (zest of 1 lemon, finely zested)
Instructions
- Juice those lemons by cutting them in half and using a citrus juicer to extract 1/2 cup of juice.
- Combine lukewarm water and your chosen sweetener in a bowl, mixing until fully dissolved.
- Pour the fresh lemon juice into your sweetened water mixture, add the zest, and stir well.
- Fill your popsicle molds with the mixture, leaving space for expansion.
- Freeze for 4-6 hours or until solid.
- Remove popsicles from molds, running under warm water if needed, and enjoy!
Notes
For a twist, add fresh berries or herbs to the mixture before freezing. Adjust sweetness based on your preference.
Nutrition
- Serving Size: 1 popsicle
- Calories: 100
- Sugar: 17g
- Sodium: 2mg
- Fat: 0g
- Saturated Fat: 0g
- Unsaturated Fat: 0g
- Trans Fat: 0g
- Carbohydrates: 25g
- Fiber: 0g
- Protein: 0g
- Cholesterol: 0mg
Keywords: lemonade, popsicles, summer dessert, homemade treat