A Cozy Embrace: The Art of Homemade Apple Cider
There’s something incredibly soothing about the scent of fresh apple cider simmering on the stove. The aroma wafts through the house like a warm hug, drawing everyone closer and inviting smiles, laughter, and stories. Home is where the heart (and the food!) is, and today, I want to share with you the magic of making homemade apple cider—it’s truly a labor of love that brings people together!
Personal Story: A Sweet Childhood Memory
Growing up, autumn was a canvas painted in warm hues of orange, red, and gold. It meant leaves crunching underfoot and the joyous sound of laughter in the brisk air. One of my favorite fall traditions was the apple-picking trip with my family. We’d spend the day at the orchard, filling our baskets to the brim with juicy, ripe apples. It was an adventure filled with the simple pleasures of life, from climbing ladders to pluck the biggest apples to racing each other back to the car, baskets in tow.
After our apple-picking escapade, we’d return home with our treasure, and my mom would set the kitchen ablaze with the scent of cinnamon and sweet apples. She would grab a bunch of our bounty, chop them up, and throw them into a big pot with some spices and sugar—just like a hug in liquid form. Homemade apple cider became a staple in our household! We’d sip on it as we carved pumpkins and watched our favorite Halloween movies, creating memories that felt timeless. Today, I’m excited to carry on that tradition and share my own twist on this classic recipe with you!
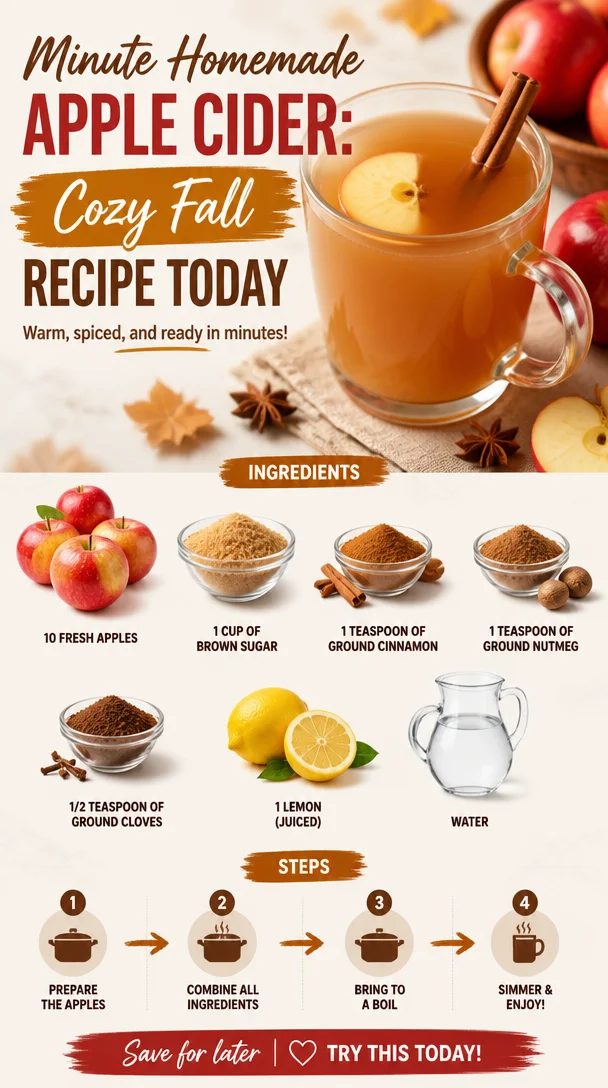
Ingredients
To make your very own homemade apple cider, you’ll need the following ingredients:
- 10 Fresh Apples: Go for a mix of Granny Smith for tartness, Honeycrisp for sweetness, and Gala for a smooth finish. If you’re in a pinch, any variety will do, but the flavor will change slightly!
- 1 Cup Brown Sugar: This adds depth and a touch of caramel flavor. Coconut sugar works as a fantastic substitute if you’re looking for a healthier option.
- 1 Teaspoon Ground Cinnamon: This beloved spice captures the essence of fall. If you want to kick things up a notch, try using cinnamon sticks instead for a more intense flavor.
- 1 Teaspoon Ground Nutmeg: Just a pinch adds warmth and complexity. If you don’t have nutmeg, you can enhance the spice with a bit more cinnamon.
- 1/2 Teaspoon Ground Cloves: Cloves bring a wonderfully aromatic element. Ground allspice can be a good swap if you’re out of cloves.
- 1 Lemon (juiced): The acidity of lemon balances the sweetness. If you can’t find any, a splash of apple cider vinegar can do the trick.
- Water: To help extract all those juicy flavors; use filtered water for the best taste!
Step-by-Step Instructions
Now, let’s turn those fresh apples into a steamy, spiced cider!
-
Prepare Your Apples: Start by rinsing your apples well under cold water. I like to leave the peels on for added flavor and nutrients, but if you want a smoother cider, feel free to peel them. (Chef’s tip: Get the family involved and have a peeling contest!)
-
Cut It Up: Core and cut your apples into quarters. You don’t have to be fancy about it; regular cuts work just fine since everything will be strained later.
-
Get Cooking: Throw your apple quarters into a large pot. Cover them with about 8 cups of water—enough to fully submerge the apples. It’s like giving them a refreshing spa treatment!
-
Sweeten the Deal: Add in your brown sugar, cinnamon, nutmeg, and cloves. Squeeze the lemon juice over the top, and toss everything together gently. This is where the magic begins!
-
Simmer Time: Bring your mixture to a boil over medium-high heat. Once boiling, reduce it to a simmer. Let it simmer away for about 2-3 hours. The apples should start to break down, and your kitchen will begin to smell like heaven. (Chef’s hack: Use a potato masher to mash the apples every 30 minutes to release even more flavor!)
-
Strain the Goodness: After your apples are all soft and mushy, it’s time to strain! Using a fine-mesh sieve or cheesecloth, carefully pour the apple mixture over it into another large pot or a bowl. Use a ladle or spoon to press down on the solids to extract as much liquid as possible. (Pro tip: Save the apple pulp for homemade applesauce or even in baking; it’s nutritious!)
-
Taste and Adjust: Now, give your cider a taste! If you want it sweeter, feel free to add another splash of brown sugar. For a zippier kick, add a bit more lemon juice. Adjust until it’s perfect for your palate!
-
Cool It Down: Let your cider cool a bit before transferring it to a jar or bottle. You can store it in the fridge for up to a week, or freeze it for later use—perfect for cozying up in the winter months!
Serving Suggestions
To serve your delicious homemade cider, heat it gently on the stove or in the microwave until warmed through. Pour it into charming mugs, and consider adding a cinnamon stick for extra flair. For a fun twist, sprinkle some extra cinnamon on top or garnish with thin apple slices. And don’t forget to invite friends over; good things are meant to be shared!
Recipe Variations
Feeling adventurous? Here are some fun variations to try:
- Spiked Apple Cider: Add a splash of bourbon or rum for a cozy adult version—ideal for a fall gathering!
- Cider with Orange: Toss in a couple of orange slices or use orange zest for a citrusy twist.
- Herbal Infusion: Add fresh herbs like rosemary or thyme during cooking for a unique flavor profile.
- Heated Cider Cocktails: Mix your cider with ginger beer for a spiced mocktail that’s bubbly and refreshing.
Chef’s Notes
This recipe has evolved over the years, with each iteration bringing me a step closer to cider perfection. One time, I experimented with adding some star anise and cardamom, which took the flavor to a whole new level—like a dreamy fall party in a mug! There have been batches that went too heavy on the sugar, and some that turned out a bit bland, but each mistake taught me something new. The beauty of cooking is that it allows for exploration, and I encourage you to play with flavors until you find your signature blend!
FAQs and Troubleshooting
Here are some common questions and potential hiccups you might face while making your homemade apple cider:
-
Why is my cider too sweet? If your cider tastes overly sweet, you can dilute it with more water or add a bit of lemon juice to balance it out.
-
What if my apples aren’t juicy enough? Look for firm apples with a little bit of give when you squeeze them. You can also combine different types of apples to get the right balance of sweetness and tartness.
-
Can I use apple juice instead? Definitely! If you’re looking for a shortcut, you can use store-bought apple juice as a base but remember to still add your spices and sugar to enhance the flavor.
-
How do I store leftovers? Let your cider cool and transfer it to an airtight container. It’ll keep in the refrigerator for about a week or can be frozen for future cozy nights in!
Nutritional Info
While I always recommend enjoying food in moderation, here’s a rough idea of what you’re looking at per cup of homemade apple cider (without added sugar):
- Calories: ~100
- Carbohydrates: ~25 g
- Fiber: ~2 g
- Sugars: ~20 g (from apples)
So, there you have it—our journey to crafting delightful homemade apple cider! So grab your kitchen buddy, and make some memories of your own. After all, every cup of cider tells a story of family, laughter, and the warm embrace of fall. Happy cooking!
PrintHomemade Apple Cider
Warm and comforting homemade apple cider, perfect for sharing with family and friends during the fall season.
- Prep Time: 15 minutes
- Cook Time: 180 minutes
- Total Time: 195 minutes
- Yield: 8 servings 1x
- Category: Beverage
- Method: Simmering
- Cuisine: American
- Diet: Vegetarian
Ingredients
- 10 Fresh Apples
- 1 Cup Brown Sugar
- 1 Teaspoon Ground Cinnamon
- 1 Teaspoon Ground Nutmeg
- 1/2 Teaspoon Ground Cloves
- 1 Lemon (juiced)
- Water
Instructions
- Prepare Your Apples: Start by rinsing your apples well under cold water.
- Cut It Up: Core and cut your apples into quarters.
- Get Cooking: Throw your apple quarters into a large pot and cover them with about 8 cups of water.
- Sweeten the Deal: Add in your brown sugar, cinnamon, nutmeg, and cloves.
- Simmer Time: Bring your mixture to a boil, then reduce it to a simmer for about 2-3 hours.
- Strain the Goodness: After simmering, strain the mixture using a fine-mesh sieve or cheesecloth.
- Taste and Adjust: Give your cider a taste and add more sugar or lemon juice as needed.
- Cool It Down: Let your cider cool before transferring it to a jar or bottle.
Notes
For variations, try spiking it with bourbon, adding orange slices, or infusing fresh herbs.
Nutrition
- Serving Size: 1 cup
- Calories: 100
- Sugar: 20g
- Sodium: 5mg
- Fat: 0g
- Saturated Fat: 0g
- Unsaturated Fat: 0g
- Trans Fat: 0g
- Carbohydrates: 25g
- Fiber: 2g
- Protein: 0g
- Cholesterol: 0mg
Keywords: apple cider, fall recipes, homemade drinks