Sweet Memories: The Joy of Homemade Fruit Tart
Welcome to Basil Board, my favorite corner of the internet where we celebrate delectable homemade delights! Today, we’re diving into a recipe that brings a sprinkle of joy to any gathering: the Homemade Fruit Tart. Trust me, this is one dessert that’s sure to evoke delight, nostalgia, and a little magic on even the busiest weeknights.
Fruit tarts are a culinary love letter to the changing seasons, vibrant colors, and the sweet fresh flavors bursting forth from every bite. Just imagining the buttery crust cradling a silky vanilla pastry cream, garnished with an array of succulent fruits, makes my heart flutter. Making a fruit tart is much like painting a canvas; every fruit slice you add creates a masterpiece that’s almost too beautiful to eat. But don’t be fooled by appearances — it’s simpler than you might think!
So, grab your apron, roll up your sleeves, and let’s create something that’s not just food, but a delightful moment to share.
A Dish Whipped Up with Love
There’s something special about fruit tarts that takes me back to my childhood. I remember my grandmother’s kitchen, bustling with energy and the intoxicating aroma of freshly baked treats. One sunny afternoon, I watched her whip up her famous fruit tart. She lovingly formed the crust, spreading the pastry cream like it was frosting a cake. I was her little helper, armed with a small plate of sliced strawberries, blueberries, and kiwi. I remember how we giggled as we arranged the fruits, making sure to keep everything balanced and beautiful.
“Food is not just about taste, darling. It’s about love and connection,” she said with a smile as we carefully placed down each berry like treasures from a magical garden. Those moments spent together feel like pure gold, shimmering with joy. And with every bite of fruit tart, I get transported back to those laughter-filled afternoons when cooking felt like the most wonderful adventure.
Ingredients You’ll Need
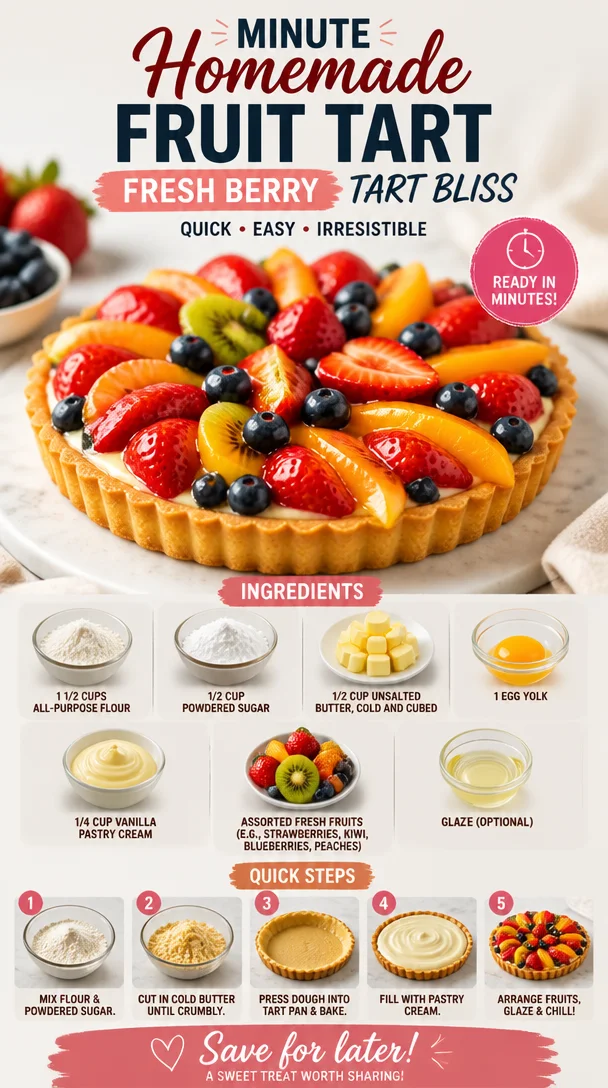
Here’s what goes into our delicious fruit tart, along with some handy tips to help you along the way!
-
1 1/2 cups all-purpose flour
- This is the foundation of our tart crust! If you need a gluten-free option, feel free to swap it out for a gluten-free flour blend. Just be sure to check for our ratios!
-
1/2 cup powdered sugar
- This adds a touch of sweetness to the crust. Using powdered sugar ensures a soft texture. If you don’t have it on hand, granulated sugar will work in a pinch — just give it a quick whirl in the blender for a bit to create a finer version.
-
1/2 cup unsalted butter, cold and cubed
- Cold butter helps create that perfect flaky crust. If you’re vegan or dairy-free, try a plant-based butter alternative that’s designed for baking.
-
1 egg yolk
- This enriches the dough and binds everything together. For an egg-free version, you can use 1 tablespoon of unsweetened applesauce as a substitute.
-
1/4 cup vanilla pastry cream
- This is the secret that gives the tart its dreamy filling. You can use store-bought or make your own for that extra touch of homemade charm.
-
Assorted fresh fruits (e.g., strawberries, kiwi, blueberries, peaches)
- Choose whatever fruits are in season or your personal favorites. The more colorful, the better! If you’re feeling adventurous, mix in some tropical fruits like mango or passionfruit for an exciting twist!
-
Glaze (optional)
- A simple fruit glaze (made from warming fruit preserves or jelly) gives a beautiful shine to your tart. It’s entirely optional, but these little finishing touches make a big impact!
Step-by-Step Instructions
Let’s get cooking! Follow these simple steps to create a stunning fruit tart that will wow your friends and family:
-
Prepare the Tart Crust
In a mixing bowl, combine the flour and powdered sugar. Add in the cold, cubed butter and, using a pastry cutter or your fingers, mix until the mixture resembles coarse crumbs. Chef Tip: Keep the butter cold for that flaky texture! If your kitchen is warm, feel free to chill the mixture in the fridge for 10 minutes before moving to the next step. -
Add the Egg Yolk
Incorporate the egg yolk into the mixture, mixing until everything just comes together into a dough. Avoid overmixing; we want it tender! Gather the dough into a ball, flatten it into a disk, wrap it in plastic, and chill it in the refrigerator for at least 30 minutes. This rest time helps the gluten relax for the perfect bake! -
Roll Out the Dough
Once chilled, generously flour your working surface and roll out your dough to about 1/8 inch thick. Gently place it into a 9-inch tart pan, pressing it into the edges. Cut off any excess dough that hangs over the sides. Little Hint: Don’t worry about it being perfect; a rustic look adds charm! -
Blind Bake the Crust
Preheat your oven to 375°F (190°C). Cover the crust with parchment paper, fill it with pie weights or dried beans, and bake for 15 minutes. Then, carefully remove the weights and parchment and bake for another 10-15 minutes until lightly golden. Let it cool completely before adding the filling. -
Prepare the Vanilla Pastry Cream
While the crust is cooling, prepare your vanilla pastry cream (or use store-bought). If you’re making your own, whisk together the egg yolks, sugar, and milk in a saucepan, cooking over medium heat until it thickens. Stir in vanilla extract at the end for that lovely aroma. Once thickened, allow it to cool down a bit before spreading. -
Assembly Time
Spread the vanilla pastry cream evenly across the cooled tart crust, smoothing it with a spatula. Now comes the fun part — decorating! Artfully arrange your assorted fruits on top, aiming for a vibrant and colorful display. -
Optional Glaze
If you’re using a glaze, brush it gently over the fruit with a pastry brush. This step brings a lovely shine to your tart, giving it that professional finish!
And just like that, your fruit tart is complete!
Serving Suggestions
To serve it up beautifully, cut the tart into wedges and place them on dessert plates. You might sprinkle some mint leaves for a pop of color and fresh aroma. A dollop of whipped cream on the side wouldn’t hurt either!
Recipe Variations
Love to mix things up? Here are some creative twists for your tart:
- Chocolate Lovers: Drizzle melted dark chocolate over the fruit for an indulgent surprise.
- Coconut Twist: Incorporate shredded coconut in the pastry cream for a tropical flavor.
- Savory Option: Swap fruits for slices of roasted veggies like zucchini and tomatoes for a savory tart!
- Nutty Crust: Add ground almonds to your crust for added flavor and texture.
- Citrusy Burst: Mix lemon or lime zest into the pastry cream for a refreshing tartness.
Chef’s Notes
This recipe has evolved over time, just like my cooking style. I remember the early days when my tarts would come out less than perfect — but you know what? They still tasted fantastic! Cooking is all about learning, experimenting, and most importantly, enjoying the process. Since then, I’ve had so much fun tweaking different elements — from the crust’s texture to swapping fruits based on the season. Each tart carries a little part of my kitchen journey, weaving stories into every bite.
FAQs and Troubleshooting
1. My tart crust shrank while baking! What happened?
Avoid overworking the dough, and make sure to chill it well before baking. Additionally, letting it rest in the tart pan can help prevent shrinkage.
2. How do I prevent my fruit from turning brown?
Tossing sliced fruits, especially apples and bananas, in a little lemon juice can help keep them fresh and vibrant.
3. What if my pastry cream is too thick?
If your cream turns out too thick, whisk in a little milk until it reaches your desired consistency. It should be smooth and spreadable!
4. Can I make this tart the night before?
Absolutely! Just assemble it up to the glaze and refrigerate, adding the fruits just before serving for optimal freshness.
Nutritional Info
While every bite of this fruit tart is heavenly, moderation is key! Each slice can range around 250-300 calories, depending on the fruit and any additional toppings you use. Just remember, you’re nourishing your body with delicious, wholesome ingredients!
So there you have it! Your homemade fruit tart is ready to dazzle your taste buds and create lasting memories at your table. Cooking together brings us closer, so let’s make it a tradition to share delicious moments with those we love. Happy baking! 🍓🥝🍑
PrintHomemade Fruit Tart

A delightful homemade fruit tart featuring a buttery crust, silky vanilla pastry cream, and a vibrant array of fresh fruits.
- Prep Time: 15 minutes
- Cook Time: 30 minutes
- Total Time: 45 minutes
- Yield: 8 servings 1x
- Category: Dessert
- Method: Baking
- Cuisine: French
- Diet: Vegetarian
Ingredients
- 1 1/2 cups all-purpose flour
- 1/2 cup powdered sugar
- 1/2 cup unsalted butter, cold and cubed
- 1 egg yolk
- 1/4 cup vanilla pastry cream
- Assorted fresh fruits (e.g., strawberries, kiwi, blueberries, peaches)
- Glaze (optional)
Instructions
- Prepare the Tart Crust: In a mixing bowl, combine the flour and powdered sugar. Add in the cold, cubed butter and, using a pastry cutter or your fingers, mix until the mixture resembles coarse crumbs. Keep the butter cold for that flaky texture! Chill for 10 minutes if your kitchen is warm.
- Add the Egg Yolk: Incorporate the egg yolk into the mixture, mixing until everything just comes together into a dough. Gather the dough into a ball, wrap in plastic, and chill in the refrigerator for at least 30 minutes.
- Roll Out the Dough: Once chilled, flour your working surface and roll out your dough to about 1/8 inch thick. Place it into a 9-inch tart pan and cut off any excess dough.
- Blind Bake the Crust: Preheat your oven to 375°F (190°C). Cover the crust with parchment paper, fill it with pie weights or dried beans, and bake for 15 minutes. Remove weights and parchment, then bake for another 10-15 minutes until lightly golden. Let it cool completely.
- Prepare the Vanilla Pastry Cream: Whisk together egg yolks, sugar, and milk in a saucepan over medium heat until it thickens. Stir in vanilla extract and allow it to cool.
- Spread the vanilla pastry cream evenly across the cooled tart crust. Arrange your assorted fruits on top for a colorful display.
- Brush the optional glaze gently over the fruit for a shiny finish.
Notes
This tart can be made the night before; just add the fruits before serving for optimal freshness. Feel free to experiment with different fruits and flavors!
Nutrition
- Serving Size: 1 slice
- Calories: 275
- Sugar: 15g
- Sodium: 100mg
- Fat: 14g
- Saturated Fat: 8g
- Unsaturated Fat: 6g
- Trans Fat: 0g
- Carbohydrates: 32g
- Fiber: 2g
- Protein: 3g
- Cholesterol: 40mg
Keywords: fruit tart, dessert, homemade, baking, pastry, summer recipes