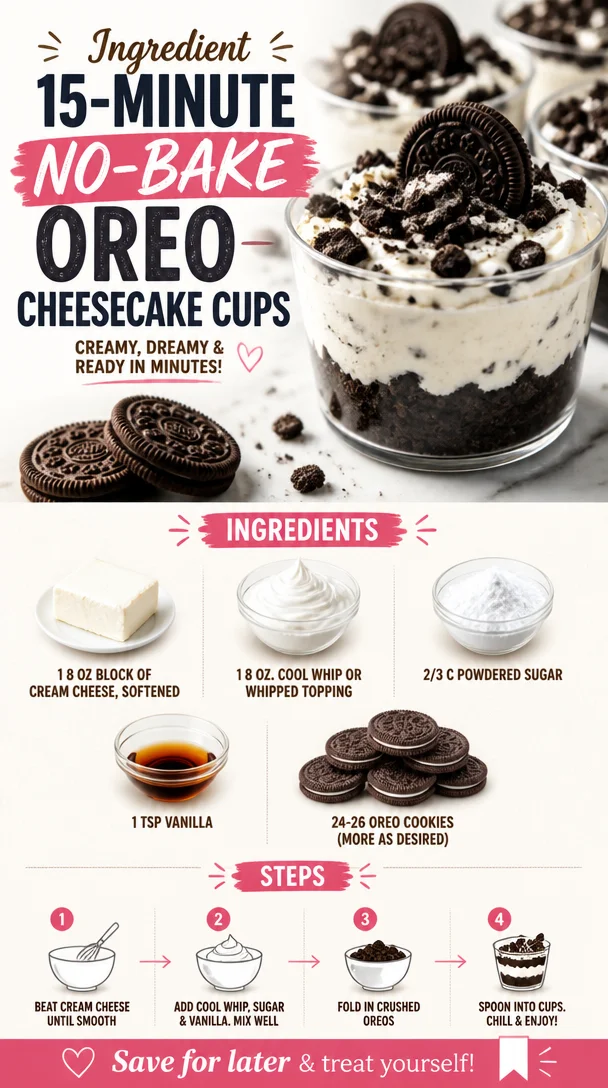
Irresistible Oreo No-Bake Cheesecake Cups: A Sweet Taste of Nostalgia
Hey there, fellow food lovers! Today, I’m excited to share a delectable dessert that’s not only a crowd-pleaser but also packs a punch of nostalgia! We’re diving into the wonderfully creamy, dreamy world of Oreo No-Bake Cheesecake Cups. It’s the kind of treat that transports you back to simpler times, where Saturday afternoons were filled with laughter, friends, and of course, delicious desserts.
Now, who could resist the rich flavors of creamy cheesecake layered with crunchy, chocolatey Oreo bits? These cups are perfect for any occasion—celebrating a special day or simply indulging in a well-deserved treat at the end of a long week. Plus, the no-bake aspect means you can whip them up quickly, without turning on the oven or making a mess. Let’s jump right in!
A Slice of My Childhood
I’ll never forget the first time I indulged in a creamy cheesecake. I was at my best friend’s birthday party, and her mom had made this magnificent classic cheesecake topped with a glossy layer of chocolate ganache. As we all gathered around a beautifully decorated dessert table, I remember feeling my heart do a little dance when I tasted that first creamy bite. Fast forward years later, and the love for cheesecake has only grown.
When I started experimenting in the kitchen, I thought, “Why not create an easy, delightful no-bake version?” That was the birth of these Oreo No-Bake Cheesecake Cups. They remind me of those joyful birthday parties, filled with sweet surprises, laughter, and, of course, sugar rushes that made us run around like crazy. So, grab a spoon and let’s create that bliss!
What You’ll Need
Ingredients:
-
1 8 oz block of cream cheese, softened
Chef Insight: Ensure the cream cheese is at room temperature for easy mixing. If you forget, you can quickly soften it in the microwave for about 15-20 seconds—just don’t melt it! -
1 8 oz Cool Whip or whipped topping
Substitution Tip: If you prefer a homemade touch, feel free to whip heavy cream (about 1 cup) with a tablespoon of powdered sugar until soft peaks form. -
2/3 cup powdered sugar
Quick Note: This sweetener helps to balance the tanginess of the cream cheese. -
1 tsp vanilla
Flavor Boost: You can substitute this with almond extract for a unique twist! -
24-26 Oreo cookies (plus more for garnishing)
Extra Tip: Go ahead and use any variety of Oreos to mix it up—double stuff, mint, or even seasonal flavors!
Step-by-Step Instructions
-
Mix the Cream Cheese and Sugar:
In a large mixing bowl, combine your softened cream cheese and powdered sugar. Using an electric mixer, beat them together until smooth and fluffy, about 2-3 minutes. Tip: Start on a low speed to avoid a sugar explosion! -
Incorporate the Vanilla:
Add the vanilla extract to the fluffy cream cheese mixture. Blend again briefly until it’s fully combined. Chef Hack: Smell that vanilla? It’s pure magic in a bottle! -
Fold in the Cool Whip:
Gently fold the Cool Whip into the cream cheese mixture. Use a spatula to carefully combine them without deflating the whipped cream. Keep that light texture! Tip: You want it to be well-mixed but fluffy, like a sweet cloud. -
Crush the Oreos:
Place 18 Oreo cookies in a resealable plastic bag and crush them into fine pieces using a rolling pin. It’s a great way to relieve some stress, too! Kitchen Tip: You can also pulse them in a food processor for an even finer crumb. -
Mix in the Crushed Oreos:
Add the crushed Oreos to the cream cheese mixture and gently fold them in. The bits of cookies will give you that delightful crunch in every bite. -
Prepare the Serving Cups:
Grab your favorite cups, jars, or bowls (clear jars show off those beautiful layers!). Spoon in a layer of the cheesecake mixture, followed by a layer of remaining crushed Oreos, and then repeat until you reach the top. Tip: Use a piping bag for cleaner layers—just cut a small hole and pipe it in! -
Chill:
Cover your cheesecake cups and place them in the refrigerator for at least 2 hours, but ideally overnight. This helps them set perfectly, making it easy to scoop through the layers. -
Final Touch:
Just before serving, garnish with additional Oreo pieces or a dollop of whipped cream. Fun Fact: You can even drizzle some chocolate syrup for an extra indulgent touch!
Serving Suggestions
When it comes to plating, simplicity is key! Serve these adorable Oreo No-Bake Cheesecake Cups in clear glasses to showcase those beautiful layers. Add a little sprig of mint on top for a pop of color, and don’t forget those extra Oreo crumbles for a charming finishing touch. These cups are as delightful to look at as they are to eat!
Recipe Variations
Feeling adventurous? Here are some fun twists to elevate your Oreo No-Bake Cheesecake Cups:
- Peanut Butter Lover’s Delight: Swirl in some creamy peanut butter into the cheesecake mixture for a nutty flavor boost.
- Minty Fresh: Use Mint Oreos for a refreshing mint flavor twist. A splash of mint extract can take it even further!
- Chocolate Cookies: Try making chocolate cookie crusts using crushed cookies at the bottom for an extra crunch.
- Fruit Toppings: Top your cups with fresh berries or banana slices for a fruity contrast to the rich cheesecake.
- Dairy-Free Version: Substitute cream cheese with vegan cream cheese and Cool Whip with coconut whipped cream for a delicious dairy-free option!
Chef’s Notes
Let’s be real, cooking in the kitchen isn’t always perfect, and sometimes things can go hilariously wrong. I recall one time that I forgot about the Oreos while crushing them—let’s just say I had a cookie explosion! The walls, counters, and floor were speckled with little black bits of heaven. But hey, that’s the fun of it! Each recipe evolves through mishaps and lessons learned. These Oreo No-Bake Cheesecake Cups are a testament to finding joy in that journey.
FAQs and Troubleshooting
1. My cheesecake mixture is too runny. What do I do?
If your mixture is a bit runny, it might be because the cream cheese wasn’t completely softened or blended well. Make sure to blend until fully smooth. If it’s already too mixed, try adding more powdered sugar or crushed cookies to thicken it up.
2. Can I make these ahead of time?
Absolutely! These cheesecake cups keep well in the fridge for 3-4 days. Just add the toppings right before serving to keep everything fresh.
3. What if I can’t find Oreo cookies?
No problem! Any similar sandwich cookie will work. Just adjust the amount of sugar if your cookie is sweeter or less sweet than Oreos.
4. How do I store leftovers?
Keep them covered in an airtight container in the refrigerator. If you’ve topped them with anything perishable like cream or fruit, consume them within 2-3 days.
Nutritional Info (optional)
While I don’t typically count calories in my kitchen, knowing some nutrition facts can help balance your servings. Each Oreo No-Bake Cheesecake Cup is approximately 250 calories, depending on serving size and additional toppings.
I hope you enjoy making these delicious Oreo No-Bake Cheesecake Cups as much as I have! They’re a reminder of the little joys in life—food, friends, and fantastic memories. So, get in that kitchen, bring out those ingredients, and let’s whip up something delightful together. Happy cooking, and don’t forget to savor each bite!
PrintOreo No-Bake Cheesecake Cups
A creamy and dreamy no-bake dessert featuring rich cheesecake layers and crunchy Oreo bits, perfect for any occasion.
- Prep Time: 15 minutes
- Cook Time: 0 minutes
- Total Time: 120 minutes
- Yield: 4 servings 1x
- Category: Dessert
- Method: No-Bake
- Cuisine: American
- Diet: Vegetarian
Ingredients
- 1 8 oz block of cream cheese, softened
- 1 8 oz Cool Whip or whipped topping
- 2/3 cup powdered sugar
- 1 tsp vanilla extract
- 24–26 Oreo cookies (plus more for garnishing)
Instructions
- Mix the cream cheese and powdered sugar until smooth and fluffy.
- Incorporate the vanilla extract into the mixture and blend briefly.
- Fold in the Cool Whip gently to maintain fluffiness.
- Crush the Oreo cookies in a resealable bag or food processor.
- Mix the crushed Oreos into the cream cheese mixture.
- Prepare serving cups by layering cheesecake mixture and remaining crushed Oreos.
- Chill in the refrigerator for at least 2 hours or overnight.
- Garnish with additional Oreo pieces or whipped cream before serving.
Notes
Feel free to customize with different Oreo flavors or toppings like fresh berries or chocolate syrup.
Nutrition
- Serving Size: 1 serving
- Calories: 250
- Sugar: 23g
- Sodium: 200mg
- Fat: 14g
- Saturated Fat: 8g
- Unsaturated Fat: 4g
- Trans Fat: 0g
- Carbohydrates: 30g
- Fiber: 1g
- Protein: 3g
- Cholesterol: 25mg
Keywords: Oreo cheesecake, no-bake dessert, Oreo cups, creamy cheesecake, easy dessert