Cookies & Cream Dessert Cups: A Sweet Treat to Share
Hey there, fellow food lovers! If you’re anything like me, there’s a soft spot in your heart (and stomach) for a delicious dessert that comes together with minimal fuss. Today, I’m thrilled to share a recipe for Cookies & Cream Dessert Cups — a whimsical treat that is sure to impress family and friends but is super approachable for us home cooks. Whether it’s a casual gathering, a birthday bash, or a random Tuesday night craving, these dessert cups are show-stoppers that don’t require expert baking skills.
But first, let me tell you a little story about my first encounter with cookies and cream. It was a warm summer evening, and I had gathered with friends for a backyard barbecue. As the sun dipped below the horizon, someone pulled out a tub of cookies and cream ice cream. Let me tell you, it was a magical moment! We piled the ice cream into bowls and topped it with crumbled cookies, complete with chocolate syrup drizzled on top. Every spoonful was bliss, laughter filled the air, and we shared stories under the twinkling stars. That night solidified my love for cookies and cream, and inspired me to create this simple yet delectable dessert cup that echoes all the joy of that moment, but with a bit of a twist.
The Ingredients: What You’ll Need
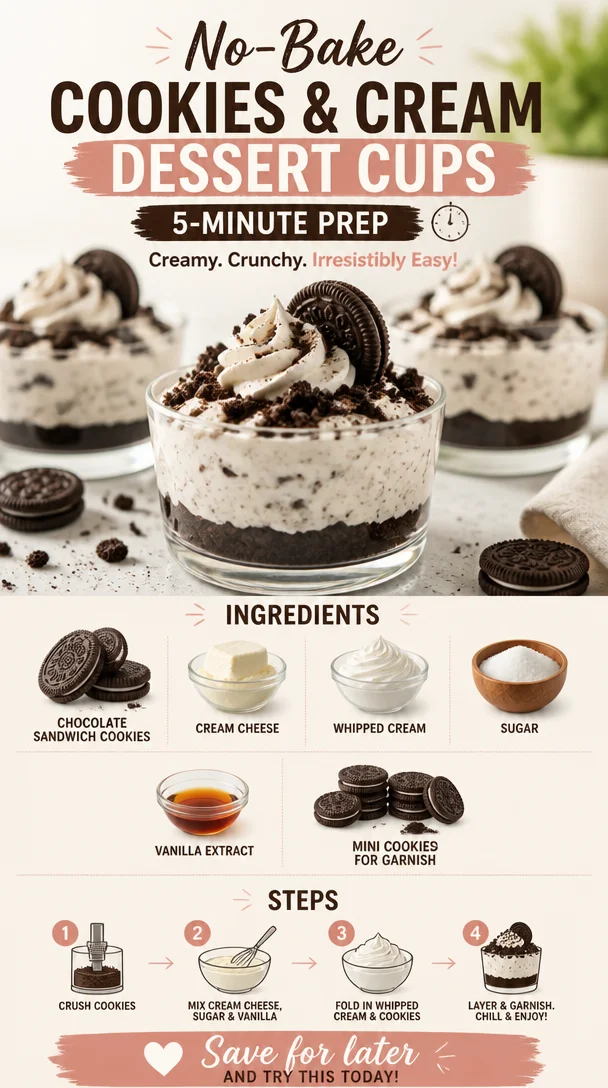
Here’s what you need to whip up these delightful dessert cups:
-
Chocolate sandwich cookies: The classic base of this dessert. You can use any brand you like — Oreos are a fan-favorite! Substitute with gluten-free cookies if needed.
-
Cream cheese: This gives the dessert a rich, creamy texture. If you’re looking for a lighter version, use low-fat cream cheese or even Greek yogurt for tanginess.
-
Whipped cream: The fluffy goodness that takes this treat to the next level! For a shortcut, store-bought whipped cream works just fine — or you can whip up your own. Use coconut cream if you’re dairy-free.
-
Sugar: A little sweetness to balance the tang of cream cheese. Feel free to reduce the sugar or replace it with a sugar substitute like agave or stevia.
-
Vanilla extract: This adds depth and flavor. Always opt for pure vanilla extract over imitation for the best taste.
-
Mini cookies for garnish: A cute topping that’s not just for looks! You can use the same chocolate cookies as the base or try something different like white chocolate-covered pretzels for a unique twist.
Step-by-Step Instructions: Let’s Get Cooking!
Ready to get started? Follow these simple steps, and you’ll have your cookies and cream dessert cups ready in no time!
-
Prepare the Base: Begin by finely crushing the chocolate sandwich cookies. You can throw them in a food processor or place them in a zip-lock bag and use a rolling pin to smash them up. Aim for a crumb-like consistency — some larger chunks are okay for texture! You’ll need about 1 to 1.5 cups of the crushed cookies. Chef Tip: Reserve some larger chunks for layering the dessert to make it visually appealing!
-
Make the Cream Mixture: In a large mixing bowl, combine 8 oz of softened cream cheese and 1/2 cup of sugar. Using a hand mixer or whisk, beat until smooth and creamy. This step will also make the cream cheese easier to blend. Chef Hack: For a fun twist, try adding a spoonful of Nutella or peanut butter!
-
Fold in the Whipped Cream: Next, gently fold in 1 cup of whipped cream to the cream cheese mixture. This makes the filling light and airy. Be careful not to over-mix — you want to keep that fluffiness! Pro Tip: If you prefer a richer flavor, consider adding a tablespoon of cocoa powder to the whipped cream before folding it in.
-
Assemble the Cups: Now it’s time for the fun part! Grab your serving cups (little mason jars or dessert wine glasses work great!) and start layering. Begin with a spoonful of the crushed cookies, followed by a layer of the cream mixture, and repeat until you reach the top. End with a layer of cookies for the ultimate crunch! Chef’s Note: If you’re feeling fancy, drizzle some chocolate sauce between the layers for a splash of elegance.
-
Chill: Once assembled, cover the dessert cups with plastic wrap and refrigerate them for at least 30 minutes. This allows the flavors to meld together and gives it that perfect creamy texture. Plus, it makes for a fabulous make-ahead dessert option!
Serving Suggestions: Presentation Matters
When it comes to serving, don’t be shy! These dessert cups can be garnished in so many fun ways. You can top them with a dollop of whipped cream, a sprinkle of crushed cookies, or even a whole mini cookie perched on top as a cute decoration. Serve them on a colorful platter or individual wooden boards for that rustic vibe. The beautiful layers will be a dessert table highlight, and your guests will be impressed!
Recipe Variations: Get Creative!
Looking to switch things up? Here are a few fun variations you can try:
-
Mint Cookies & Cream: Substitute your regular cookies with mint chocolate cookies for a refreshing twist!
-
Fruit Twist: Layer in some crushed strawberries or raspberries between the cream layers for a fruity surprise.
-
Nutty Delight: Add crushed nuts like almonds or hazelnuts to the layers for extra crunch and flavor.
-
No-Bake Cheesecake Version: Add a splash of lemon juice to the cream mixture for a cheesecake-inspired flavor.
-
Vegan Option: Replace cream cheese with a vegan cream cheese alternative and use coconut whipped cream for a plant-based dessert.
Chef’s Notes: A Little Extra Love
I have to admit, this recipe has evolved over the years. It all started as a simple ice cream dessert for family gatherings, and as I learned more about flavors and textures, it transformed into this vibrant cup of happiness. I can’t help but smile when I see kids’ faces light up as they dig into their dessert. It reminds me of warmth and laughter, just like that backyard barbecue many summer nights ago. Every time I make this recipe, I try to add something new or a little extra fun, and it’s always a hit!
FAQs and Troubleshooting
-
What if my cream cheese isn’t soft enough?
If your cream cheese is too firm, simply cube it and microwave it for about 10 seconds. Just be careful not to melt it! -
Can I make these in advance?
Absolutely! You can prepare these dessert cups a day in advance and refrigerate them. Just add any toppings just before serving to keep them fresh. -
How can I prevent the cookies from becoming soggy?
Keep the layers separate until you’re ready to eat! Layer the cookies right before serving, and they’ll stay crunchy. -
Can I use different flavored cookies?
Yes, you can! Experiment with different flavored sandwich cookies like vanilla, peanut butter, or even birthday cake flavors for fun variations.
Nutritional Info
Enjoying life through food doesn’t have to come with guilt! While I don’t have specific nutritional information for this recipe, if you swap in lower-fat options (like cream cheese and whipped cream), it can make this dessert a smidge healthier. Just remember, balance is key, so indulge in moderation!
So there you have it, my friends! A nostalgic dessert with endless possibilities that will bring a smile to your face and joy to your gathering. I hope you give these Cookies & Cream Dessert Cups a try and make them your own. Can’t wait to hear how yours turn out! Grab your apron, turn up those playlists, and let’s get cooking! Happy dessert making!
PrintCookies & Cream Dessert Cups
A whimsical treat that brings together the classic flavors of cookies and cream in delightful dessert cups perfect for any occasion.
- Prep Time: 15 minutes
- Cook Time: 30 minutes
- Total Time: 45 minutes
- Yield: 4 servings 1x
- Category: Dessert
- Method: No-Bake
- Cuisine: American
- Diet: Vegetarian
Ingredients
- 1 to 1.5 cups chocolate sandwich cookies, crushed
- 8 oz cream cheese, softened
- 1/2 cup sugar
- 1 cup whipped cream
- 1 tsp vanilla extract
- Mini cookies for garnish
Instructions
- Prepare the base by finely crushing the chocolate sandwich cookies.
- Make the cream mixture by combining cream cheese and sugar until smooth.
- Fold in the whipped cream until well combined.
- Assemble the cups by layering the crushed cookies and cream mixture in serving cups.
- Chill for at least 30 minutes to meld the flavors.
Notes
Garnish with whipped cream or a mini cookie for presentation. Can be made a day in advance.
Nutrition
- Serving Size: 1 cup
- Calories: 400
- Sugar: 20g
- Sodium: 300mg
- Fat: 25g
- Saturated Fat: 10g
- Unsaturated Fat: 10g
- Trans Fat: 0g
- Carbohydrates: 45g
- Fiber: 2g
- Protein: 5g
- Cholesterol: 30mg
Keywords: dessert, cookies and cream, no-bake