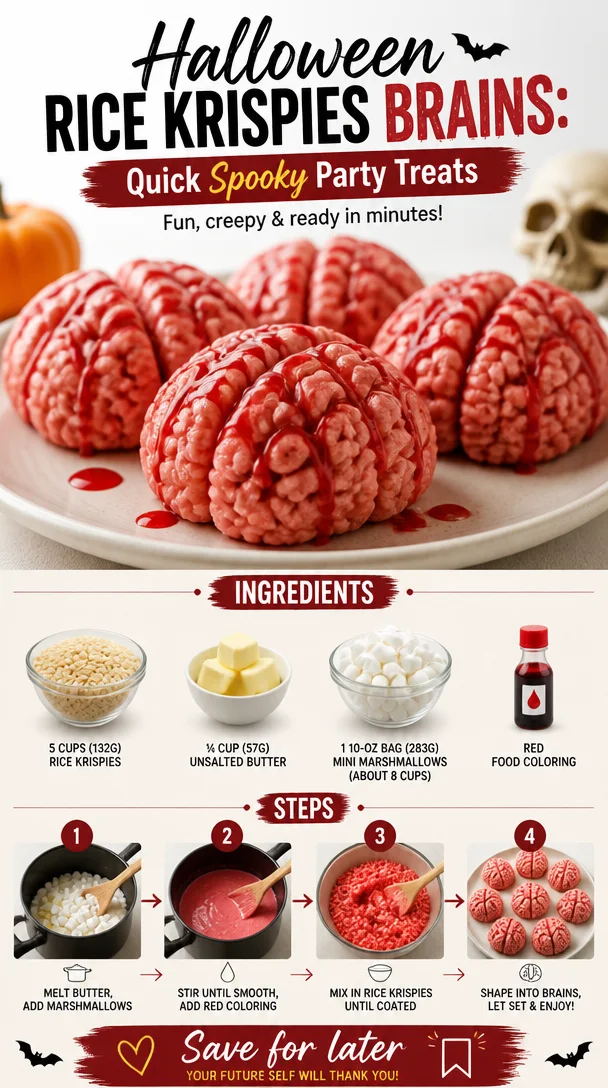
Creepy-Cool Rice Krispies Brains: A Fun Twist on a Classic Treat
Halloween is creeping up faster than you can say "trick or treat!" If you’re like me, you’re already dreaming up all sorts of spooky delights to share with friends and family. This year, I’m all about turning a well-loved classic dessert into something delightfully ghoulish: enter the Rice Krispies Brains! These treats are not only oozing with nostalgia but also offer a fun, interactive cooking experience that kids and adults alike will adore. They’re easy to make, packed with sweetness, and just the right amount of creepy to get you in the Halloween spirit.
I can still remember the first time I experimented with making themed Rice Krispies Treats. I was at a Halloween party, and my friend had whipped up a batch of "witches’ hats" using chocolate cones and candy. I was inspired to add my twist and make brain-shaped treats that looked shockingly realistic (while being oh-so-delicious, of course!). With minimal fuss, we created gooey, marshmallowy goodness. The best part? Watching everyone’s eyes widen as they took their first bites, thrilled by the combination of tasty nostalgia and Halloween flair!
Ready to get your spooky bake on? Let’s dive into the particulars of making these Rice Krispies Brains—this could be the highlight of your Halloween spread!
Personal Story: A Spook-tacular Memory
Growing up, Halloween was always a time of magic in our household. My mom would spend hours in the kitchen with my siblings and me, crafting delicious treats and terrifying decorations. One year, we decided to host a haunted house party in our garage. I remember sticking my hands into bowls filled with “eyeballs”—grapes—and “brains”—a bowl of spaghetti. It looked gross, but it was all in good fun! That night, while we munched on crunchy popcorn balls and buttery pumpkin seeds, I realized that the best part of Halloween wasn’t just the treats; it was the memories we created. That’s what I want you to experience with these Rice Krispies Brains—a little bit of kitchen magic and a whole lot of fun!
Ingredients
Let’s talk ingredients. Here’s what you’ll need, plus some handy tips and tricks!
-
5 cups (132g) Rice Krispies (or any kind of crispy rice cereal)
These crispy little gems are the foundation of our treats! Feel free to use any similar cereal like crispy corn flakes for a twist. -
¼ cup (57g) unsalted butter
Butter is the secret to that rich flavor and perfect texture. If you’re looking for a lighter option, you could try using coconut oil, though it will impart a slight coconut flavor. -
1 10-oz bag (283g) mini marshmallows (about 8 cups)
Mini marshmallows melt beautifully and are perfect for creating that gooeyness we crave. You can also use regular-sized marshmallows; just note that they might take a little longer to melt. -
Red food coloring
The star of our spooky show! You’ll want this to transform your mixture into a brain-like hue. You can swap it with natural food coloring made from beet juice if you’re looking for a more organic option. -
Butter and extra for greasing your hands (optional)
Just a little extra to grease up those hands when forming the brains—trust me, it makes cleanup a breeze!
Step-by-Step Instructions
Now, let’s get to the fun part: making those creepy Rice Krispies Brains! Follow these steps, and you’ll be a Halloween hero in no time.
-
Prepare a Baking Tray
Start by lining a baking tray with parchment paper. Get that ready, as we want a clean surface for our cooling treats. If you want to make it even more fun, lightly spray the parchment with cooking spray or grease it with a bit of butter—this helps them pop right off! -
Melt the Butter
In a large saucepan over low heat, melt the unsalted butter until it’s completely liquid. Stir it occasionally to prevent it from browning. Butter gives these treats a soft texture that makes them irresistible, so take your time here. -
Add the Marshmallows
Once the butter is completely melted, shake in the mini marshmallows and stir until they’re gloriously gooey and melted. This step is all about patience—keep the heat low and stir until you have a delightful marshmallow mixture. It’s okay if it looks a bit chunky; we’ll make it smooth in the next step. -
Incorporate the Rice Krispies
Remove the pan from the heat, and add in the Rice Krispies. Fold them into the marshmallow mixture gently but thoroughly, ensuring each crispy piece gets well-coated. Pro tip: Using a spatula works wonders, but I sometimes choose to get in there with my hands (covered in grease, of course) for the best integration! -
Add the Food Coloring
Here’s where the magic happens! Add several drops of red food coloring to your mixture. Stir it in until you achieve that brain-like shade of pinky-red. Don’t be shy—if you want a spookier look, mix in a bit more for deeper color! -
Shape the Brains
Now the fun begins! Grease your hands, and take a handful of the mixture. Squeeze and form it into a brain shape—don’t worry about perfection; slight irregularities just add to the "creepy" charm! Aim for a round base and then add some twists and bumps to mimic the brain’s ridges. -
Cool down
Place your shaped brains onto the prepared baking tray and let them cool for about 30 minutes. This will allow them to firm up beautifully and maintain their shape. The anticipation while waiting is half the fun! -
Serve with Style
Once they’ve set, you can serve them as they are, or get extra creative with a drizzle of melted chocolate or sprinkles. Either way, they’re bound to impress!
Serving Suggestions
Serve your Rice Krispies Brains on a spooky platter, perhaps surrounded by gummy worms or candy corn for extra flair. If you’re feeling particularly festive, you could even create a “graveyard” scene with crushed chocolate cookies as dirt and edible tombstones (or cookies with funny messages). Grab some Halloween-themed plates, and let the screams of delight begin!
Recipe Variations
Looking to switch things up? Here are some fun twists to try with your Rice Krispies Brains:
- Chocolate Version: Mix in cocoa powder or chocolate Rice Krispies for a chocolatey treat. You can also drizzle melted chocolate over the top!
- Nutty Flavor: Add chopped nuts or nut butter into the mix for an extra crunchy surprise.
- Cereal Swaps: Try using Fruity Pebbles or Cocoa Pebbles for vibrant color and flavor variations.
- Flavor Extracts: A dash of vanilla or almond extract can add a deeper flavor profile and unique twist.
- Rainbow Brains: Layer different colored mixtures for a vibrant, psychedelic look—perfect for a whimsical touch.
Chef’s Notes
As always, cooking is an adventure, and every time I make these, I discover something new or have a little funny mishap. The first time I shaped these, I got so into it that my “brains” turned into a hilarious blob! Now I embrace it—because perfection isn’t the goal, having fun and creating memories together is! These Rice Krispies Brains are a timeless treat, and I love how they bring a dash of nostalgia while being a hit for every Halloween gathering.
FAQs and Troubleshooting
-
What do I do if my mixture is too sticky?
If your Rice Krispies mix is too sticky to mold, it might need a bit more butter or grease on your hands. Just be gentle when shaping them; you can always return them to the mixing bowl and add more cereal. -
Can I use larger marshmallows?
Absolutely! If you use larger marshmallows, just cut them up into smaller pieces before adding them to the saucepan. They will take a little longer to melt, but the result will still be delightful! -
How do I store leftovers?
Keep any leftover brains in an airtight container at room temperature to maintain their crispiness for up to 3 days. They won’t last long, though—they’re just too tasty! -
Why didn’t my treats hold their shape?
It could be that the ratio of marshmallows to Rice Krispies was off. Make sure to measure accurately. If they’re too sticky, adding a few more cups of Rice Krispies can help!
Nutritional Info
While I’m not a nutritionist, I firmly believe in balance. These delightful Rice Krispies Brains are a fun treat to indulge in moderation, especially during the holiday season! So gather your loved ones around and savor the sweetness of shared moments!
There you have it, friends! I hope you enjoy making these Rice Krispies Brains as much as I do. Let’s conjure up some spooky fun in the kitchen this Halloween and celebrate the sweetness of gathering and creating together. Grab your spatulas, don your aprons, and let’s get cooking. Happy haunting!
PrintCreepy-Cool Rice Krispies Brains

A fun twist on a classic treat, these Rice Krispies Brains are perfect for Halloween and will delight kids and adults alike.
- Prep Time: 15 minutes
- Cook Time: 10 minutes
- Total Time: 25 minutes
- Yield: 8 servings 1x
- Category: Dessert
- Method: No-Bake
- Cuisine: American
- Diet: Vegetarian
Ingredients
- 5 cups (132g) Rice Krispies (or any kind of crispy rice cereal)
- ¼ cup (57g) unsalted butter
- 1 10-oz bag (283g) mini marshmallows (about 8 cups)
- Red food coloring
- Butter and extra for greasing hands (optional)
Instructions
- Prepare a baking tray by lining it with parchment paper.
- Melt the unsalted butter in a large saucepan over low heat.
- Add the mini marshmallows and stir until melted and gooey.
- Incorporate the Rice Krispies, folding gently into the marshmallow mixture.
- Add several drops of red food coloring and mix until combined.
- Shape the mixture into brain shapes using greased hands.
- Cool the shaped brains on the baking tray for about 30 minutes.
- Serve with style, optionally adding melted chocolate or sprinkles.
Notes
Use various cereals for fun twists and store leftovers in an airtight container for up to 3 days.
Nutrition
- Serving Size: 1 serving
- Calories: 200
- Sugar: 10g
- Sodium: 50mg
- Fat: 7g
- Saturated Fat: 4g
- Unsaturated Fat: 3g
- Trans Fat: 0g
- Carbohydrates: 30g
- Fiber: 0g
- Protein: 1g
- Cholesterol: 15mg
Keywords: Halloween, Treats, Rice Krispies, Desserts, Fun Recipes