The Ultimate Guide to Mastering Your Own Homemade Tart Crust
There’s something undeniably special about a homemade tart crust. Those flaky edges, the buttery aroma wafting through your kitchen, and the anticipation of what delicious filling awaits. Whether you’re planning to whip up a classic fruit tart, a silky chocolate ganache, or a zesty lemon custard, mastering this basic yet versatile foundation will open up a world of dessert possibilities.
At Basil Board, we believe that food is about connection, and sharing a homemade tart with friends and family is the perfect way to create those moments. So, grab your apron and let’s dive into the art of making a perfect tart crust, step-by-step!
A Slice of My Kitchen Memories
Growing up, one of my fondest memories was baking with my grandmother in her tiny, sunlit kitchen. She would pull out her old, flour-dusted rolling pin and the mixing bowl that had seen better days but still had stories to tell. I vividly remember the feeling of flour on my fingertips while we whispered secrets, all while carefully measuring and mixing each ingredient to create her famous fruit tart.
It wasn’t just about the baking—it was about the warmth, the laughter, and the sweeter moments that lingered long after the last bite was taken. The luscious, colorful fruits sitting atop that golden tart were a feast for the eyes and a reminder that the simplest ingredients can come together to create something magical.
Now, every time I make a tart, I think of those days— the joy of sharing, the excitement of creating something from scratch, and the beauty of making food a centerpiece of connection.
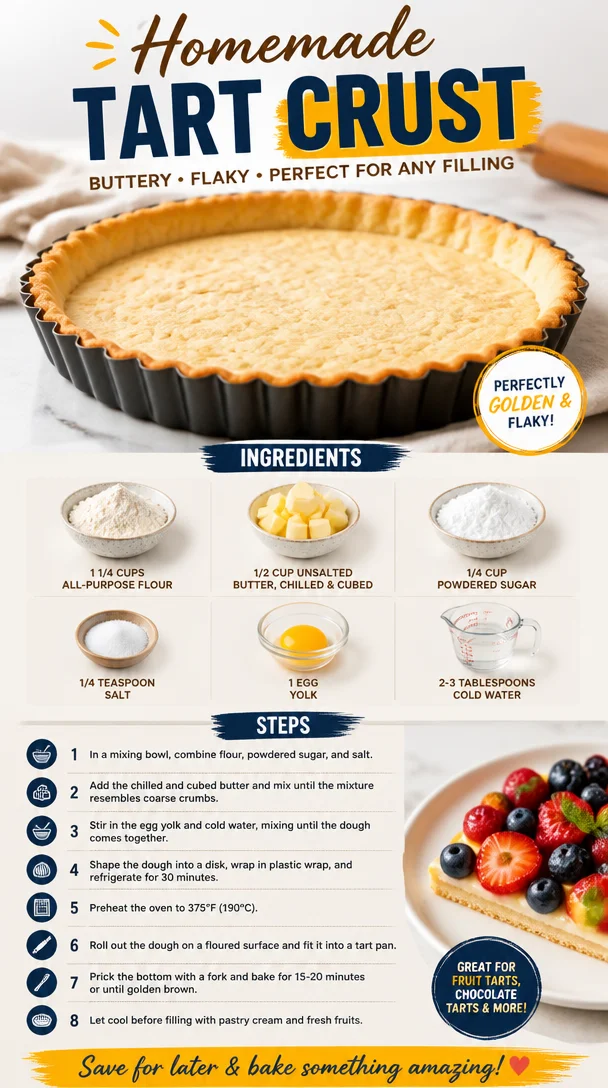
Ingredients You’ll Need
Ready to create your own masterpiece? Here’s what you’ll need to make the perfect homemade tart crust:
-
1 1/4 cups all-purpose flour
- A classic choice for a flaky crust. You can substitute with gluten-free all-purpose flour if you need to go gluten-free, though the texture may vary slightly.
-
1/2 cup unsalted butter, chilled and cubed
- The star of the show! Opt for high-quality butter for a richer flavor. If you’re in a pinch, you can use margarine, but I always recommend butter for that signature taste.
-
1/4 cup powdered sugar
- Adds a hint of sweetness without the graininess of granulated sugar. If you’re looking for a sugar-free option, try using powdered erythritol or another sweetener of your choice.
-
1/4 teaspoon salt
- This enhances the overall flavor. It’s a small amount, but it makes a big difference! Feel free to use kosher salt or sea salt if that’s what you have.
-
1 egg yolk
- Helps bind everything together. You could replace it with one tablespoon of dairy-free yogurt if you’re looking for an egg-free option.
-
2-3 tablespoons cold water
- Just enough to bring the dough together. Keep the water ice-cold; it helps keep the butter firm and contributes to a flakier crust!
Step-by-Step Instructions
Now, let’s roll up those sleeves and get cooking. Follow these steps carefully, and you’ll have a homemade tart crust that you can be proud of!
-
Prep Your Workspace:
- Clear a space on your countertop and have all your ingredients measured out. This will make the process feel smooth and easy!
-
Mix Dry Ingredients:
- In a large mixing bowl, whisk together the flour, powdered sugar, and salt until well combined. This distributes the ingredients evenly and ensures your crust will have a balanced flavor.
-
Cut in the Butter:
- Add the cubed, chilled butter to the flour mixture. Using a pastry cutter, fork, or even your hands, work the butter into the flour until the mixture resembles coarse crumbs. You want little pea-sized pieces of butter to remain – these will help create that flaky texture!
-
Add the Egg Yolk:
- Now, make a little well in the center of your mixture and add the egg yolk. Mix with a fork until partially combined. Don’t worry about achieving uniformity just yet!
-
Incorporate Cold Water:
- Gradually add the cold water, one tablespoon at a time. With your hands (or a spatula), mix until the dough just comes together. Be careful not to overwork it; you want it to remain tender!
-
Chill the Dough:
- Form the dough into a flat disc (it’ll make rolling out much easier later on), wrap it in plastic wrap, and pop it in the fridge for at least 30 minutes. This step is crucial—it helps relax the gluten and allows the butter to firm up.
-
Roll It Out:
- After chilling, lightly flour your surface and rolling pin. Roll the dough out into a circle about 1/8-inch thick, transferring it carefully to your tart pan. Don’t worry if it cracks a bit; you can gently press it back together.
-
Trim and Crimp the Edges:
- Press the dough into the corners of the tart pan and trim any excess. Use your fingers or a fork to crimp the edges for that polished finish.
-
Pre-Bake:
- Prick the base of the crust with a fork (this prevents it from puffing up) and place a piece of parchment paper filled with pie weights or dried beans on top. Bake at 375°F (190°C) for about 15-20 minutes, or until lightly golden. Let it cool before filling.
-
Fill and Serve:
- Once cooled, fill your tart crust with your desired filling, whether it’s fresh fruits, a rich ganache, or a creamy custard. Serve it up, and watch your friends and family rave about your culinary skills!
Serving Suggestions
For plating, don’t hold back! Arrange your tart on a beautiful cake stand or a wooden board, garnished with fresh herbs or a dusting of powdered sugar. You can drizzle some chocolate sauce or a homemade fruit coulis on the plate for that extra touch. Serve slices alongside a scoop of vanilla ice cream, and you’ve got yourself a dessert that will impress anyone!
Recipe Variations
- Nutty Twist: Substitute 1/4 cup of all-purpose flour with finely ground almonds or hazelnut flour for an almond tart crust that adds a unique flavor.
- Herb-Infused: Want to get adventurous? Blend in finely chopped fresh herbs like rosemary or thyme into the dough for a savory option.
- Cocoa Crust: For a chocolatey base, swap 1/4 cup of the flour with unsweetened cocoa powder. This is perfect for cheesecakes or chocolate tarts!
- Cheesecake Base: Use crushed graham crackers mixed with melted butter instead of traditional pastry for a no-bake cheesecake base.
- Vegan Delight: Replace the butter with coconut oil and use a flax egg as a binding agent for a delicious vegan tart crust.
Chef’s Notes
This tart crust recipe has been a staple in my kitchen for years. I’ll let you in on a little secret: I often make double batches and freeze some for those surprise gatherings or when I’m feeling particularly lazy! Simply prepare the dough, wrap it up tightly, and pop it into the freezer. When you’re ready to bake, just thaw it in the fridge overnight, and you’re good to go.
Remember, cooking doesn’t have to be perfect. I’ve had my share of wonky tarts – a cracked crust here, a filling that overflowed there. But each little "oops" is a learning opportunity, and that’s what makes this journey so fun!
FAQs and Troubleshooting
-
Why is my tart crust tough?
- If you overwork the dough while mixing or rolling it out, you’ll develop the gluten and end up with a tough crust. Richness and flakiness come from being gentle!
-
My tart crust shrunk while baking. What happened?
- This can happen if the dough wasn’t chilled long enough. Make sure to chill your crust both before rolling it out and after shaping it in the tart pan to help prevent shrinkage.
-
How can I tell when my crust is done baking?
- Look for a light golden color all over the crust. If it’s too pale, it may still be raw in the center. A deep golden color is a good rule of thumb!
-
Can I make this dough ahead of time?
- Absolutely! You can prepare the dough and keep it in the fridge for up to 2 days or freeze it for a month. Just make sure to wrap it tightly!
Nutritional Info
(for a basic tart crust, per slice; yields about 8 slices)
- Calories: 175
- Fat: 10g
- Carbohydrates: 19g
- Fiber: 0.5g
- Protein: 1.5g
So there you have it! Your comprehensive guide to crafting a delightful homemade tart crust that serves as a blank canvas for your culinary creativity. From the first measurements to the final slice, each step is a celebration of flavor and connection. I hope this inspires you to let your love for cooking shine in your kitchen. Now get out there and make some tart magic happen!
PrintHomemade Tart Crust
Master the art of crafting a perfect homemade tart crust with this step-by-step guide, ideal for any filling.
- Prep Time: 15 minutes
- Cook Time: 20 minutes
- Total Time: 35 minutes
- Yield: 8 servings 1x
- Category: Dessert
- Method: Baking
- Cuisine: French
- Diet: Vegetarian
Ingredients
- 1 1/4 cups all-purpose flour
- 1/2 cup unsalted butter, chilled and cubed
- 1/4 cup powdered sugar
- 1/4 teaspoon salt
- 1 egg yolk
- 2–3 tablespoons cold water
Instructions
- Prep Your Workspace: Clear a space on your countertop and have all your ingredients measured out.
- Mix Dry Ingredients: In a large mixing bowl, whisk together the flour, powdered sugar, and salt until well combined.
- Cut in the Butter: Add the cubed, chilled butter to the flour mixture. Work the butter into the flour until it resembles coarse crumbs.
- Add the Egg Yolk: Make a well in the center of your mixture and add the egg yolk. Mix with a fork until partially combined.
- Incorporate Cold Water: Gradually add the cold water, one tablespoon at a time, mixing until the dough just comes together.
- Chill the Dough: Form the dough into a flat disc, wrap it in plastic wrap, and refrigerate for at least 30 minutes.
- Roll It Out: Lightly flour your surface and rolling pin, then roll the dough into a circle about 1/8-inch thick.
- Trim and Crimp the Edges: Press the dough into the corners of the tart pan and trim any excess.
- Pre-Bake: Prick the base with a fork, place parchment with weights on top, and bake at 375°F (190°C) for 15-20 minutes until golden.
- Fill and Serve: Once cooled, fill your tart crust with your desired filling and serve with a flourish!
Notes
For best results, chill the dough properly to avoid shrinkage during baking.
Nutrition
- Serving Size: 1 slice
- Calories: 175
- Sugar: 5g
- Sodium: 150mg
- Fat: 10g
- Saturated Fat: 6g
- Unsaturated Fat: 4g
- Trans Fat: 0g
- Carbohydrates: 19g
- Fiber: 0.5g
- Protein: 1.5g
- Cholesterol: 30mg
Keywords: tart, crust, baking, dessert, homemade, pastry