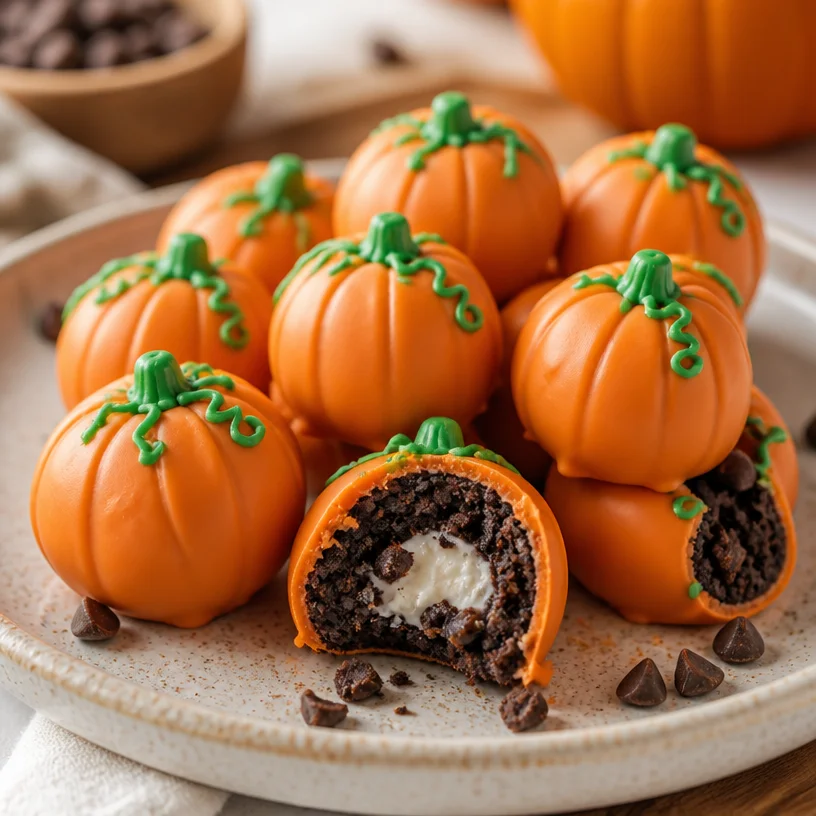
No-Bake Pumpkin Shaped Oreo Balls: A Sweet Fall Treat
Ah, fall—the season when everything gets a little cozier, the leaves start to dance in vibrant hues, and the scent of pumpkin spice wafts through the air. There’s something undeniably magical about this time of year, especially when it comes to indulgent treats. Get ready to roll up your sleeves, dust off your mixing bowl, and enter the world of autumn bliss with my favorite no-bake pumpkin-shaped Oreo balls! These adorable bites are not just a feast for your taste buds but also a delightful addition to your fall gatherings.
Imagine this: It’s a crisp October afternoon. Your kids have gathered around the kitchen table, their eager hands stretched out like small pumpkins themselves, ready to help you create something fun and festive. The sun streams through the window, highlighting their mischievous grins as crumbs scatter across the table. These moments, where laughter fills the air and something delicious is coming together, are what make cooking a rewarding experience. And trust me, these no-bake pumpkin-shaped Oreo balls will bring the joy of the season right into your home!
Personal Story
Every year, when the leaves start falling, my family and I would plan our yearly pumpkin carving day. The kitchen would buzz with excitement as we’d roast pumpkin seeds, create sticky concoctions of pumpkin spice treats, and, of course, save the innards for our famous pie! One particular year, I decided to add a new treat to our festivities after stumbling upon a simple yet magical idea: Oreo balls. As we formed them into little pumpkins, laughter echoed throughout the kitchen, and those orange and green treats quickly became a family favorite. Now, every autumn, they not only populate our dessert table but also our hearts, reminding us that food is about sharing moments and love just as much as it is about taste!
Ingredients
Here’s what you’ll need to whip up these delicious pumpkin-shaped Oreo balls:
-
1 package of Oreo cookies
The star of the show! A classic chocolate cookie that serves as the perfect base for our creamy filling. For a twist, try using the golden Oreos for a fun flavor change! -
8 oz cream cheese, softened
This provides the creamy texture that holds everything together. If you want a lighter version, you could use Neufchâtel cheese for a lower-fat option. -
Orange candy melts
These are essential for giving your Oreo balls that festive pumpkin hue. You can use colored chocolate, but melts work best for that smooth coating. -
Chocolate chips
A small amount adds a deeper chocolate flavor when molding the balls. Plus, they can double as adorable little “eyes” on your pumpkins! -
Green candy melts (for stems)
These are the finishing touch, transforming your treats from simple balls into adorable pumpkins. If you don’t have green melts, you could use green frosting, but be careful with the thickness!
Step-by-Step Instructions
Now that you’ve gathered your ingredients, let’s get started!
-
Crush the Oreo cookies:
Using a food processor, pulse the Oreo cookies until they are a fine crumb. This step is crucial! If you don’t have a food processor, you can place them in a zip-top bag and crush them with a rolling pin. It’s a great way to relieve some stress too!Chef Tip: Make sure the cookies are ground well; larger chunks may disrupt the smooth texture of your balls.
-
Mix in the cream cheese:
In a large bowl, combine the crushed Oreos with the softened cream cheese. Use a spatula or your hands to mix until everything is fully incorporated. The mixture should look like a thick, chocolatey dough.Chef Insight: Make sure your cream cheese is softened to room temperature; this will make mixing much easier!
-
Chill the mixture:
Cover the bowl with plastic wrap and let it chill in the refrigerator for about 30 minutes. This will make it easier to shape the balls later.Chef Hack: If you’re in a hurry, you can pop the bowl in the freezer for about 15 minutes instead!
-
Shape the balls:
After chilling, scoop out tablespoon-sized portions and roll them into round balls. Then, gently press them to flatten slightly, creating a pumpkin shape. No need for perfection here—each one will have its own character!Tip: You can use a melon baller if you want to keep them uniform or just use your hands for that homemade touch.
-
Melt the candy melts:
In separate microwave-safe bowls, melt the orange and green candy melts according to package instructions. Melt in short intervals, stirring in between to prevent overheating.Important: Keep an eye on them! Overheating can lead to clumpy melts—no one wants that!
-
Coat the balls:
Dip each pumpkin-shaped ball into the orange candy melts, allowing any excess to drip off. Using a fork can help keep your fingers clean. Place them on a wax-paper-lined baking sheet.Pro tip: Tap the fork gently against the bowl’s edge to remove excess chocolate!
-
Add the stems:
Using the melted green candy melts, drizzle a small amount onto the tops of the pumpkin balls for the stems. If you’re using chocolate chips, press one chip into the top of each pumpkin while the candy melt is still soft! -
Let them set:
Allow the coated Oreo balls to sit at room temperature for about 30 minutes or until the candy melts are fully set. If you’re in a hurry, you can place them in the fridge to speed up the cooling process.
Serving Suggestions
When it comes to serving your no-bake pumpkin Oreo balls, presentation can be part of the fun! Arrange them on a festive platter, scatter a few fall leaves around, and watch your guests’ eyes light up with delight. You can even display them in a cute pumpkin basket for a fun, seasonal touch!
Recipe Variations
Feeling adventurous? Here are a few fun twists on this classic recipe:
- Nutty Pumpkin Spice: Add 1 tsp of pumpkin spice to the cream cheese mixture for a little extra fall flavor.
- White Chocolate Drizzle: After coating with orange melts, drizzle with melted white chocolate for a beautiful contrast and added sweetness.
- Vegan Version: Use vegan cream cheese and dark chocolate melts to cater to your plant-based friends!
- Candy Corn Toppers: Instead of green stems, place candy corn on top for a colorful and sweet alternative!
Chef’s Notes
One of the best parts about this recipe is its adaptability. I’ve made these little bites for every occasion—a Halloween party, Thanksgiving dessert table, and even just a cozy family night in. Each time, they disappear faster than I can say "pumpkin spice"! Feel free to experiment with shapes and flavors. After all, cooking is about creativity and fun, so don’t be afraid to put your spin on it!
FAQs and Troubleshooting
Q: Why did my chocolate coating crack?
A: This can happen if the chocolate was overheated and then cooled too quickly. Make sure to melt slowly and at the right temperature to avoid this mishap.
Q: Can I store these for later?
A: Absolutely! Store your pumpkin balls in an airtight container in the fridge for up to two weeks. They can also be frozen for up to a month—just remember to thaw in the fridge before serving.
Q: My balls aren’t holding their shape. What’s wrong?
A: If your mixture is too wet, try adding more crushed Oreos until you achieve a better consistency. Alternatively, you may not have chilled them long enough before shaping.
Q: Can I make these ahead of time?
A: Yes! They are perfect for making a day ahead and keeping in the fridge. Just be sure to coat them just before serving for the best texture.
Nutritional Info
While these pumpkin-shaped Oreo balls are a sweet treat to indulge in sparingly, here’s a rough estimate of the nutritional content per ball (when serving about 20):
- Calories: 120
- Total Fat: 6g
- Saturated Fat: 3g
- Carbohydrates: 15g
- Sugar: 10g
- Protein: 1g
So there you have it! A heartwarming, fun, and scrumptious dessert that’s perfect for any fall gathering. With these no-bake pumpkin-shaped Oreo balls, you’ll not only be serving up smiles but also creating future kitchen memories with those you love. Now grab your apron, turn on your favorite tunes, and let’s dive into this delicious fall treat together! Happy cooking! 🍂
PrintNo-Bake Pumpkin Shaped Oreo Balls
These adorable no-bake pumpkin-shaped Oreo balls are a delightful treat for fall gatherings, combining chocolate cookie, cream cheese, and festive candy melts.
- Prep Time: 15 minutes
- Cook Time: 0 minutes
- Total Time: 45 minutes
- Yield: 20 servings 1x
- Category: Dessert
- Method: No-Bake
- Cuisine: American
- Diet: Vegetarian
Ingredients
- 1 package of Oreo cookies
- 8 oz cream cheese, softened
- Orange candy melts
- Chocolate chips
- Green candy melts (for stems)
Instructions
- Crush the Oreo cookies: Using a food processor, pulse the Oreo cookies until they are a fine crumb. If you don’t have a food processor, you can place them in a zip-top bag and crush them with a rolling pin.
- Mix in the cream cheese: In a large bowl, combine the crushed Oreos with the softened cream cheese. Use a spatula or your hands to mix until fully incorporated.
- Chill the mixture: Cover the bowl with plastic wrap and let it chill in the refrigerator for about 30 minutes.
- Shape the balls: After chilling, scoop out tablespoon-sized portions and roll them into round balls, pressing them to flatten slightly.
- Melt the candy melts: In separate microwave-safe bowls, melt the orange and green candy melts according to package instructions.
- Coat the balls: Dip each pumpkin-shaped ball into the orange candy melts and place them on a wax-paper-lined baking sheet.
- Add the stems: Using the melted green candy melts, drizzle a small amount onto the tops of the pumpkin balls.
- Let them set: Allow the coated Oreo balls to sit at room temperature for about 30 minutes or until the candy melts are fully set.
Notes
Store in an airtight container in the fridge for up to two weeks or freeze for up to a month.
Nutrition
- Serving Size: 1 ball
- Calories: 120
- Sugar: 10g
- Sodium: 50mg
- Fat: 6g
- Saturated Fat: 3g
- Unsaturated Fat: 2g
- Trans Fat: 0g
- Carbohydrates: 15g
- Fiber: 1g
- Protein: 1g
- Cholesterol: 15mg
Keywords: pumpkin-shaped, Oreo balls, no-bake, fall treats, Halloween desserts