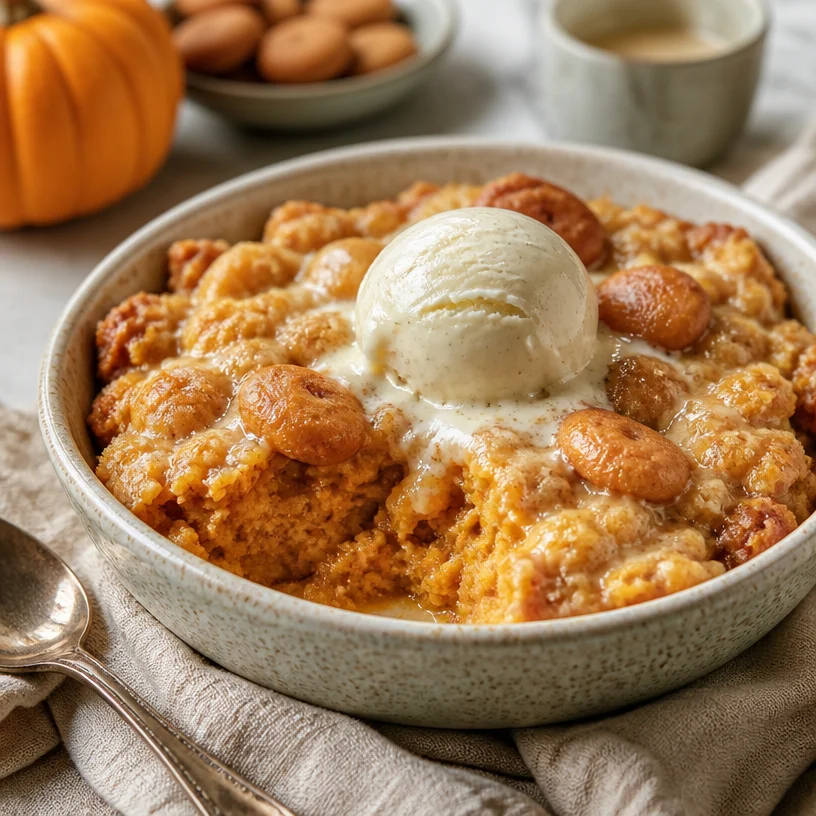
A Whirlwind of Flavor: Pumpkin Vanilla Bean Dump Cake
Ah, the magic of fall! As soon as that first leaf changes color and the air feels a tad crisper, there’s an undeniable urge that pulls me into the kitchen with a wink from my spice cabinet. One of my all-time favorite creations to whip up during this enchanting season is none other than the Pumpkin Vanilla Bean Dump Cake. It’s a cozy hug in dessert form, combining the warm, spiced flavors of pumpkin with the luxurious essence of vanilla beans. If you’ve ever found yourself staring into the pantry, wondering what to make with a lonely can of pumpkin puree and a box of cake mix, you’re in for a treat!
Why do I love this recipe? It’s ridiculously easy to prepare, taking less time than it takes to bake a store-bought cake. Seriously! Just dump, stir, and let the oven do the rest. Every bite is a delightful blend of fluffy, cake-like textures enveloped in smooth pumpkin richness, all topped with a crispy wafer crumble. Imagine serving this warm out of the oven, the scent wafting through your home, beckoning friends and family alike to gather ’round the table. So, let’s grab our aprons and dive into making this delightful pumpkin dessert that’s sure to become a staple in your fall repertoire!
A Slice of Nostalgia
Growing up, fall was synonymous with two things in my house: simmering chili on the stove and my mother’s pumpkin desserts wafting in from the kitchen. She had a knack for transforming simple ingredients into comforting masterpieces, and every Thanksgiving, her pumpkin pie was the star of the show.
I still remember the joyful chaos that ensued when she would pull out all the baking essentials. The kitchen became a delightful mess of flour dust and sugar sprinkles, but the best part? The stories shared while mixing, the laughter that filled the air, and the comforting aroma of cinnamon and nutmeg that lingered long after the dishes were cleared.
One year, I asked her for a new twist on her pumpkin treats. That’s when we stumbled upon the concept of a dump cake. “Let’s make it a dump cake, but jazz it up with vanilla bean!” I suggested. That holiday season, we created this Pumpkin Vanilla Bean Dump Cake together, and it instantly became a hit at our family gatherings. Here’s how you can capture that same joyful spirit in your kitchen!
Ingredients
Here’s what you’ll need to bring this fabulous dessert to life:
-
Pumpkin Puree: Use a good-quality canned pumpkin puree for convenience, or go the homemade route by roasting and pureeing fresh pumpkins. It’s packed with nutrients and gives the dish its famous flavor. Consider swapping with butternut squash puree if you’re feeling adventurous!
-
Vanilla Bean Paste: This stuff is liquid gold! It’s more convenient than scraping a real vanilla bean but still provides that aromatic kick. If you don’t have any, pure vanilla extract works, but you’ll miss out on those delightful little vanilla flecks.
-
White Cake Mix: The base of this dump cake. Use any brand you love! For a whole-grain twist, opt for a whole wheat cake mix. And if gluten-free is your jam, there are plenty of gluten-free cake mixes available to suit your needs.
-
Vanilla Wafers: They add a delightful crunch and flavor contrast. Crushed graham crackers or even a store-brand cookie would work if vanilla wafers aren’t your thing.
-
Butter: The secret sauce for that crispy, golden topping! You can reduce the butter a tad if you like, or swap it for coconut oil for a dairy-free version.
Step-by-Step Instructions
-
Preheat Your Oven: First things first, let’s get that oven preheated to 350°F (175°C). This way, it’s nice and ready for your cake when you finish prepping!
-
Mix the Wet Ingredients: In a large mixing bowl, combine the pumpkin puree and vanilla bean paste. Give it a good stir until they’re well combined. This step brings the two main flavors together effortlessly. Feel free to dab a little of the mixture on your finger and taste; it’s like fall in a spoonful!
-
Place in the Pan: Lightly grease a 9×13-inch baking dish. Pour the pumpkin mixture into the bottom of the dish, ensuring it’s spread evenly. This creates the perfect base for the cake mix to rest on.
-
Sprinkle the Cake Mix: Now, here comes the fun part! Open the box of white cake mix and sprinkle it over the pumpkin layer, gently covering it completely. Don’t worry about mixing—just spread it out evenly!
-
Add Vanilla Wafers: Crush the vanilla wafers and sprinkle them over the cake mix. This will give your dump cake that irresistible crunchy topping. You can totally get creative with the crunch by adding crumbled nuts or even chocolate chips if you’re feeling wild.
-
Drizzle with Butter: Melt the butter and drizzle it generously over the entire cake mix surface. This step is crucial for achieving that delicious golden crust on top. Don’t skimp here; it’s what makes it all come together!
-
Bake: Place the baking dish in the preheated oven and let it bake for 35-40 minutes until the top is golden brown. Your kitchen will soon fill with the scent of warm spices, and trust me, your neighbors might start sniffing around!
-
Let it Cool: Once baked, remove it from the oven and let it cool for about 10-15 minutes. This step helps it set a bit, and let’s be honest, it’s tough waiting when it smells so good!
-
Serve and Enjoy: Scoop a warm piece into a bowl, add a scoop of vanilla ice cream (if you’re feeling indulgent), and enjoy! You just made a delightful Pumpkin Vanilla Bean Dump Cake!
Serving Suggestions
When plating this cake, consider serving it warm in a shallow bowl, topped with a generous scoop of vanilla ice cream. Drizzle with a little caramel sauce for an extra touch of decadence. If you’re feeling festive, a sprinkle of candied pecans or a dusting of cinnamon on top can bring a beautiful look to your dish and complement those autumn flavors beautifully.
Recipe Variations
- Spicy Kick: Add a dash of cayenne or a sprinkle of ginger to your pumpkin mixture for a surprise heat.
- Nutty Bliss: Swirl in some chopped walnuts or pecans into the pumpkin mix for added crunch.
- Chocolate Lovers: Toss a handful of chocolate chips into the cake mix before baking for a sweet combo.
- Maple Infusion: Replace half of the sugar with maple syrup for a hint of maple goodness.
- Dairy-Free Option: Substitute the butter with coconut oil or vegan margarine and ensure your cake mix is dairy-free for a delicious vegan dessert.
Chef’s Notes
This recipe is near and dear to my heart, and it has evolved since that first chaotic Thanksgiving kitchen moment. Over the years, I’ve played around with different toppings and flavor combinations, even trying it with chocolate cake mix for a twist on a classic combination. Life is all about experimenting, and that’s truly the joy of cooking. Also, beware: I once added too much butter and ended up with a gooey puddle instead of a cake! But we laughed and decided to call it “pumpkin soup,” and it was a hit nonetheless.
Each time I serve this dish, it sparks conversations and nostalgia, reminding everyone of their own cherished food memories. Don’t forget to share yours, too!
FAQs and Troubleshooting
1. My dump cake seems too soggy. What went wrong?
This can happen if too much liquid is added or if the cake mix isn’t spread evenly. Ensure you follow the ingredient amounts closely, and don’t mix the pumpkin and cake mix together; just layer them.
2. Can I prep this ahead of time?
You can prepare the pumpkin mixture and store it separately in the fridge pre-baking. Just assemble everything when you’re ready to bake!
3. What if I can’t find vanilla bean paste?
No problem! You can use good-quality vanilla extract, but you’ll lose some of the delightful flecks. A few drops will still work wonders!
4. Can I use fresh pumpkin instead of canned?
Absolutely! Roast, scoop, and puree fresh pumpkin, and you’ll have an even fresher taste. Just ensure it’s cooked down to a smooth consistency similar to canned pumpkin.
Nutritional Info
While I love indulging in delicious desserts, I also believe in balance. This Pumpkin Vanilla Bean Dump Cake is a treat, so be mindful of portion sizes! Each serving’s nutritional content can vary based on chosen ingredients and portion size, but it’s a comforting dessert that brings warmth and joy.
So what are you waiting for? Get into that kitchen and whip up some of this pumpkin magic! Let’s make sweet memories together one bite at a time!
PrintPumpkin Vanilla Bean Dump Cake
A delightful and easy dessert combining warm pumpkin flavors and luxurious vanilla bean in a dump cake form, perfect for fall.
- Prep Time: 10 minutes
- Cook Time: 40 minutes
- Total Time: 50 minutes
- Yield: 8 servings 1x
- Category: Dessert
- Method: Baking
- Cuisine: American
- Diet: Vegetarian
Ingredients
- 1 can pumpkin puree
- 3 tablespoons vanilla bean paste
- 1 box white cake mix
- 1 cup vanilla wafers, crushed
- 1/2 cup butter, melted
Instructions
- Preheat your oven to 350°F (175°C).
- Mix the pumpkin puree and vanilla bean paste in a large mixing bowl until well combined.
- Place the pumpkin mixture into a lightly greased 9×13-inch baking dish.
- Sprinkle the white cake mix over the pumpkin layer evenly.
- Add the crushed vanilla wafers on top of the cake mix.
- Drizzle the melted butter over the entire surface of the cake mix.
- Bake for 35-40 minutes until the top is golden brown.
- Let it cool for about 10-15 minutes before serving.
- Serve warm, optionally topped with vanilla ice cream.
Notes
Consider adding a scoop of vanilla ice cream or a drizzle of caramel sauce when serving.
Nutrition
- Serving Size: 1 serving
- Calories: 350
- Sugar: 20g
- Sodium: 400mg
- Fat: 18g
- Saturated Fat: 10g
- Unsaturated Fat: 8g
- Trans Fat: 0g
- Carbohydrates: 45g
- Fiber: 2g
- Protein: 3g
- Cholesterol: 30mg
Keywords: pumpkin, dessert, fall, easy recipe, dump cake