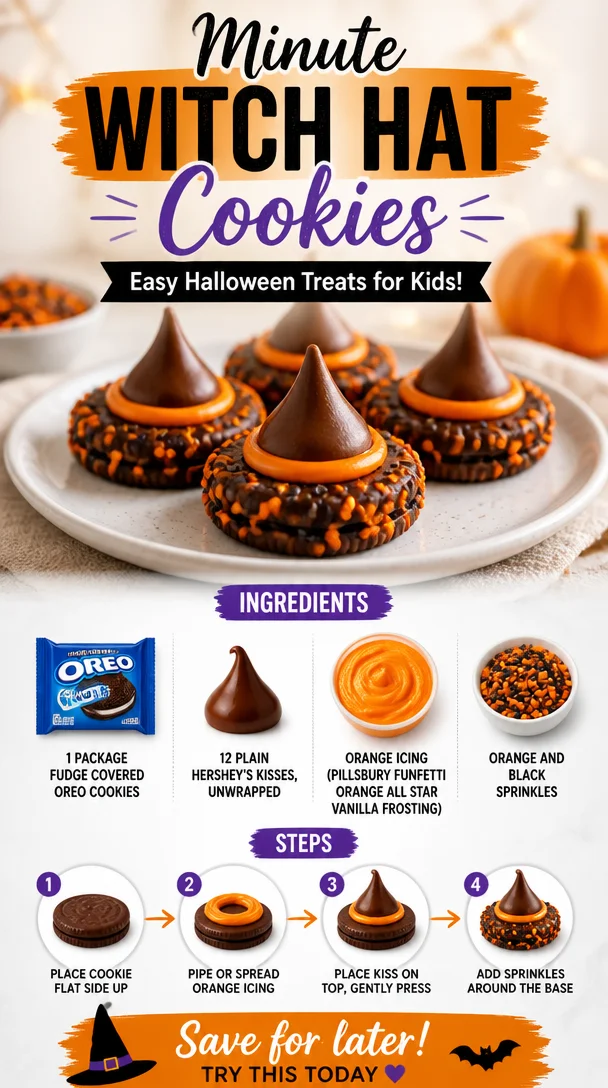
Witch Hat Cookies: A Spooktacular Treat for Any Occasion
Hello, fellow food lovers and Halloween enthusiasts! Today, we’re diving into a super fun, easy-to-make treat that’ll delight kids and adults alike—Witch Hat Cookies. These delicious little wonders are a fabulous way to add some festive flair to your holiday gatherings, school parties, or even just a cozy night in with the family.
What’s magical about these cookies is not just their spooky appearance but also the delightful combination of flavors. Combining the rich fudge-covered Oreo cookie with creamy chocolate from the Hershey’s Kisses creates a taste explosion that’s hard to resist. And don’t even get me started on the cheerful orange icing and sprinkles—it makes these cookies as fun to decorate as they are to eat!
Picture this: You’re sitting around the table with family, and you start to assemble these cute little witch hats. Laughter fills the air as you pass the frosting and sprinkles around, each person putting their own creative spin on their cookie. Before you know it, you’re all sharing sweet stories and making magical memories, all while the aroma of chocolate lingers in the air. That’s what cooking is all about, folks—creating connections through food!
Are you ready to whip up these enchanting Witch Hat Cookies? Let’s jump right in!
A Little Magic from My Kitchen
Ah, Witch Hat Cookies! The moment I think of these delightful treats, I’m transported back to my childhood kitchen on Halloween night. My mom and I used to get all our ingredients ready: cookies, chocolate, sprinkles—you name it. The excitement was palpable; it was like a secret ritual that transformed us into witches in our little baking corner.
I remember one particular Halloween where we decided to host a spooky movie night for my friends. We created a mini cookie assembly line, and between decorating, we snuck bites of leftover chocolate and giggled over our favorite scary movies. It was pure joy! Those moments really solidified my love for creating festive treats. Now, I’m honored to share this memory and recipe with all of you so that you can create just as many happy memories in your kitchen!
Ingredients
-
1 package fudge-covered Oreo cookies
These cookies are the magical base of our witch hats. The rich chocolate coating adds a decadent touch. If you’re looking for a gluten-free option, there’s a gluten-free version of Oreo cookies available! -
12 plain Hershey’s Kisses, unwrapped
These delightful chocolate kisses serve as the “point” of the witch hats. Need a nut-free option? Go for the Caramel Kisses or dark chocolate if you want a flavor twist! -
Orange icing (I used Pillsbury Funfetti Orange All Star Vanilla frosting)
This creamy, vibrant frosting does double duty—serving as a glue and decoration. If you prefer making your own icing, a simple buttercream with orange food coloring works wonders! -
Orange and black sprinkles
They’re the finishing touch that brings everything to life! Want to make it extra spooky? Try using edible glitter or themed candy decorations to jazz things up!
Step-by-Step Instructions
-
Gather Your Ingredients
Start by making sure you have all your ingredients ready to go. This makes the whole process smoother and more enjoyable! The last thing you want is to be mid-cookie assembly and realize you forgot the sprinkles. -
Prepare Your Workspace
Grab a large cutting board or a clean countertop. Lining it with parchment paper can help with cleaning up later—who doesn’t love an easy cleanup? Trust me, after a baking session, even the most organized kitchen needs a breather! -
Unwrap the Hershey’s Kisses
Pop open that chocolate bag and unwrap each kiss. This step is key—you’ll want to have these ready to go for a smooth assembly process. And hey, if you "accidentally" snack on a few, I won’t tell! -
Start Assembling the Cookies
Take an Oreo cookie and squeeze a dollop of orange icing in the center. This will act as your "glue." Then, gently press a Hershey’s Kiss on top. The kiss should sit proud like a witch’s hat! Pro tip: Don’t skimp on the icing; it’s your secret weapon. -
Top It Off
Coat the top of the kiss with another small dollop of orange icing. Now, take a sprinkle of your orange and black sprinkles and toss it on top. It’s like dressing your witch in the most fabulous Halloween attire! Want to create a little more flair? Add in some edible glitter too! -
Let Them Set
Now that your witches are set and decorated, let them sit for a few minutes so the icing firms up a tad. This will keep your hats from sliding off. While you’re waiting, use this time to clean up (or eat a few of the “mistakes” you made!).
Serving Suggestions
These Witch Hat Cookies are perfect for serving up at parties or gatherings. Arrange them on a platter along with some seasonal fruits or nuts for a festive touch. You could even place a few of them in clear treat bags to hand out as party favors! The vibrant colors and delightful shapes will catch everyone’s eye and bring some Halloween cheer to the table.
Recipe Variations
- Chocolate Dipped Oreos: Switch up the base by using chocolate-covered Oreos instead of the fudge ones for an extra chocolaty hit.
- Flavored Icing: Use colored icing in different flavors such as lemon or raspberry to add a twist to your cookies.
- Alternative Candies: Try using different candies as the hat point, like peanut butter cups or mini Reese’s, for a different flavor profile.
- Non-Dairy Version: Opt for dairy-free chocolate, and use a vegan icing to make this treat accessible to everyone!
- Mini Witch Hats: For bite-sized fun, use mini Kisses and smaller cookies for a snackable version of these treats.
Chef’s Notes
These Witch Hat Cookies are one of those recipes that have evolved over the years. Initially, I started by sticking to the traditional style with just black sprinkles. But as time went on, I began to explore and let my creativity take flight. Now, I love seeing what combinations and tweaks others come up with too! Also, can I just say? The assembly process can become quite competitive! I often find myself in a friendly ‘who-can-assemble-the-best-hat’ challenge with friends and family. Don’t be surprised if this becomes a yearly tradition in your home too!
FAQs and Troubleshooting
Q: Can I make these cookies ahead of time?
A: Absolutely! You can assemble the cookies a day in advance and store them in an airtight container. Just be careful—the longer they sit, the softer the cookies might get!
Q: What if I don’t have orange icing?
A: No worries at all! You could use any color icing, or make your own with powdered sugar and a bit of orange juice or food coloring for maximum customization.
Q: How do I keep the cookies from falling apart?
A: The key here is to use enough icing to keep the Kiss stable on the Oreo. If all else fails, gently refrigerate them to help the icing set before serving.
Q: Can I use different types of cookies?
A: For sure! Feel free to experiment with different cookie bases. Just remember that the flavor combinations should complement each other—like peanut butter cookies with Chocolate Kisses for an irresistible combo!
Nutritional Info
While these Witch Hat Cookies are certainly a treat, they’re best enjoyed in moderation. Each cookie has a rich, indulgent flavor, thanks to the fudge-covered Oreo and chocolate kiss. If you’re mindful of your sugar intake, perhaps enjoy a couple with a nice cup of herbal tea!
Now that you’ve got all the recipes and tips for making these magical Witch Hat Cookies, I hope you’re inspired to gather around the kitchen and create some joy! Remember, it’s all about having fun and indulging in sweet moments together. So grab that apron and let’s conjure up some deliciousness! Happy baking, friends!
PrintWitch Hat Cookies
A spooktacular treat combining fudge-covered Oreos and chocolate kisses for a festive Halloween delight.
- Prep Time: 10 minutes
- Cook Time: 0 minutes
- Total Time: 10 minutes
- Yield: 24 servings 1x
- Category: Dessert
- Method: No-Bake
- Cuisine: American
- Diet: Vegetarian
Ingredients
- 1 package fudge-covered Oreo cookies
- 12 plain Hershey’s Kisses, unwrapped
- Orange icing (Pillsbury Funfetti Orange All Star Vanilla frosting recommended)
- Orange and black sprinkles
Instructions
- Gather Your Ingredients
- Prepare Your Workspace
- Unwrap the Hershey’s Kisses
- Start Assembling the Cookies
- Top It Off
- Let Them Set
Notes
These cookies can be made ahead of time and stored in an airtight container. Experiment with different cookie bases and icing colors for fun variations!
Nutrition
- Serving Size: 1 cookie
- Calories: 150
- Sugar: 8g
- Sodium: 50mg
- Fat: 6g
- Saturated Fat: 3g
- Unsaturated Fat: 2g
- Trans Fat: 0g
- Carbohydrates: 22g
- Fiber: 0g
- Protein: 1g
- Cholesterol: 0mg
Keywords: halloween cookies, witch hat cookies, festive treats, easy recipes, no-bake desserts