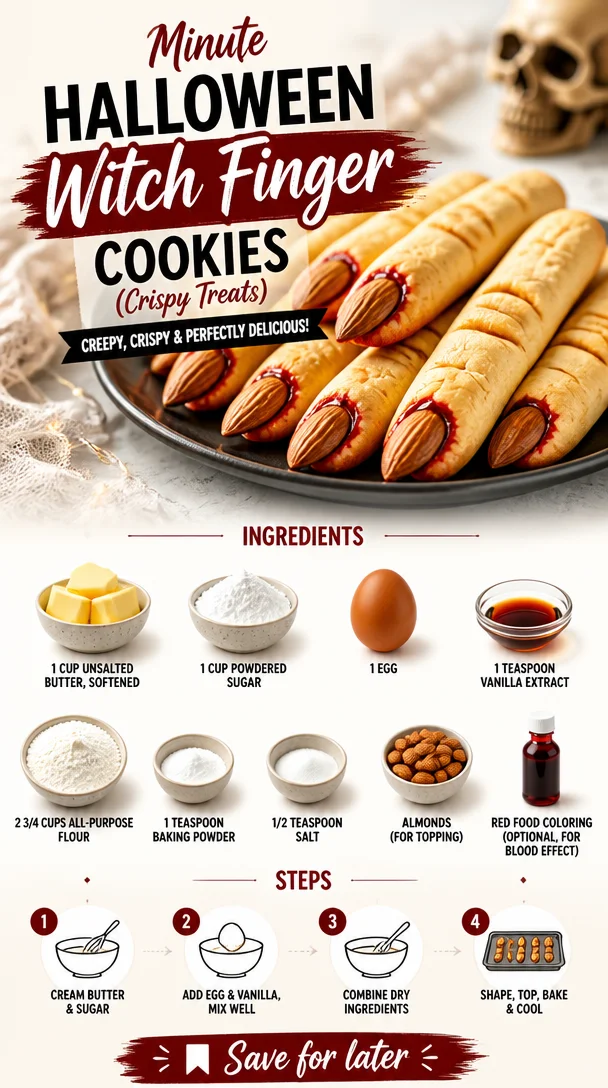
Getting Spooky in the Kitchen: Witch Finger Cookies Recipe
Ahoy, fellow food lovers! As the leaves turn golden and the air gets a bit crisper, my kitchen starts buzzing with excitement for all things spooky. Halloween is just around the corner, and you know what that means! It’s time to whip up treats that are delightfully creepy and utterly delicious. This season, I’m excited to share with you one of my absolute favorite Halloween recipes: Witch Finger Cookies! Not only do they look fabulously eerie with their gnarled, finger-like shape, but they’re also melt-in-your-mouth delicious—perfect for trick-or-treaters or a themed gathering.
Picture this: you’re hosting a Halloween party, and as guests walk in, they are greeted by the sight of these crazy, creepy cookies sitting on a platter. The blend of buttery goodness and almond crunch takes everyone by surprise. Oh, and don’t forget the little touch of red food coloring that adds a spooky effect reminiscent of something deliciously sinister. Trust me, you’ll want to keep this recipe handy for years to come!
But I’m getting ahead of myself. Let’s dive into the magic of these Witch Finger Cookies, so you’re all set to bake your first batch. Grab your apron, and let’s make some kitchen memories together!
A Little Kitchen Memory
I still remember the first time I made Witch Finger Cookies back when I was in middle school. My friends and I were all into all things spooky, and Halloween was our favorite holiday. We decided to have a mini baking competition after school, and this cookie recipe was our secret weapon. I can still hear our giggles as we shaped the dough into witchy fingers and placed almonds at the tip for that extra creepy touch.
My mom had a penchant for creating deliciously spooky treats, but nothing could hold a candle to our spirited creations. The cookies turned out surprisingly well for a bunch of pre-teens, and we felt like baking rockstars! We adorned our living room with cobwebs and eerie decorations, and as our made-up party came alive, the cookies were the star attraction. One bite brought a wave of nostalgic joy, and you could hear the chorus of delighted “yums” echoing through the house. It was a spooktacular day filled with sweet memories and laughter, and it ignited a love for whimsical baking that lives on to this day!
Witch Finger Cookies Ingredients
Let’s gather our ingredients so we can get this spooky baking party started! Here’s what you’ll need:
-
1 cup unsalted butter, softened
This rich, creamy butter is the star of the show, adding that lovely melt-in-your-mouth flavor. If you’re out of unsalted butter, feel free to substitute with salted butter but reduce the added salt in the recipe accordingly. -
1 cup powdered sugar
This sugar not only sweetens the cookies but also gives them that meltaway texture. If you don’t have powdered sugar, you can quickly make your own by blending granulated sugar until fine. -
1 egg
This little ingredient acts as the binding agent, bringing all our cookie components together. If you’re looking for a vegan alternative, try using a tablespoon of ground flaxseed mixed with three tablespoons of water. -
1 teaspoon vanilla extract
A splash of pure vanilla extract infuses the cookies with a warm, aromatic flavor. It’s the magical touch that elevates everything! -
2 3/4 cups all-purpose flour
This provides the base structure of our cookies. For a gluten-free option, you can use a 1:1 gluten-free flour blend, which works just as beautifully. -
1 teaspoon baking powder
This leavening agent helps our cookies puff up just a bit, ensuring they’re nice and tender. If you are out of baking powder, you can substitute it with baking soda by using 1/3 teaspoon per teaspoon of baking powder. -
1/2 teaspoon salt
Balances the sweetness and enhances all the flavors. It’s a crucial component, so don’t skip it! -
Almonds (for topping)
These provide the ghoulish “fingernails” of our Witch Finger Cookies. If you’re allergic to nuts, you can use sunflower seeds or chocolate chips as a fun alternative. -
Red food coloring (optional, for blood effect)
This adds a bit of drama and flair to our spooky treats! Use it sparingly to create splatters or tips to enhance the creepy feel. You can also use raspberry or strawberry jam as a natural alternative if you’re avoiding artificial colors.
Step-by-Step Instructions
Now that we have our ingredients ready, it’s time to bring these Witch Finger Cookies to life! Follow these steps, and I promise you’ll find this process not only easy but lots of fun too.
Step 1: Preheat the Oven
Let’s get things started by preheating your oven to 325°F (160°C). This will create that perfect baking environment for our cookies, allowing them to bake evenly and achieve that delicious golden color.
Step 2: Cream the Butter and Sugar
In a large mixing bowl, add the softened butter and powdered sugar. Use a hand mixer or stand mixer to beat them together until the mixture is fluffy and light—a process that should take about 2-3 minutes. This step is essential as it incorporates air into the mix, leading to light and tender cookies. Don’t forget to scrape down the sides of the bowl to ensure everything is well combined.
Step 3: Add the Egg and Vanilla
Next, add in the egg and vanilla extract. Beat this mixture until it is thoroughly combined. The batter will begin to look more cohesive and light as you incorporate everything! The aroma of vanilla will start to fill your kitchen, making it feel warm and cozy.
Step 4: Mix Dry Ingredients
In a separate bowl, whisk together the flour, baking powder, and salt. Once combined, gradually add this dry mixture to the wet ingredients. You can do this in batches to avoid flour clouds in your kitchen. Stir until just combined; be careful not to overmix! Overmixing can lead to tough cookies (which we definitely don’t want!).
Step 5: Shape the Cookies
Now for the fun part! Using your hands, take small sections of dough (about the size of a golf ball) and roll them into finger shapes. Make them as long or short as you’d like; just remember, this is a creative endeavor! Once shaped, place them on a parchment-lined baking sheet, leaving some space in between each cookie.
Step 6: Add the Almonds
Now it’s time to add our “nails”! Gently press an almond onto the tip of each shaped cookie to create that creepy fingernail look. Here’s a little chef hack: you can slightly bend the almond to make it look even more gnarled and witchy.
Step 7: Bake!
Pop those cookies into the preheated oven and bake for about 18-20 minutes, or until they start to turn a light golden brown around the edges. Keep an eye on them because oven times may vary. The moment the cookies come out, they’ll smell heavenly, and you might find it hard to resist just a little nibble.
Step 8: Add the Finishing Touch
If you’re feeling extra spooky, once the cookies have cooled slightly, you can use a toothpick to add red food coloring to create a drippy “blood” effect around the almond. This adds a fun and spooky touch that everyone will love!
Serving Suggestions
To serve your Witch Finger Cookies, place them on a long platter lined with spooky-themed decorations: think cobwebs or mini plastic spiders for those dramatic effects. You could also stack them like a creepy tower or arrange them in a crooked line, adding a few placed almonds around for extra flair. Your guests will love picking off these eerie delights!
Recipe Variations
Feel free to play around with this recipe! Here are a few variations you can consider:
- Chocolate Chip Fingers: Add mini chocolate chips into the dough for an extra burst of sweetness.
- Spicy Oat Fingers: Mix in some cinnamon and oats for a fall twist—just chop the flour down by about half a cup.
- Gluten-Free: Use a gluten-free flour blend. Your cookies will still be delicious and perfect for all dietary needs!
- Theme Beyond Halloween: Use different food coloring for other holidays. Think green fingers for St. Patrick’s Day or red for festive Christmas cookies!
Chef’s Notes
This recipe is one of my all-time favorites, and it has evolved throughout the years. Initially, I made these cookies simply because they were fun and spooky, but I’ve come to appreciate how they spark joy and laughter during Halloween. I remember one year, I switched it up by adding candy eyes to some of the fingers, transforming them into grinning, ghastly treats, which turned out to be a crowd favorite!
I always chuckle thinking about the little mishaps in the kitchen—like the time I dropped a whole batch onto the floor (hello, witch finger disaster!). But that just made for a fun story and more cookies to bake!
FAQs and Troubleshooting
1. My cookies spread too much! What could I have done wrong?
This can happen if your butter was too soft. Make sure to slightly chill your cookie dough before shaping it, and always preheat your oven thoroughly.
2. How do I store these cookies?
Once cooled, they can be stored in an airtight container at room temperature for 3-5 days, or you can freeze them for later enjoyment! Just make sure to separate layers with parchment paper.
3. What if my dough is too dry?
If your dough seems too dry (which can happen depending on the flour you’re using), add in a tablespoon of milk or water to help bring it together.
4. Can I make these in advance?
Absolutely! You can prepare the dough ahead of time and refrigerate it for a day or freeze it for up to a month. Just thaw it in the fridge before baking!
Nutritional Info
Each Witch Finger Cookie (based on 24 cookies):
- Calories: 115
- Protein: 1.5g
- Fat: 6g
- Carbohydrates: 14g
- Sugar: 3g
So there you have it: a delightful, spooky treat that’s perfect for Halloween or any time you want to sprinkle a bit of magic into your cooking. Whether you’re baking with family or surprising friends with these eerie goodies, the joy you’ll bring is what cooking is all about. So, get in the kitchen and unleash your inner witch! Happy baking!
PrintWitch Finger Cookies

Delightfully creepy Witch Finger Cookies, perfect for Halloween festivities with a buttery, melt-in-your-mouth texture.
- Prep Time: 15 minutes
- Cook Time: 20 minutes
- Total Time: 35 minutes
- Yield: 24 cookies 1x
- Category: Dessert
- Method: Baking
- Cuisine: American
- Diet: Vegetarian
Ingredients
- 1 cup unsalted butter, softened
- 1 cup powdered sugar
- 1 egg
- 1 teaspoon vanilla extract
- 2 3/4 cups all-purpose flour
- 1 teaspoon baking powder
- 1/2 teaspoon salt
- Almonds (for topping)
- Red food coloring (optional, for blood effect)
Instructions
- Preheat the oven to 325°F (160°C).
- Cream the butter and powdered sugar until fluffy.
- Add the egg and vanilla extract; mix until combined.
- Mix the flour, baking powder, and salt in a separate bowl.
- Combine dry ingredients with wet ingredients, stirring until just mixed.
- Shape the dough into finger shapes and place on a baking sheet.
- Add an almond on each cookie to represent fingernails.
- Bake for 18-20 minutes until golden brown.
- Add red food coloring for a spooky touch, if desired.
Notes
Store cookies in an airtight container at room temperature for 3-5 days or freeze for later enjoyment.
Nutrition
- Serving Size: 1 cookie
- Calories: 115
- Sugar: 3g
- Sodium: 50mg
- Fat: 6g
- Saturated Fat: 3g
- Unsaturated Fat: 3g
- Trans Fat: 0g
- Carbohydrates: 14g
- Fiber: 0g
- Protein: 1.5g
- Cholesterol: 30mg
Keywords: Halloween, cookies, spooky treats, family-friendly baking, witch finger cookies