Indulge Without the Bake: Your Go-To No Bake Dark Chocolate Tart Recipe
Hello, fellow food enthusiasts! I’m so excited to share a recipe today that has become a staple in my kitchen — a delightful No Bake Dark Chocolate Tart. This decadent dessert is perfect for all those moments when you want to treat yourself or impress guests without spending hours in the kitchen. Life is busy, and sometimes the hustle and bustle can make it tricky to whip up a fancy dessert. That’s where this tart comes to the rescue!
Picture this: the rich, velvety taste of dark chocolate, the crunch of an Oreo crust, and the fresh burst of berries on top, all coming together to create a dessert that feels like magic yet requires no baking at all! It’s a dream for chocolate lovers and an instant crowd-pleaser, making it the ultimate sweet ending to any meal. So grab your apron, and let’s dive into this no-fuss yet fabulous recipe that will surely elevate any occasion!
A Sweet Memory in Every Slice
Growing up, my family had a tradition of Sunday dinners. The table was always adorned with love, laughter, and of course, tons of food. But dessert held a special place in my heart. My aunt, the queen of improvisation, was the first one to introduce me to the concept of no-bake desserts. I fondly remember standing beside her as she tossed together crushed cookies, melted chocolate, and whipped cream without a care in the world, all while sharing stories and jokes that made the kitchen alive with warmth.
One particular Sunday, she decided to switch things up with a chocolate treat that left everyone raving. While she didn’t follow a specific recipe, her creation had a similar vibe to what I’m sharing with you today. That experience sparked my love for easy, delightful desserts, and now, every time I make this No Bake Dark Chocolate Tart, I can’t help but feel nostalgic about those cherished moments we spent together in the kitchen. Food truly does weave the fabric of our lives!
The Delicious Line-Up: Ingredients
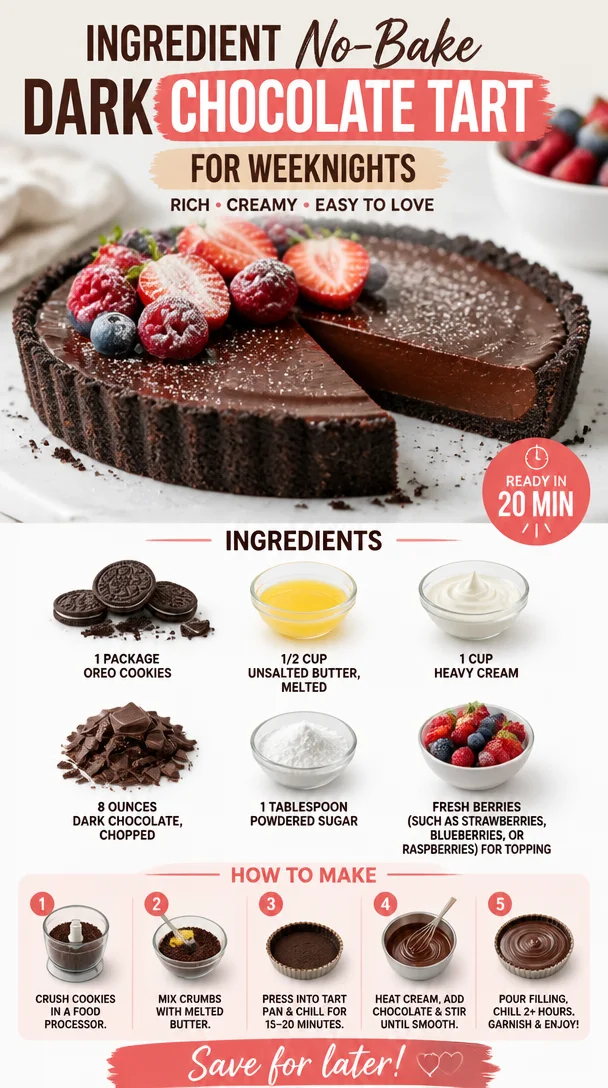
Before we dive into the cooking, let’s gather our magical ingredients. Here’s what you’ll need for this sumptuous tart:
-
1 package Oreo cookies
These form the base of our tart. Their chocolatey goodness adds depth and crunch. If you’re feeling adventurous, you can substitute with chocolate graham crackers or any other favorite cookie! -
1/2 cup unsalted butter, melted
This acts as the glue that holds those crushed cookies together. Don’t have unsalted butter? No worries! You can use salted butter; just skip adding any extra salt in the recipe. -
1 cup heavy cream
Heavy cream gives our filling that perfect lusciousness. If you’d like a lighter version, you can substitute half of it with coconut cream. -
8 ounces dark chocolate, chopped
Look for high-quality chocolate (at least 60% cacao) for that rich flavor! Don’t have dark chocolate? Try using semisweet or milk chocolate instead for a sweeter profile. -
1 tablespoon powdered sugar
This adds a touch of sweetness to the whipped cream without overpowering the chocolate. You can omit it if you’re watching your sugar intake or use a sugar substitute. -
Fresh berries (such as strawberries, blueberries, or raspberries) for topping
These not only add a pop of color but also balance out the richness with their tartness. If fresh berries aren’t available, you can use frozen berries; just thaw and drain them beforehand.
Let’s Get Cooking: Step-by-Step Instructions
Alright, my fellow kitchen adventurers, let’s transform these ingredients into a show-stopping tart!
Step 1: Create the Crust
-
Crush the Oreos: Using a food processor, pulse the Oreo cookies until they resemble fine crumbs. If you don’t have a food processor, pop the cookies in a sealed plastic bag and crush them with a rolling pin — it’s a great way to relieve stress too!
-
Combine with Butter: In a mixing bowl, combine the cookie crumbs with the melted butter, mixing until everything is evenly coated and holds together when pressed.
-
Form the Crust: Press the mixture firmly into the bottom and up the sides of a tart pan (9-inch works great!). Use the bottom of a measuring cup or your fingers to make sure it’s even. Pop it in the fridge to set while we work on the filling.
Step 2: Make the Chocolate Filling
-
Melt the Chocolate: In a microwave-safe bowl, combine the chopped dark chocolate and heat it in the microwave in 30-second intervals, stirring in between, until completely melted and smooth. Alternatively, you can use a double boiler if you prefer.
-
Whip the Cream: In a separate bowl, pour in the heavy cream and use an electric mixer to whip it until soft peaks form. Add the powdered sugar during this process for a hint of sweetness.
-
Combine the Mixtures: Gently fold the melted chocolate into the whipped cream until fully incorporated. Be careful not to deflate the mixture too much; you want that light, airy texture!
Step 3: Assemble the Tart
-
Fill the Crust: Remove the tart crust from the fridge and pour the chocolate filling into it. Spread it evenly with a spatula for a smooth finish.
-
Chill: Cover with plastic wrap and let it set in the refrigerator for at least 4 hours, or ideally overnight. This helps the tart firm up perfectly.
Serving Suggestions
Once your tart has set and you’re ready to serve, remember to unlock its full potential with a few finishing touches. Garnish with a generous sprinkle of fresh berries, and for a touch of elegance, drizzle with melted chocolate or even a dollop of whipped cream! When you slice into that tart, the creamy filling will just glide onto the plate, promising a beautiful presentation every time.
Recipe Variations
You’re going to love how versatile this No Bake Dark Chocolate Tart can be! Here are a few creative twists you might want to try:
- Peanut Butter Swirl: Before chilling, swirl in some creamy peanut butter into the chocolate filling for a deliciously nutty flavor.
- Mint Chocolate: Add a few drops of peppermint extract to the melted chocolate for that refreshing minty kick.
- Vegan Version: Use coconut oil instead of butter, coconut cream in place of heavy cream, and dairy-free chocolate to whip up a vegan-friendly tart.
- Coffee Infusion: Fold in a tablespoon of instant coffee granules to the chocolate mixture for an impressive mocha flavor.
- Additional Fruit: Layer sliced bananas or hints of orange zest into the tart for extra flavor and a bit of zest.
Chef’s Notes
This No Bake Dark Chocolate Tart holds a special place in my heart, not just for its incredible taste but because it reminds me of the joy of sharing food with loved ones. The recipe has evolved over time as I’ve incorporated different flavors, making it a true testament to the joys of improv cooking. On a busy day, this tart is a lifesaver — it allows me to impress my friends without spending hours in the kitchen. Oh, and if you see someone “testing” the tart with a spoon while it’s setting in the fridge? Yeah, that’s totally me!
FAQs and Troubleshooting
1. Why is my filling not setting?
If the filling hasn’t set, it may need more chill time. Ensure that you let it sit in the refrigerator as long as recommended; overnight is often best.
2. Can I use milk chocolate instead of dark chocolate?
Absolutely! Milky chocolate will yield a sweeter tart. Just adjust the amount of powdered sugar if you want to balance the sweetness.
3. My crust seems crumbly; what did I do wrong?
You might not have used enough butter or didn’t pack the crumbs tightly enough into the tart pan. Don’t be shy about pressing that crust firmly!
4. How do I store leftover tart?
Keep it covered in the fridge for up to 4 days. Just remember to layer it with parchment paper if you’re stacking to prevent sticking.
Nutritional Info
(Approximate per slice based on 8 servings)
- Calories: 350
- Total Fat: 25g
- Saturated Fat: 15g
- Cholesterol: 50mg
- Carbohydrates: 28g
- Sugars: 15g
- Protein: 4g
Let’s Wrap It Up!
And there you have it, my friends! A No Bake Dark Chocolate Tart that’s as easy to make as it is to devour. I hope this recipe brings as much joy to your kitchen as it has to mine. The laughter, the stories, and the delicious moments shared around the table are what cooking is all about. Now go ahead, get into that kitchen, and let’s create beautiful memories one slice at a time! Happy cooking!
PrintNo Bake Dark Chocolate Tart

A decadent No Bake Dark Chocolate Tart with a crunchy Oreo crust and topped with fresh berries, perfect for any occasion.
- Prep Time: 15 minutes
- Cook Time: 0 minutes
- Total Time: 240 minutes
- Yield: 8 servings 1x
- Category: Dessert
- Method: No Bake
- Cuisine: American
- Diet: Vegetarian
Ingredients
- 1 package Oreo cookies
- 1/2 cup unsalted butter, melted
- 1 cup heavy cream
- 8 ounces dark chocolate, chopped
- 1 tablespoon powdered sugar
- Fresh berries (such as strawberries, blueberries, or raspberries) for topping
Instructions
- Create the Crust
- Crush the Oreos until they resemble fine crumbs.
- Combine cookie crumbs with melted butter until evenly coated.
- Form the crust in a tart pan and refrigerate to set.
- Make the Chocolate Filling
- Melt the chocolate in a microwave-safe bowl until smooth.
- Whip the heavy cream until soft peaks form, adding powdered sugar.
- Combine the melted chocolate and whipped cream gently.
- Assemble the Tart
- Fill the crust with the chocolate filling and spread evenly.
- Chill in the refrigerator for at least 4 hours or overnight.
Notes
For variations, try adding peanut butter or mint extract to the filling.
Nutrition
- Serving Size: 1 slice
- Calories: 350
- Sugar: 15g
- Sodium: 50mg
- Fat: 25g
- Saturated Fat: 15g
- Unsaturated Fat: 8g
- Trans Fat: 0g
- Carbohydrates: 28g
- Fiber: 1g
- Protein: 4g
- Cholesterol: 50mg
Keywords: no bake, dark chocolate, dessert, tart, easy recipe