Pickled Radishes: A Crunchy, Tangy Delight
Ah, pickled radishes! Just the thought of those vibrant pink beauties can make my mouth water. They’re like little bursts of joy, adding the perfect pop of color and crunch to any dish. Whether you’re a salad enthusiast, a taco lover, or just someone who enjoys a little zing in their meals, pickled radishes are your new best friend. Not only are they easy to whip up, but they also add depth and flair to a myriad of dishes.
Today, I’m excited to share my favorite pickled radish recipe with you. But before we get into the nitty-gritty of ingredients and instructions, let’s take a little jaunt down memory lane. I promise you’ll want to stick around!
Personal Story
I’ll never forget the first time I tasted pickled radishes. It was at my friend Anna’s house during a summer barbecue. She served up these gorgeous tacos, piled high with grilled chicken, fresh cilantro, and—wait for it—pickled radishes. At first, I thought, "Radishes? Really?" But oh boy, was I in for a surprise!
One bite, and I was hooked. Those crunchy, tangy gems instantly elevated the entire taco experience, brightening up the robust flavors of the meat and spices. I watched in awe as Anna just casually tossed them into her taco assembly line, like it was the most natural thing in the world. That day, I realized that pickling wasn’t just a way to preserve leftovers; it was a culinary superpower that transformed ordinary ingredients into extraordinary additions.
After that day, pickling became my mission, and radishes quickly became my go-to. They not only burst with flavor but also added a delightful crunch to almost everything I was cooking. Now, I can’t imagine summer meals without a jar of homemade pickled radishes in the fridge, waiting to bring a little zing to the table! So, let’s dive into this simple recipe so you can start your own pickled radish journey!
Ingredients
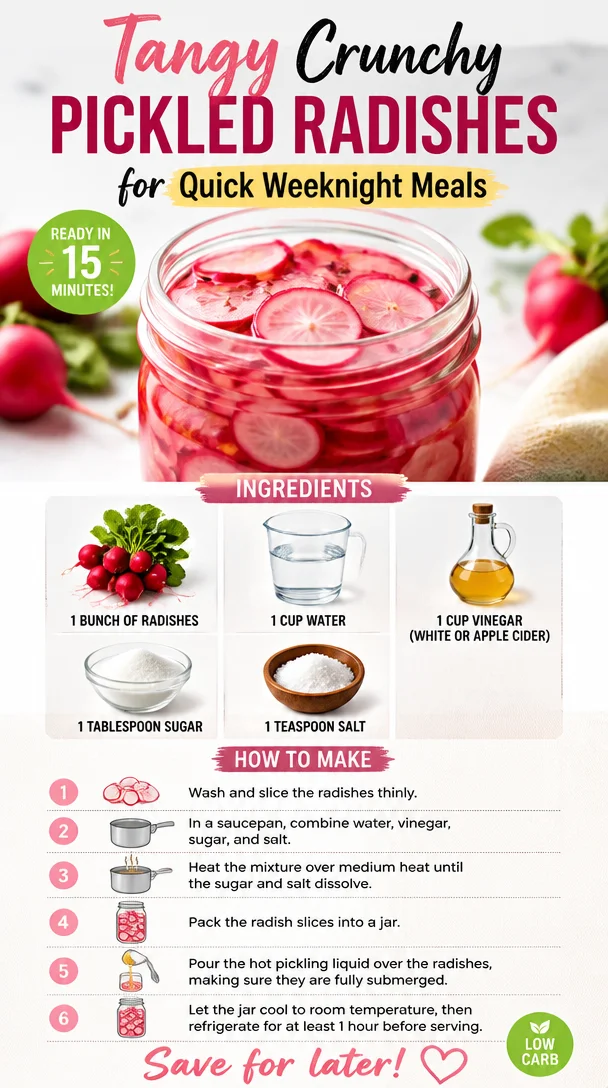
Here’s everything you’ll need to create your own crunchy, tangy pickled radishes:
-
1 bunch of radishes: Choose firm, fresh radishes for the best flavor and crunch. You can substitute with turnips or carrots for a different twist.
-
1 cup water: This will help to dilute the vinegar and create the perfect brine. If you prefer a stronger contrast in flavor, you can use vegetable broth instead.
-
1 cup vinegar (white or apple cider): Vinegar is the backbone of any pickling process. White vinegar offers a sharper taste, while apple cider vinegar provides a hint of sweetness.
-
1 tablespoon sugar: This helps to balance out the tanginess of the vinegar. You can use honey or agave syrup for a more natural sweetener if you prefer.
-
1 teaspoon salt: Salt is essential for flavor and also helps to draw out moisture from the radishes. Consider using sea salt or kosher salt, both of which have a great texture and flavor.
Step-by-Step Instructions
Ready to get your pickle on? Here’s how to make these fabulous pickled radishes:
-
Prepare the Radishes: Begin by washing the radishes under cold water. Once they’re nice and clean, trim off the greens and roots. You can slice them into thin rounds or wedges, depending on your preference. The thinner the slices, the quicker they’ll pickle.
Tip: Use a mandoline for perfectly even slices. Just be careful — those little fingers are precious!
-
Make the Brine: In a medium saucepan, combine the water, vinegar, sugar, and salt. Heat over medium heat, stirring gently until the sugar and salt dissolve completely. You don’t need to boil it; just warm it up enough to combine everything well.
Chef Hack: You can infuse your brine with additional flavors like garlic, peppercorns, or herbs. Just toss them in during the heating process and strain them out later.
-
Pour the Brine Over Radishes: Place the sliced radishes in a clean, sterilized jar. Carefully pour the hot brine over the radishes, making sure they’re fully submerged. If you have any leftover brine, reserve it for future pickling adventures!
Tip: A chopstick is great for pushing down the radish slices and releasing any trapped air bubbles.
-
Cool and Refrigerate: Allow the jar to cool to room temperature. Once cooled, seal it with a lid and pop it in the fridge. The radishes will be ready to devour in just a few hours, but they’re at their best after a day or two.
Chef Insight: The longer they sit, the more flavor they absorb, so if you can resist, wait a week before diving in!
-
Enjoy: Your pickled radishes are now ready to spice up your life! Enjoy them as a snack, on top of salads, or as the star of your taco night.
Serving Suggestions
When it comes to serving these pickled radishes, the world is your oyster! Try them on:
- Tacos: ditch the typical toppings and add pickled radishes for that perfect crunch and zing.
- Salads: sprinkle them over fresh greens for a brilliant splash of color.
- Sandwiches: use them as a tangy component in grilled cheese or banh mi.
- Charcuterie boards: they make a stunning addition, inviting everyone to dive in with a fork!
Recipe Variations
Feel like mixing it up? Here are a few ideas for variations to keep things exciting:
-
Spicy Pickled Radishes: Add red pepper flakes or sliced jalapeños to the brine for a kick.
-
Citrusy Twist: Incorporate a splash of orange or lime juice into the brine for a refreshing twist.
-
Herb-Infused: Add sprigs of dill, thyme, or cilantro while the brine is heating for a fragrant addition.
-
Beet Pickled Radishes: Use beet juice instead of water to create gorgeous pink radishes with an earthy flavor.
-
Garlic Lovers: Toss a couple of crushed garlic cloves into the brine for a delicious flavor punch.
Chef’s Notes
As a foodie, I’m always experimenting in the kitchen. When I first started making pickled radishes, I was a little timid with the flavors. Over time, it became an outlet for creativity! I’ve learned to embrace improvisation—if I have a bit of leftover cucumber or sliced bell pepper, I throw them in with the radishes.
Oh, and I still chuckle when I think about the first batch I made. I forgot to put the lid on my jar and ended up with a lovely kitchen pickle explosion! Lesson learned: always, and I mean always, double-check that lid before you walk away. Kitchen mishaps are just part of the adventure, after all!
FAQs and Troubleshooting
1. How long do pickled radishes last?
In the fridge, pickled radishes can last up to two to three weeks. Just make sure to keep them submerged in the brine!
2. What if my radishes are too soft?
Tighter, fresher radishes will give you the crunch you’re looking for. If they’re too soft, they may have been overcooked during the slicing or pickling process. Stick to firm radishes next time!
3. Can I pickle other vegetables using the same brine?
Absolutely! The pickling brine works wonderfully for cucumbers, cauliflower, carrots, and even onions. Just adjust the pickling time according to the vegetable being used!
4. My radishes taste too salty. What did I do wrong?
Saltiness can vary depending on personal taste and the type of salt used. If you feel it’s too salty, try adding a little more sugar and water to the brine for balance.
Nutritional Info (Optional)
Pickled radishes are a low-calorie, low-carb food packed with vitamins and minerals. A serving of pickled radishes (1 oz) contains about 15 calories and provides Vitamin C and potassium. Plus, they’re a great way to add flavor without additional calories!
So, what are you waiting for? Grab your apron and dive into this tangy adventure with pickled radishes! I can’t wait for you to taste how easy and delightful home pickling can be. Let me know how it goes, and happy cooking!
PrintPickled Radishes: A Crunchy, Tangy Delight
A simple recipe for crunchy, tangy pickled radishes that elevate any dish.
- Prep Time: 10 minutes
- Cook Time: 5 minutes
- Total Time: 15 minutes
- Yield: 4 servings 1x
- Category: Condiment
- Method: Pickling
- Cuisine: American
- Diet: Vegan
Ingredients
- 1 bunch of radishes
- 1 cup water
- 1 cup vinegar (white or apple cider)
- 1 tablespoon sugar
- 1 teaspoon salt
Instructions
- Prepare the radishes: Wash the radishes under cold water, trim off the greens and roots, and slice into thin rounds or wedges.
- Make the brine: Combine the water, vinegar, sugar, and salt in a medium saucepan. Heat over medium, stirring until dissolved.
- Pour the brine over the radishes in a clean jar, ensuring they are submerged.
- Cool and refrigerate: Let the jar cool to room temperature, then seal and refrigerate. Best after a day or two.
- Enjoy: Use them to spice up snacks, salads, or tacos.
Notes
The longer they sit, the more flavor they absorb. Can infuse brine with garlic, herbs, or spices for variation.
Nutrition
- Serving Size: 1 oz
- Calories: 15
- Sugar: 1g
- Sodium: 280mg
- Fat: 0g
- Saturated Fat: 0g
- Unsaturated Fat: 0g
- Trans Fat: 0g
- Carbohydrates: 3g
- Fiber: 1g
- Protein: 0g
- Cholesterol: 0mg
Keywords: pickled radishes, tangy snack, quick pickle, vegetarian, easy recipe