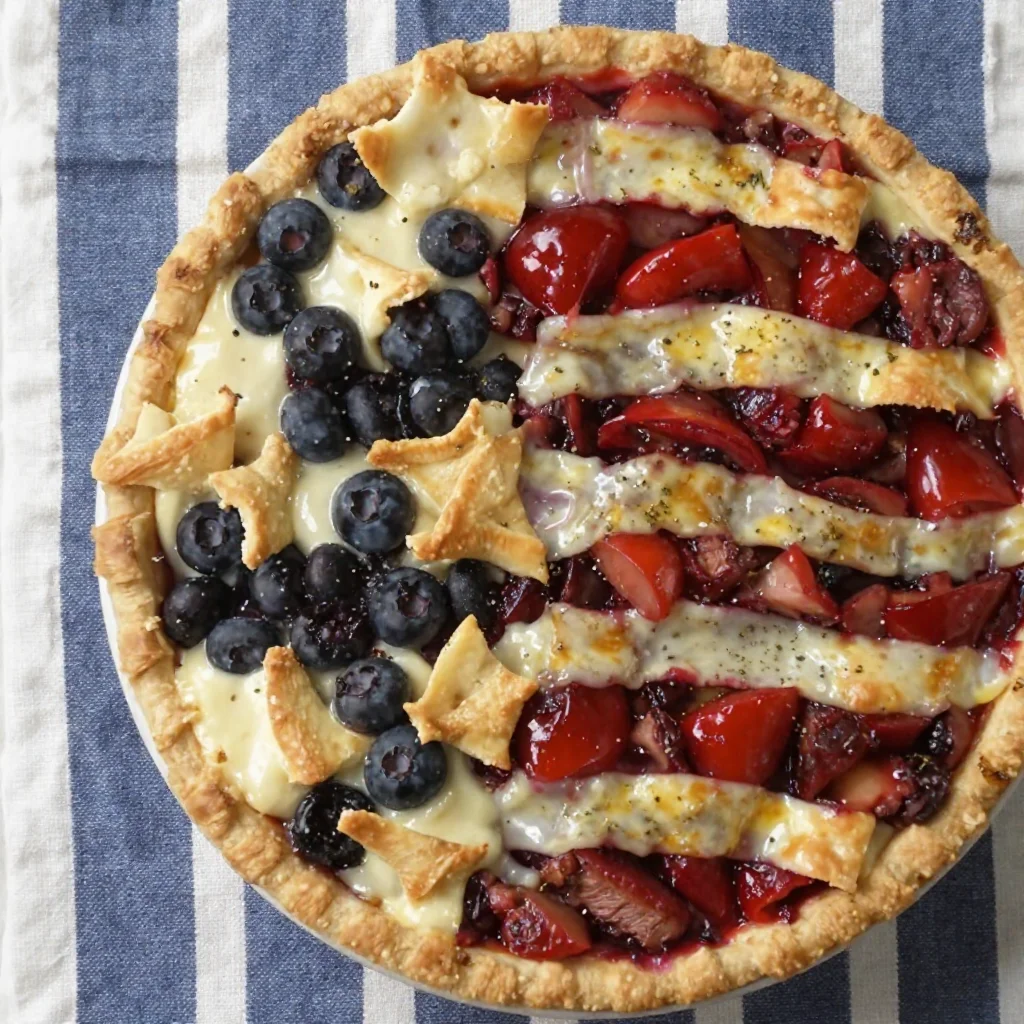
The Joy of Cherry and Blueberry Pie: A Slice of Summer
Introduction
There’s something about pie that makes everything feel a little more special, isn’t there? Perhaps it’s the flaky crust that crumbles just right or the juicy, vibrant filling that bursts with flavor. Whatever it is, pie has a way of bringing people together—especially when it’s a scrumptious cherry and blueberry pie. This delightful dessert is like summer in a dish, and it’s perfect for family gatherings, backyard barbecues, or even a cozy night in.
Welcome to the world of baking magic, where I’m here to guide you through creating the ultimate cherry and blueberry pie that’s sure to impress. With a few simple ingredients and a sprinkle of love, you can whip up this show-stopping dessert in no time. Plus, I’ll share some fun stories, helpful tips, and variations that will make you feel like a professional baker, even if you’re just starting out!
Personal Story
One of my fondest childhood memories revolves around my grandma’s kitchen. Her home was our family lighthouse—a place where we gathered not just to eat, but to create memories. Summer evenings were particularly magical, with the sweet scent of ripe cherries and plump blueberries wafting through the air as she prepared her famous pies. I remember standing on a stool, stretching to reach the countertop, while she handed me the rolling pin to help with the crust. The laughter, the mess, and the shared joy of baking made those moments unforgettable.
One specific evening remains etched in my memory; I had mistakenly added far too much sugar to the filling, and we ended up with a spectacular, sticky blueberry avalanche. Grandma just laughed, scooped some into a bowl, and declared it an “experimental dessert.” That’s the essence of cooking, isn’t it? Embracing the unexpected and relishing the joy of creation. Let’s bring that same spirit to your kitchen as we dive into making this delectable cherry and blueberry pie!
Ingredients
Here’s what you’ll need to create your very own cherry and blueberry pie, along with some handy tips for each ingredient:
-
Refrigerated Pie Crust:
The backbone of any great pie! You can use homemade pie crust for a personal touch, but I love the convenience of refrigerated options. If gluten-free is more your style, swap it out for a gluten-free pie crust available in most grocery stores. -
Daisy Sour Cream:
This magical ingredient adds richness and a slight tanginess to your filling, balancing the sweetness of the fruits. If you’re looking for lighter alternatives, Greek yogurt can be a great substitute. -
Egg Yolks, Divided:
We’ll use these to enrich our filling and help bind everything together. If you wish to swap, consider using a flax or chia egg (1 tablespoon ground flaxseed or chia seeds mixed with 2.5 tablespoons water = 1 egg) for a vegan version. -
Sugar:
Sweetness is key! Use granulated sugar for the filling, but if you want to elevate the flavor profile, you can combine it with brown sugar for a deeper, caramel-like taste. -
Cherry Pie Filling:
Store-bought is quick and easy, but you can also make your own if you’re feeling adventurous! Just remember that sour cherries will give you a tangy kick; sweet cherries will yield that classic dessert flavor. -
Blueberry Pie Filling:
Like the cherries, you can use the store-bought variety or make your own fresh blueberry filling. They’re both delicious as long as they’re packed with flavor! -
Milk:
We’ll use this to brush the crust for that beautiful golden finish. Any milk works! If you prefer plant-based options, feel free to use almond milk or oat milk.
Step-by-Step Instructions
Let’s get cooking! Follow these detailed steps to create a cherry and blueberry pie that will have your friends and family begging for the recipe:
-
Preheat Your Oven:
Turn your oven to 425°F (220°C). This hot temperature will help our pie crust become golden and flaky while ensuring the fruity filling bubbles beautifully. -
Prepare Your Pie Crust:
Roll out your refrigerated pie crust according to package instructions. If using homemade dough, you’ll want to roll it out to about 12 inches in diameter, ensuring it’s about 1/8-inch thick. Gently place it into your pie dish, pressing it into the edges, and leaving a little overhang.Chef’s Tip: If your crust is cracking, don’t worry! Just use your fingers to pinch or smooth it back together. Every pie tells a story.
-
Combine the Fillings:
In a mixing bowl, combine the cherry pie filling and blueberry pie filling. Add in 1 cup of sugar and 2 egg yolks, plus ½ cup of Daisy sour cream. Mix gently until everything is combined.Little Hack: Always taste your filling before it goes into the crust. If it’s not sweet enough for you, feel free to add a bit more sugar or a splash of lemon juice for brightness!
-
Fill the Pie Crust:
Pour the fruit filling into your crust, spreading it evenly.Chef Insight: If you’re adventurous, toss in a dash of cinnamon or nutmeg to add a warm, spicy note to your pie!
-
Prepare the Top Crust:
Roll out your second refrigerated pie crust and carefully place it over the filled pie. Using a knife, cut a few slits in the top crust to allow the steam to escape. Tuck the edges under and crimp with your fingers or a fork to seal.Chef’s Tip: If you’re feeling creative, make a lattice top! Just cut your dough into strips and weave them over your filling for a beautiful finish.
-
Brush with Milk:
Lightly brush the top crust with milk for that gorgeous golden finish.Fun Hint: For an extra touch, sprinkle some sugar over the top for a nice crunch!
-
Bake Your Pie:
Place your pie on a baking sheet (to catch any drips!) and place it in the preheated oven. Bake for about 45-50 minutes until the crust is golden and the filling is bubbling. Keep an eye on it; if the edges brown too quickly, cover them with foil.Chef’s Note: The smell wafting through your home will be absolutely irresistible!
-
Cool and Serve:
Once baked, remove the pie from the oven and cool it for at least an hour. This cooling step allows the filling to set properly.
Serving Suggestions
When it’s finally time to slice into your beautiful creation, serve generous pieces with a scoop of vanilla ice cream or a dollop of whipped cream. Arrange your pie slices on colorful plates, drizzle a bit of raspberry coulis or dust with powdered sugar for that gorgeous presentation. Remember, we eat with our eyes first, so don’t forget that flair!
Recipe Variations
Here are some creative twists to keep things interesting:
- Add Zesty Citrus: Incorporate lemon or orange zest into your filling for a zesty kick.
- Nutty Crust: Add crushed nuts like almonds or pecans into your pie crust for an unexpected crunch.
- Spiced Up Filling: Try mixing in a teaspoon of almond extract or vanilla for depth.
- Vegan Version: Substitute dairy and egg ingredients for vegan alternatives (like coconut cream and a flax egg) for an equally delicious pie!
Chef’s Notes
I can’t tell you how many pies I’ve made throughout the years, and each one brings back a flood of kitchen memories—some sweet, some just plain messy! I’ve learned that the recipes might evolve, but what truly matters is the joy shared with others in the process. Don’t be afraid to embrace your inner pie-maker and get a little creative. Perhaps your first pie won’t be perfect, but it will definitely be perfect in the memories you create along the way.
FAQs and Troubleshooting
Q: What do I do if my pie crust is too dry?
A: If your dough is too crumbly, try adding a tablespoon of ice water at a time until it comes together.
Q: Can I make a pie ahead of time?
A: Absolutely! You can make your pie and keep it in the fridge for 1-2 days or freeze it before baking. Just remember to adjust baking times if you’re starting from frozen.
Q: Why is my filling too runny?
A: If you notice your pie filling bubbling over, it could be due to not enough thickening agent. Consider adding a bit of cornstarch or tapioca starch to thicken the filling further.
Q: Can I use frozen fruit instead of fresh?
A: Yes! Just be sure to thaw and drain the excess liquid before mixing it into your filling.
Nutritional Info
While I believe in enjoying treats like this pie in moderation, here’s an approximate breakdown per slice (1/8 of the pie):
- Calories: 320
- Protein: 4g
- Fat: 15g
- Carbohydrates: 44g
- Fiber: 2g
- Sugars: 16g
In this cherry and blueberry pie, you won’t just find bites of sweetness; you’ll find stories, nostalgia, and a place for flavor to thrive. So let’s heat up those ovens and get cooking—the fruit of your labor is about to become a cherished memory at the dinner table! Grab your apron, and let’s make some magic!
PrintCherry and Blueberry Pie

A delightful cherry and blueberry pie that captures the essence of summer in every slice.
- Prep Time: 20 minutes
- Cook Time: 50 minutes
- Total Time: 70 minutes
- Yield: 8 servings 1x
- Category: Dessert
- Method: Baking
- Cuisine: American
- Diet: Vegetarian
Ingredients
- 1 refrigerated pie crust
- ½ cup Daisy sour cream
- 2 egg yolks, divided
- 1 cup granulated sugar
- 1 can cherry pie filling
- 1 can blueberry pie filling
- Milk for brushing
Instructions
- Preheat your oven to 425°F (220°C).
- Prepare your pie crust by rolling it out according to package instructions and placing it in your pie dish.
- Combine the cherry pie filling and blueberry pie filling in a mixing bowl. Add sugar, egg yolks, and sour cream. Mix gently.
- Fill the pie crust with the fruit mixture, spreading it evenly.
- Prepare the top crust and place it over the filled pie. Cut slits for steam to escape.
- Brush the top crust with milk.
- Bake for about 45-50 minutes until golden brown and bubbling.
- Cool the pie for at least an hour before serving.
Notes
Serve with a scoop of vanilla ice cream or whipped cream for a delightful treat.
Nutrition
- Serving Size: 1 slice
- Calories: 320
- Sugar: 16g
- Sodium: 200mg
- Fat: 15g
- Saturated Fat: 7g
- Unsaturated Fat: 5g
- Trans Fat: 0g
- Carbohydrates: 44g
- Fiber: 2g
- Protein: 4g
- Cholesterol: 75mg
Keywords: pie, cherry pie, blueberry pie, summer dessert, baking