Subway Bread Recipe: Italian Herb and Cheese
Introduction
Hey there, fellow foodies! It’s Maggie from BasilBoard.com, and I have a little something special for you today. If you’ve ever craved a freshly baked, warm, and cheesy Italian herb sandwich bread at home, you’re in the right place! This Subway bread recipe is indulgent, delicious, and quite easy to whip up — even on a busy weeknight. Today, I’ll guide you through each step, sprinkle in some kitchen tips, and share my love for bread that transcends the ordinary.
Why is homemade bread so magical? Well, there’s nothing quite like the smell of freshly baked bread wafting through your kitchen. It’s nostalgic, it brings comfort, and let’s be real, fresh bread can elevate any meal. This recipe will have you feeling like a rockstar in your kitchen, impressing not only your taste buds but also your friends and family. Imagine their faces lighting up when they realize you’ve made this Italian Herb and Cheese bread from scratch! It’s that kind of magic I live for.
So, roll up those sleeves, grab your apron, and let’s dive into this delightful baking adventure together. I promise you, your kitchen will become the heart of your home, filled with laughter, friendship, and of course, mouthwatering aromas.
Personal Story
If I’m being honest, I still remember the first loaf of bread I ever made. It was a rainy Saturday, and I was searching for something to do after binge-watching my favorite cooking shows. I ended up in the kitchen, finding an old, dusty cookbook, and flipped to the bread section. The dough was sticky, and I was totally unsure if I was doing it right. Fast forward a couple of hours, and I couldn’t believe the transformation! That sense of wonder and accomplishment when I pulled that golden loaf from the oven was unforgettable.
I slathered it with butter and watched as my family dove in, smiles lighting up their faces. It became our weekend tradition — a simple way to gather, share stories, and savor the joy of homemade bread. This Italian Herb and Cheese bread recipe holds that same magic. It’s a celebration of flavor and a nod to those cherished memories spent around the dining table. So why not create your own bread story at home?
Ingredients
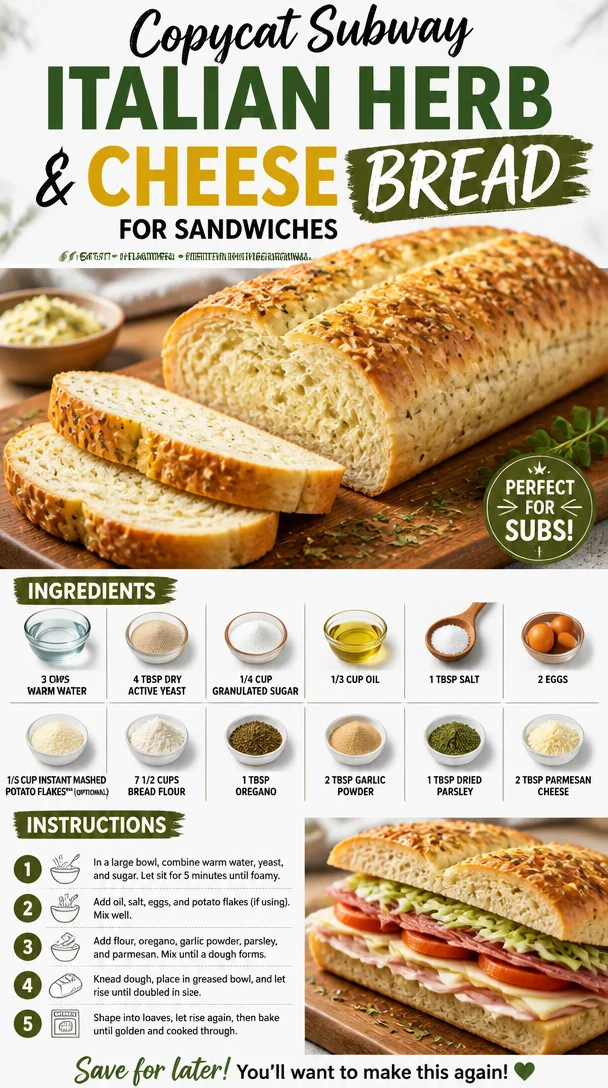
Here’s what you’ll need to make this delectable Italian Herb and Cheese bread:
-
3 cups warm water: This is the liquid gold! Warm water (about 110°F) helps activate the yeast, making your dough rise beautifully. Use a kitchen thermometer or test it with your wrist—it should feel warm, not hot.
-
4 Tbsp dry active yeast: Yeast is the key player in this recipe. It makes your dough rise and gives it that fluffy texture. You can also use instant yeast, but keep in mind that it may behave a bit differently.
-
1/4 cup granulated sugar: Not just for sweetness, sugar helps nourish the yeast, leading to a better rise.
-
1/3 cup oil: Use vegetable oil or olive oil for richness. Olive oil adds a lovely depth of flavor, but feel free to use canola or sunflower oil if you prefer a milder taste.
-
1 Tbsp salt: Essential for flavor—just don’t add it directly to the yeast, or it can inhibit its growth.
-
2 eggs: Eggs enrich the bread, adding tenderness and that glorious golden color. For a vegan option, try using flax eggs (1 Tbsp ground flaxseed mixed with 2.5 Tbsp water per egg) as a substitute.
-
1/3 cup instant mashed potato flakes (optional): Adding a bit of mashed potato flakes makes the bread softer and increases moisture. If you don’t have any on hand, it’s perfectly fine to leave it out!
-
7 1/2 cups bread flour: Bread flour contains more protein than all-purpose flour, giving your bread a chewier texture. You can substitute with all-purpose flour in a pinch, but your bread may be slightly less chewy.
-
1 Tbsp oregano: This herb gives the dough an aromatic kick. Feel free to switch it up with Italian seasoning for a more complex flavor.
-
2 Tbsp garlic powder: Garlic and bread just go hand in hand. If you want a fresh twist, consider using minced garlic instead.
-
1 Tbsp dried parsley: Adds a pop of color and that lovely herbal note. Fresh parsley works too, but you’ll need to adjust the quantity.
-
2 Tbsp parmesan cheese: Because cheese makes everything better! For a dairy-free option, try nutritional yeast for that cheesy flavor without the dairy.
Step-by-Step Instructions
Ready to dive into the baking process? Here we go!
-
Activate the yeast: In a large bowl, combine warm water, sugar, and yeast. Let it sit for about 5–10 minutes until it’s frothy. This step is crucial! If your mixture doesn’t bubble up, it means the yeast is either dead or not activated.
-
Combine wet ingredients: Once your yeast is frothy, add in the oil and eggs. Give it a gentle whisk until everything is combined. This will incorporate the flavors before you mix in the dry ingredients.
-
Mix the dry ingredients: In another large bowl, whisk together your bread flour, salt, oregano, garlic powder, parsley, and potato flakes (if using). This ensures even distribution of the spices throughout the dough.
-
Combine wet and dry: Gradually add your dry ingredients to the wet mixture. Stir until a shaggy dough forms. I like to use a sturdy wooden spoon or a dough whisk to incorporate everything without getting too messy.
-
Kneading time!: Transfer your dough onto a floured surface. Knead it for about 10 minutes until it’s smooth and elastic. You’ll know it’s ready when you can stretch it without it tearing—this is a fun (and empowering) stage!
-
First rise: Place your kneaded dough in a greased bowl, covering it with plastic wrap or a damp kitchen towel. Let it rise in a warm place for about 1–2 hours, or until it has doubled in size. Check back occasionally—this is the fun part when you can see the magic happen!
-
Shape the loaves: Once risen, punch down the dough to release the air. Divide it into three equal portions (for three loaves). Shape each portion into a loaf by flattening it out, then rolling it tightly, tucking in the edges as you go.
-
Second rise: Place the loaves seam-side down in greased loaf pans. Cover them and let rise again for about 30–45 minutes until they puff up nicely.
-
Preheat your oven: While your loaves are doing their final rise, preheat your oven to 375°F (190°C). This step ensures an even and quick bake for that perfect crust.
-
Add the finishing touches: Before popping them in the oven, brush the tops with a little oil (or an egg wash for a glossy finish) and sprinkle with extra parmesan cheese.
-
Bake: Bake those beauties for 30–35 minutes, or until they’re golden brown and sound hollow when tapped on the bottom. Your home will smell divine at this point!
-
Cool and enjoy: Let your loaves cool in their pans for 10 minutes, then transfer them to a wire rack to cool completely. Patience is key here; it’s hard to wait, but trust me, it’s worth it!
Serving Suggestions
Now that you’ve got your warm Italian Herb and Cheese bread, it’s time to think about serving! Slice it up and serve it alongside your favorite pasta dish, use it for delicious sandwiches, or simply enjoy it warm with a pat of butter or a drizzle of olive oil.
For a fun twist, dice the bread into cubes and toast them up with garlic and herbs to make croutons for your salads, or serve with a fresh marinara for a homemade garlic bread experience. The possibilities are endless!
Recipe Variations
Feel like mixing things up a bit? Here’s how you can play with this Italian Herb and Cheese bread:
-
Cheese lovers delight: Mix different cheeses like mozzarella, cheddar, or fontina into the dough for an extra cheesy experience.
-
Herb-infused: Swap out or add in herbs like thyme, rosemary, or even a touch of chili flakes for a kick.
-
Olive oil drizzle: Infuse your oil with Italian herbs before mixing it into the dough for an added flavor burst.
-
Sweet twist: For a sweeter version, reduce the sugar and add cinnamon and raisins for a delightful breakfast treat.
-
Gluten-free option: Substitute gluten-free flour mix with a binding agent like xanthan gum for gluten-free deliciousness.
Chef’s Notes
This bread holds a special place in my heart, and yes, it’s taken a bit of tweaking over the years to get it just right. The memories made in the kitchen while baking this bread are unforgettable — laughter, delicious smells, and a bit of flour here and there (okay, maybe a lot!).
I remember one time my niece wanted to help, and she accidentally added a whole cup of salt instead of sugar. Let me tell you, the look on her face when she tried the dough was priceless! Lessons learned: always double-check your ingredients and keep the little ones close — they give the best kitchen giggles!
FAQs and Troubleshooting
1. My bread didn’t rise! What went wrong?
Your yeast may have been inactive, or the water temperature might have been too hot or too cold. For future reference, make sure to check the yeast’s expiration date and use the warm water method outlined in the instructions.
2. My bread is too dense! How can I make it fluffier?
A dense bread could be a result of not kneading enough or using too much flour. When you measure your flour, use the spoon-and-level technique to avoid packing in too much. Kneading develops the gluten, giving it that lovely fluffy texture.
3. Can I make this ahead of time?
Absolutely! You can prepare the dough and let it rise in the fridge overnight. Just take it out the next day, allow it to come to room temperature, shape it, let it rise again, and then bake.
4. What if I don’t have bread flour?
No worries! You can use all-purpose flour, though it may produce a slightly different texture. Just keep in mind that the final result might be a bit softer, which is still delicious!
Nutritional Info (optional)
For those interested in nutrition, a serving (1 slice) of this delightful bread contains approximately:
- Calories: 150
- Protein: 5g
- Carbohydrates: 26g
- Fat: 4g
- Fiber: 1g
- Sugar: 1g
Conclusion
And there you have it, friends! Your very own homemade Italian Herb and Cheese bread that’s going to make your kitchen smell heavenly. I hope this recipe inspires you to gather your loved ones around the table and create lasting memories over your favorite meals.
Whether it’s toasted with a drizzle of olive oil or stuffed with your go-to sandwich fillings, every bite is pure magic. So go ahead, bake this bread, and savor every moment of joy it brings to your home. Happy cooking!
PrintItalian Herb and Cheese Subway Bread
A freshly baked Italian herb and cheese bread recipe that’s perfect for sandwiches or enjoying warm. Easy to make and deliciously comforting.
- Prep Time: 30 minutes
- Cook Time: 35 minutes
- Total Time: 1 hour 5 minutes
- Yield: 3 loaves 1x
- Category: Bread
- Method: Baking
- Cuisine: Italian
- Diet: Vegetarian
Ingredients
- 3 cups warm water (about 110°F)
- 4 Tbsp dry active yeast
- 1/4 cup granulated sugar
- 1/3 cup oil (vegetable or olive)
- 1 Tbsp salt
- 2 eggs
- 1/3 cup instant mashed potato flakes (optional)
- 7 1/2 cups bread flour
- 1 Tbsp oregano
- 2 Tbsp garlic powder
- 1 Tbsp dried parsley
- 2 Tbsp parmesan cheese
Instructions
- Activate the yeast: In a large bowl, combine warm water, sugar, and yeast. Let it sit for about 5–10 minutes until frothy.
- Combine wet ingredients: Add in the oil and eggs, whisking gently until combined.
- Mix dry ingredients: In another bowl, whisk together the bread flour, salt, oregano, garlic powder, parsley, and potato flakes.
- Combine wet and dry: Gradually add dry ingredients to wet mixture, stirring until a shaggy dough forms.
- Kneading time!: Transfer dough to a floured surface and knead for about 10 minutes until smooth and elastic.
- First rise: Place dough in a greased bowl and cover. Let rise for 1–2 hours in a warm place until doubled in size.
- Shape the loaves: Punch down the dough, divide into three portions, and shape each into a loaf.
- Second rise: Place loaves seam-side down in greased pans, cover, and let rise for 30–45 minutes.
- Preheat your oven: Preheat to 375°F (190°C) while the loaves rise.
- Add finishing touches: Brush tops with oil or egg wash, sprinkle with parmesan cheese.
- Bake: Bake for 30–35 minutes until golden brown and hollow when tapped.
- Cool and enjoy: Cool in pans for 10 minutes, then transfer to a wire rack to cool completely.
Notes
For a vegan option, substitute eggs with flax eggs. Ensure your yeast is fresh for the best rise. This bread can also be prepared in advance and refrigerated before the second rise.
Nutrition
- Serving Size: 1 slice
- Calories: 150
- Sugar: 1g
- Sodium: 400mg
- Fat: 4g
- Saturated Fat: 1g
- Unsaturated Fat: 2g
- Trans Fat: 0g
- Carbohydrates: 26g
- Fiber: 1g
- Protein: 5g
- Cholesterol: 30mg
Keywords: bread, baking, italian, herb, cheese, homemade