The Joy of Homemade Bread: A Warm and Flavorful Experience
Ah, the smell of freshly baked bread wafting through the kitchen is something truly magical. It’s like a warm hug on a chilly day, a comforting welcome when you step into your home. There’s a reason why the art of bread-making has stood the test of time – it’s not just about the food; it’s an experience, a journey that takes us back to moments in our childhood and memories shared around the table. Today, we’re diving into the delightful world of homemade bread, a staple that transforms simple meals into extraordinary ones.
Let’s roll up our sleeves and explore how to make your very own loaf that will have your friends and family begging for a slice. Trust me, it’s easier than you think, and the rewards are simply out of this world!
A Personal Story: The Bread That Brought Us Together
Growing up, bread was more than just something to fill our stomachs; it was a symbol of love, connection, and warmth. I remember standing on a wobbly stool next to my grandmother as she kneaded dough on the kitchen counter, her hands covered in flour, a sprinkle of sugar dusting the air. She’d tell me stories about how her mother used to bake bread in a stone oven, the aroma filling the neighborhood streets.
The magic happened when we pulled that golden-brown loaf out of the oven. It was still warm, and the steam danced in the air as we sliced into it, spreading a generous pat of butter that melted in an instant. That first bite encapsulated pure bliss. I learned that aside from satisfying hunger, bread has an incredible ability to bring people together. Those moments in the kitchen, filled with laughter, flour fights, and the comforting scent of baking—those are the memories that inspired me to create and share my love for cooking at BasilBoard.com.
Ingredients: Crafting Your Perfect Loaf
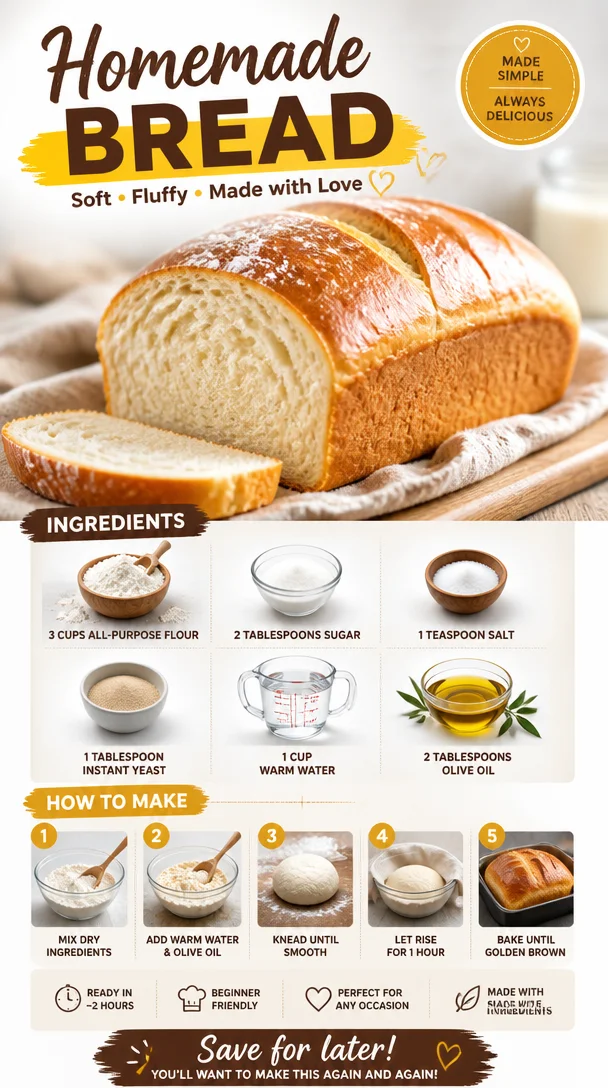
Let’s talk about the ingredients you’ll need to create this beautiful bread. Here’s what’s on our list:
-
3 cups all-purpose flour: The foundation of our bread. If you’re looking for a lighter loaf, feel free to substitute half with bread flour for an extra chewy texture!
-
2 tablespoons sugar: Adding a hint of sweetness, sugar not only enhances flavor but also helps activate the yeast. You can swap it with honey or maple syrup for a natural touch.
-
1 teaspoon salt: This is essential for taste and helps control yeast activity. Remember, too much can be overpowering, but too little can leave your bread bland.
-
1 tablespoon instant yeast: The magic maker! Instant yeast is great because it doesn’t require proofing. If you only have active dry yeast, you’ll need to activate it in water first before adding.
-
1 cup warm water: Ideally around 110°F (43°C)—too hot, and you risk killing the yeast; too cold, and the yeast won’t rise.
-
2 tablespoons olive oil: This adds moisture and richness to the bread. You could replace it with melted butter or any neutral oil you have on hand.
Step-by-Step Instructions: Let’s Get Baking!
-
Prep Your Ingredients: Gather all your ingredients and let them come to room temperature. This makes it easy to mix everything together.
-
Mix Dry Ingredients: In a large mixing bowl, combine the flour, sugar, salt, and instant yeast. Whisk it all together—air is your friend here!
-
Add Wet Ingredients: Make a well in the center of your dry mix and pour in the warm water and olive oil. Use a wooden spoon or spatula to gradually incorporate the flour from the edges into the wet mixture. You want everything to come together without too much fuss—no need for perfection!
-
Knead the Dough: Once the mixture looks shaggy and begins to form a ball, it’s time to knead. Turn the dough onto a floured surface and knead for about 8-10 minutes. You’re looking for a smooth texture that’s slightly tacky but not sticky. If you’ve got flour on hand, just sprinkle a bit more on your surface.
-
First Rise: Place the dough in a lightly greased bowl, cover it with a damp cloth or plastic wrap, and set it in a warm place. Let it rise until it’s doubled in size, about 1 to 1.5 hours. Pro tip: turning on your oven light creates a cozy environment for the dough!
-
Shape the Dough: Once it’s risen, punch it down gently to release the air. Transfer it to a lightly floured surface, and shape it into a loaf. You can also create rolls by dividing the dough into smaller pieces and shaping them accordingly.
-
Second Rise: Place your shaped dough into a greased loaf pan. Cover it again and let it rise for another 30-45 minutes, or until it has puffed up nicely.
-
Preheat the Oven: While it’s rising, preheat your oven to 375°F (190°C).
-
Bake Your Bread: Once your dough has risen, pop it in the oven and bake for about 25-30 minutes, or until the top is golden brown and the bread sounds hollow when tapped on the bottom.
-
Cool and Enjoy: Once baked, remove it from the oven and let it cool in the pan for 10 minutes before transferring it to a wire rack. This part is crucial to keep the crust crisp!
Serving Suggestions: Plating Up Your Creation
Now that your homemade bread is ready, how do you serve it? It’s all about showcasing that beautiful loaf! Slice it into thick pieces and arrange it on a rustic wooden board. Pair it with some herb-infused butter, olive oil, or a beautiful balsamic reduction for dipping. Enjoy it alongside a hearty soup, or use it as the ultimate base for a gourmet sandwich.
Recipe Variations: A Twist on Classic Bread
-
Herbed Bread: Add a tablespoon of dried herbs like rosemary, thyme, or Italian seasoning to your dry ingredients for an aromatic twist.
-
Cheesy Delight: Mix in shredded cheese (like cheddar or mozzarella) to the dough before the first rise for a cheesy version that will make your heart sing.
-
Garlic Bread: Knead in minced garlic and fresh parsley for a fragrant, mouthwatering option perfect for garlic bread lovers.
-
Sweet Bread: Add in cinnamon, a dash of nutmeg, and dried fruits like raisins or cranberries for a delightful breakfast treat.
Chef’s Notes: A Personal Touch
I have to admit; one of my favorite things about baking bread is the spontaneity of it all! I once accidentally added an entire tablespoon of cinnamon instead of just a teaspoon while making a loaf. To my surprise, it turned out to be a delightful spiced bread that my friends couldn’t stop raving about. It’s these little accidents in the kitchen that often lead to the best recipes!
Over time, I’ve realized that making bread is not only about following steps; it’s about feeling the dough’s texture, trusting your instincts, and letting creativity flow. Each loaf is a story, a little snapshot of the love and effort you put in.
FAQs and Troubleshooting: Your Bread-Making Queries Answered
Q: My bread didn’t rise; what went wrong?
A: This could be because the yeast was old, or the water was too hot or cold. Always check the expiration date on your yeast and use a thermometer if needed!
Q: My bread turned out too dense. What happened?
A: This could be due to over-kneading, under-kneading, or not enough rising time. Remember, you want a smooth and elastic dough that has doubled in size after each rise.
Q: Can I freeze the dough?
A: Absolutely! After the first rise, you can wrap the dough tightly in plastic wrap and store it in the freezer for up to 3 months. Thaw in the fridge and let it rise again before shaping and baking.
Q: What’s the best way to store my bread?
A: Store your cooled bread in a paper bag at room temperature. If you want it to last longer, slice it and keep it in a freezer bag in the freezer.
Nutritional Info
- Servings: 12 slices
- Calories: Approximately 120 calories per slice
- Protein: 4g
- Carbohydrates: 22g
- Fat: 2g
So, as you embark on this homemade bread-making adventure, remember that it’s not just about the end product. It’s about the process, the joy, and the connections made along the way. Grab your apron, put on your favorite tunes, and let’s get baking! Your kitchen is about to transform into a cozy haven filled with love, laughter, and, of course, the enchanting aroma of freshly baked bread. Happy baking!
PrintHomemade Bread
A delightful and warm recipe for homemade bread that brings comfort and joy with every slice.
- Prep Time: 15 minutes
- Cook Time: 30 minutes
- Total Time: 45 minutes
- Yield: 12 slices 1x
- Category: Bread
- Method: Baking
- Cuisine: American
- Diet: Vegetarian
Ingredients
- 3 cups all-purpose flour
- 2 tablespoons sugar
- 1 teaspoon salt
- 1 tablespoon instant yeast
- 1 cup warm water
- 2 tablespoons olive oil
Instructions
- Prep your ingredients: Gather all your ingredients and let them come to room temperature.
- Mix dry ingredients: In a large mixing bowl, combine the flour, sugar, salt, and instant yeast.
- Add wet ingredients: Make a well in the center of your dry mix and pour in the warm water and olive oil.
- Knead the dough: Turn the mixture onto a floured surface and knead for about 8-10 minutes.
- First rise: Place the dough in a greased bowl, cover it, and let it rise until doubled in size (1 to 1.5 hours).
- Shape the dough: Punch down the risen dough and shape it into a loaf.
- Second rise: Place the shaped dough in a greased loaf pan and let it rise for another 30-45 minutes.
- Preheat the oven to 375°F (190°C).
- Bake your bread: Bake for 25-30 minutes until golden brown.
- Cool and enjoy: Let it cool for 10 minutes before transferring to a wire rack.
Notes
For added flavor, consider mixing in herbs or cheese. You can also freeze the dough after the first rise for later use.
Nutrition
- Serving Size: 1 slice
- Calories: 120
- Sugar: 2g
- Sodium: 200mg
- Fat: 2g
- Saturated Fat: 0.5g
- Unsaturated Fat: 1g
- Trans Fat: 0g
- Carbohydrates: 22g
- Fiber: 1g
- Protein: 4g
- Cholesterol: 0mg
Keywords: homemade bread, baking bread, comfort food, bread recipe, fresh bread