How to Make Chia Seed Jam: A Fresh Twist on a Classic Spread
Hello there, fellow food lovers! If you’re anything like me, you know that life occasionally requires a zing of flavor to brighten up your mornings. Today, I’m excited to share with you a recipe for Chia Seed Jam that takes the humble fruit spread to the next level. This jam is not only bursting with fresh flavors but is also ridiculously easy to make. Plus, it comes with the added bonus of being a healthier alternative to typical store-bought jams. Let’s dive into this delightful journey of jam-making together!
A Sweet Memory
As I stand in my kitchen conjuring up memories, I can’t help but think back to those sunny afternoons I spent at my grandmother’s house. She was a master in the kitchen, creating the most scrumptious jams and jellies each summer when the fruits were ripe and ready. I remember standing on a little stool, my hands sticky with berry juice, while my grandma poured her love and sunshine into each jar. She taught me that making jam isn’t just about preserving fruit; it’s about memories, family connections, and the fragrance of laughter wafting through the air.
One particular summer, we had an abundance of berries from the garden. Grandma introduced me to the magical world of chia seeds—tiny yet powerful seeds that transform into a gelatinous delight when mixed with liquid. I was captivated! Little did I know, this would lead me to create my own chia seed jam today, a modern take on her gift of preserving summer’s sweetness. Let’s make some new memories!
Ingredients
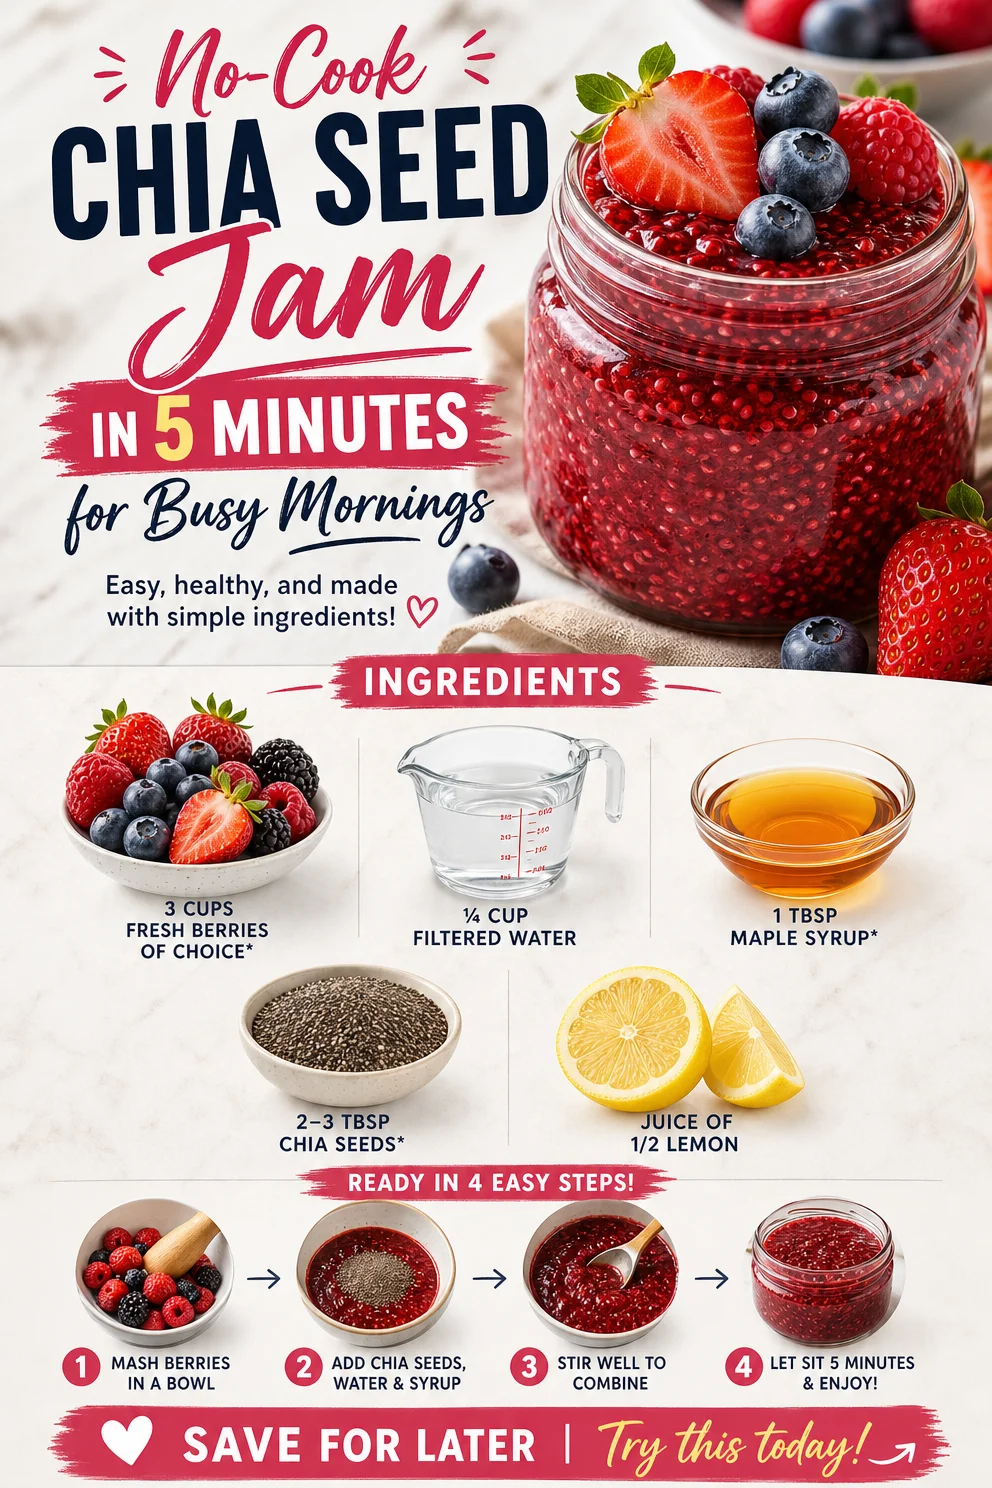
Here’s what you’ll need to create your own delicious Chia Seed Jam:
-
3 cups Fresh Berries of choice: You can use strawberries, blueberries, raspberries, or even a mix! Just like grandma taught me, go for what’s in season and bursting with sweetness. If you’re in a pinch and fresh berries aren’t available, frozen berries work just as well—just make sure to thaw them before creating your jam.
-
¼ cup Filtered Water: This helps to break down the berries and allows for easy blending. If you’re looking for a deeper flavor, try using fruit juice instead of water!
-
1 tbsp Maple Syrup: This adds a touch of natural sweetness and complements the berries beautifully. If you’re after something less sweet, you can skip it or adjust the quantity according to your taste. Honey or agave syrup are great alternatives too!
-
2-3 tbsp Chia Seeds: The star of our jam! Chia seeds swell up to form a gel-like texture, making them perfect for jam. If you’re not keen on chia seeds, ground flaxseed can also work as a thickening agent but won’t provide the same texture.
-
Juice of ½ Lemon: This brightens up the flavors and adds a zing that cuts through the sweetness. If you don’t have lemons on hand, lime juice can be a fabulous substitute!
Each of these ingredients adds a unique touch to your jam, and I love how simple substitutions can transform the taste. Let’s get cooking!
Step-by-Step Instructions
Now that we have our ingredients ready, let’s roll up our sleeves and jump right into the process of making this fabulous Chia Seed Jam.
-
Prepare the Berries: Start by washing your fresh berries thoroughly. If you’re using strawberries, remove the stems and slice them into smaller pieces. This not only makes the cooking process easier but also helps the flavor infuse beautifully. Feel free to mash them a bit for a chunkier texture—this jam is about what makes your taste buds dance!
-
Cook Down the Berries: In a medium saucepan over medium heat, combine the prepared berries and filtered water. Stir gently while bringing the mixture to a simmer. The goal is to coax out the flavors while breaking down the fruit. This should take about 5–10 minutes. When the berries start to soften and release their juices, lean into the moment and inhale deeply!
-
Sweeten It Up: Once your berries have softened, add in the maple syrup and lemon juice. Stir well to combine. Let it simmer for another minute or so. This smooths out any sharp edges of flavor and results in a cohesive jam. Remember, adjusting sweetness is up to you, so taste as you go!
-
Add the Chia Seeds: Now for the magical part! Remove the pot from heat and stir in the chia seeds. They need a minute or two to absorb the liquid and swell, creating that lovely thick consistency we all love about jam. Mix well and allow it to sit for about 10–15 minutes. You’ll see the transformation happen right before your eyes!
-
Check the Consistency: After the chia seeds have soaked, your jam should be perfectly thick and spreadable. If it’s too thick for your liking, feel free to add a splash more water until you’re content with the texture.
-
Cool and Store: Transfer the jam to a clean glass jar and let it cool completely. Once cooled, seal the jar and store it in the refrigerator. Your jam will keep for about 1-2 weeks if you can resist devouring it sooner!
Pro tip: To keep your flavors fresh, consider storing the chia seed jam in small, airtight containers. That way, you won’t have to subject the entire jar to continuous spoonfuls and air exposure!
Serving Suggestions
Now that you’ve made this delightful Chia Seed Jam, let’s talk about some fabulous ways to serve it! Spread it on your morning toast, layer it in yogurt parfaits, or slather it on pancakes. Feeling adventurous? Use it in your baking—swirl it into muffins for a tasty surprise or drizzle it over desserts. However you choose to enjoy it, each spoonful is a reminder of summer’s sweet goodness!
Recipe Variations
The beauty of Chia Seed Jam lies in its versatility! Here are some fun variations to shake things up:
-
Spicy Kick: Add a pinch of cayenne pepper or a dash of ground ginger for a surprising kick that’ll wake up your taste buds!
-
Citrus Burst: Experiment with different citrus juices like orange or grapefruit to elevate the flavor profile.
-
Herbal Hint: Infuse your jam with fresh herbs like mint or basil. Trust me, it’s a delightful twist!
-
Nutty Addition: Add a tablespoon of nut or seed butter to the jam for a creamier texture and nutty flavor.
-
Tropical Paradise: Incorporate tropical fruits like pineapple or mango for a beachy, summery vibe!
Chef’s Notes
Chia Seed Jam has become one of my go-to recipes. Not only is it quick and simple, but it encourages creativity in the kitchen. I can’t help but chuckle when I think of the first time I experimented with this jam—I accidentally added too much lemon juice, thinking it would brighten the flavors even more. What I discovered was a tangy, zesty concoction that ended up being a family favorite! It’s a great reminder that sometimes our cooking mishaps can lead to delightful surprises.
FAQs and Troubleshooting
-
Why Is My Jam Not Thickening?
- Don’t worry! If your jam isn’t thickening as you’d like, let it sit for a bit longer after mixing in the chia seeds. If that doesn’t help, try adding more chia seeds (just be careful, a little goes a long way!).
-
Can I Freeze Chia Seed Jam?
- Absolutely! Chia Seed Jam freezes beautifully. Just be sure to store it in airtight containers, leaving some space at the top for expansion.
-
What Should I Do If The Jam Is Too Thick?
- If you find your jam is too thick, simply mix in a bit of water or fruit juice until you reach your desired consistency.
-
Can I Use Other Sweeteners?
- For sure! Feel free to substitute maple syrup with honey, stevia, or agave syrup, depending on your dietary preferences.
Nutritional Info
Chia Seed Jam is not only delicious but also packed with nutrition! Chia seeds are rich in omega-3 fatty acids, fiber, and protein, while the berries contribute antioxidants and vitamins. And let’s not forget their lower sugar content compared to traditional jams—this is a guilt-free indulgence!
So there you have it, my wonderful friends—a delicious Chia Seed Jam that’s simple, joyful, and filled with memories! Whether you’re sharing it with family or just indulging yourself, this homemade jam will surely bring a little magic to your kitchen. Grab your apron, give it a try, and create new memories of your own! Happy cooking!
PrintChia Seed Jam

A fresh twist on the classic fruit spread, this Chia Seed Jam is easy to make and a healthier alternative to store-bought jams.
- Prep Time: 10 minutes
- Cook Time: 10 minutes
- Total Time: 20 minutes
- Yield: 2 cups 1x
- Category: Condiment
- Method: No Cooking (Cooking required for the process)
- Cuisine: American
- Diet: Vegan
Ingredients
- 3 cups Fresh Berries of choice
- ¼ cup Filtered Water
- 1 tbsp Maple Syrup
- 2–3 tbsp Chia Seeds
- Juice of ½ Lemon
Instructions
- Prepare the Berries: Wash the fresh berries thoroughly. If using strawberries, remove the stems and slice them.
- Cook Down the Berries: In a medium saucepan over medium heat, combine the berries and filtered water. Simmer for about 5–10 minutes.
- Sweeten It Up: Add maple syrup and lemon juice, stirring well, and let it simmer for another minute.
- Add the Chia Seeds: Remove from heat and stir in chia seeds. Allow to sit for about 10–15 minutes to thicken.
- Check the Consistency: If too thick, add a splash more water.
- Cool and Store: Transfer to a glass jar and let it cool completely. Store in the refrigerator for up to 1-2 weeks.
Notes
To keep flavors fresh, store the jam in small, airtight containers to minimize exposure to air.
Nutrition
- Serving Size: 2 tbsp
- Calories: 50
- Sugar: 3g
- Sodium: 1mg
- Fat: 2g
- Saturated Fat: 0g
- Unsaturated Fat: 1g
- Trans Fat: 0g
- Carbohydrates: 9g
- Fiber: 2g
- Protein: 2g
- Cholesterol: 0mg
Keywords: chia seed jam, homemade jam, healthy spread, berry jam